
Ultra96v2のWifiのモジュールはTI社製の WL1831MODかMicrochip社製のWILC3000に変更になっていてXilinxのlinux-xlnxにWILC3000ドライバーは含まれていません。 Ultra96V2のWifiを使う為にWILC3000のドライバーに対応させてみました。 ベースは『組込みLinux Ultra96v2 でVitisやってみる その3 Vivado ML v2022.2 HWプラットフォーム作成』で作った.xsaを基に、Linuxのビルドは、『組込みLinux Ultra96v2 でVitisやってみる その4 PetaLinux 2023.1 Linuxビルド』で使っているPetaLinuxを使っています。 PetaLinuxの使い方は『組込みLinux Ultra96v2 でVitisやってみる その4 PetaLinux 2023.1 Linuxビルド』とほぼ一緒ですが、違いは以下の2点です。
- PetaLinux2023.1で外部のLinuxソースツリーを使う(xlnx-linux-6.1.5-LTS)
- Vitisを使わないので、opencl、zocl、xrtなどを使わない
『Ultra96-V2 の WiFi で超苦労した話』を参考にさせてもらいました。
手順
- XilinxのLinuxソースをダウンロード
- Microchipのwilcドライバーをダウンロード
- wilcドライバーをLinuxソースディレクトリにコピー
- デバイスツリーオーバーレイを変更
- Makefile変更
- avnetのパッチを適用
- Kernel 設定でWILCとWPAを設定
- Linuxビルド
- microSDにルートファイルシステムを入れる
- Microchipのwilc firmwareをダウンロード
- wilc firmwareをルートファイルシステムに入れる
XilinxのLinuxソースをダウンロード
- 私は、Vivadoで作った.xsaファイルのあるディレクトリにgit cloneでダウンロードしました。
- <VIVADO_PROJ_DIR>は、私の場合、~/ultra96/vivado/project_3 です。
- 私は、6.1でやってみたかったので、masterでなく6.1のブランチを指定してダウンロードしました。
$ cd <VIVADO_PROJ_DIR>
$ git clone -b xlnx_rebase_v6.1_LTS https://github.com/Xilinx/linux-xlnx.git
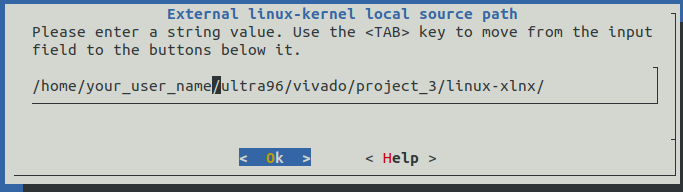
最初は、PetaLinux System Configurationでlinux-xlnxを指定していました。 するとソースを変更できないのでwilcドライバーを入れれませんでした。 そこでext-local-srcを選択して、最初はLinux Kernel Archiveからソースツリーをダウンロードしてビルドしていましたが、Ultra96v2で『Starting Kernel…』で止まってしまいました。 そこで上記のように、Xilinxが用意してくれているlinux-xlnxからダウンロードして、PetaLinux System Configurationにそのパスを指定しています。
Microchipのwilcドライバーをダウンロード
『Wi-Fi® Link Controller Linux® User Guide』に書かれている通りにMicrochipの新しいwilcドライバーのソースをダウンロード
$ git clone --depth 1 https://github.com/linux4sam/linux-at91
- wilc3000を含む新しいドライバーソースファイル群をLinuxソースツリーにコピー。 ディレクトリ名はwilc1000となっていますが、ソースコードはwilc3000とwilc1000の両方に対応しています。 デバイスツリーにwilc3000と書かれていたら、wilc3000用の動作をします。 なのでディレクトリ名はwilc1000のままにしています。
- cp ~/ultra96/vivado/project_3/ultra96_peta_proj3/temp/linux-at91/drivers/net/wireless/microchip/wilc1000/* ~/ultra96/vivado/project_3/linux-xlnx/drivers/net/wireless/microchip/wilc1000
~/ultra96/vivado/project_3/linux-xlnx/drivers/net/wireless/microchip/wilc1000内で、conpatibleにマッチする部分を確認すると、sdio.cでちゃんとwilc3000に対応してました。 Ultra96V2のWifiチップはsdio接続なので、sdio.cを使いspi.cは使いません。~/ultra96/vivado/project_3/linux-xlnx/drivers/net/wireless/microchip/wilc1000内で、conpatibleにマッチする部分を確認すると、sdio.cでちゃんとwilc3000に対応してました。 Ultra96V2のWifiチップはsdio接続なので、sdio.cを使いspi.cは使いません。
$ sudo find -type f -print | xargs grep "microchip,"
./sdio.c:	{ .compatible = "microchip,wilc1000", },
./sdio.c:	{ .compatible = "microchip,wilc3000", },
./spi.c:	{ .compatible = "microchip,wilc1000", },
./spi.c:	{ .compatible = "microchip,wilc3000", },
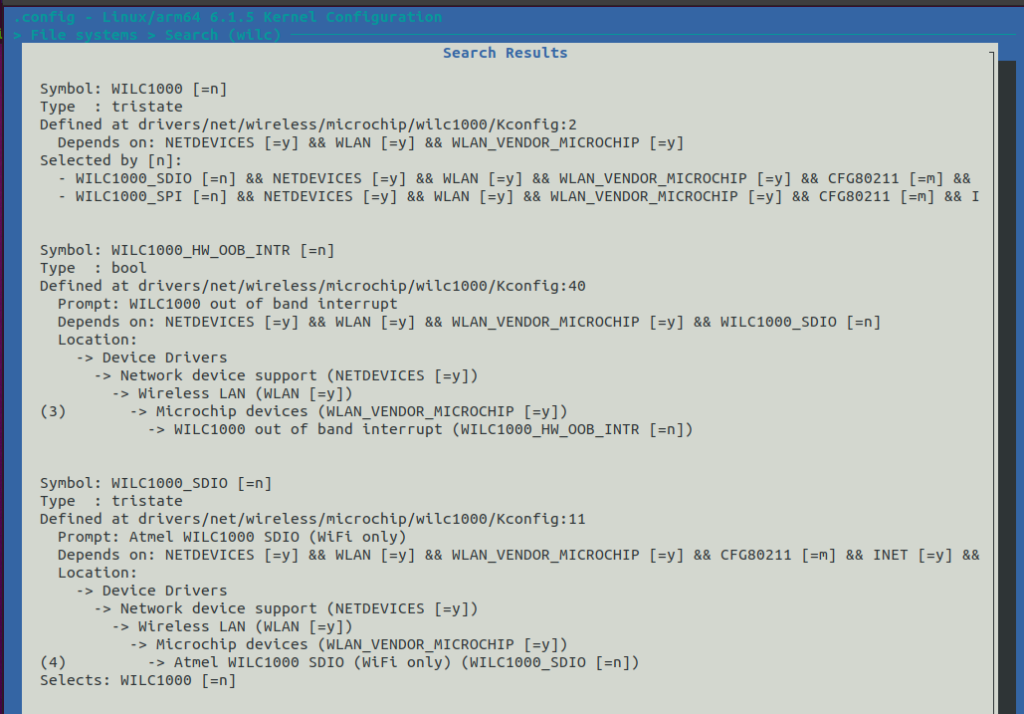
petalinux-config -c kernel 設定
- petalinux-config -c kernelで
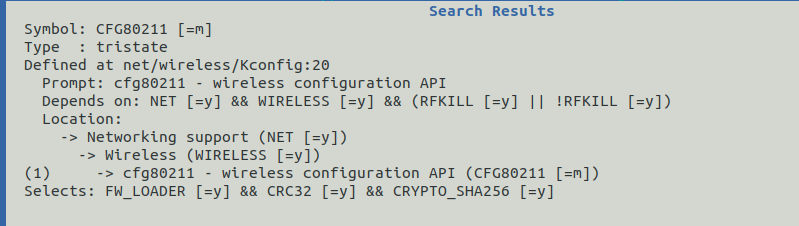
- 『CFG80211』を[=m]から[=y]に変更する。 これでwilc_sdioを[=y]に設定できる。
- しかしデバッグ時は[=y]でなくwilc_sdioを[=n]から[=m]に変更する。 全て動作したら[=y]にする。
- 『wilc_sdio』を[=m]に設定するとwilcの設定も自動的に[=n]から[=m]になる。
- 以下の図は設定前。
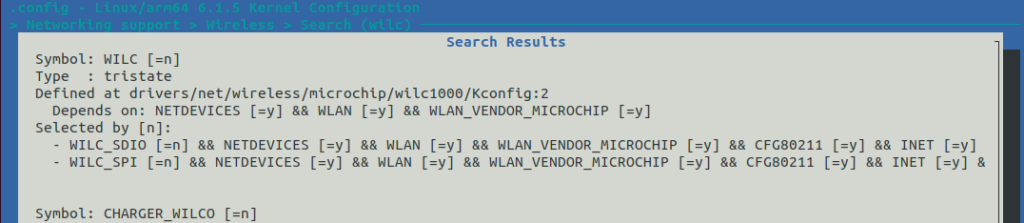
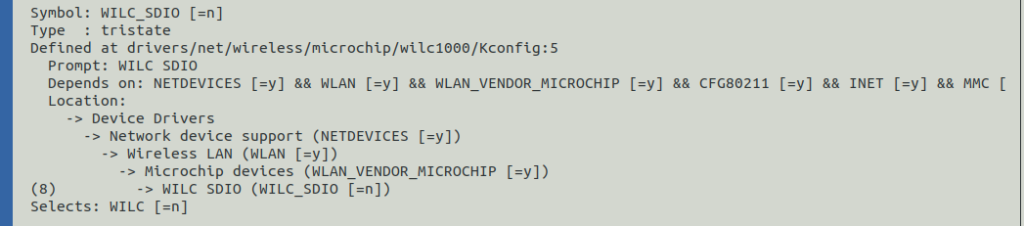
CFG80211を『y』にしたらWILC_SDIOを『y』にできた。 以下は変更する前。
(メモ) 新しいmicrochip/wilc1000ドライバソース群をコピーする前はwilc1000が表示されていましたが、新しいwilcソースをコピー後は上記の様にwilcだけになりました。
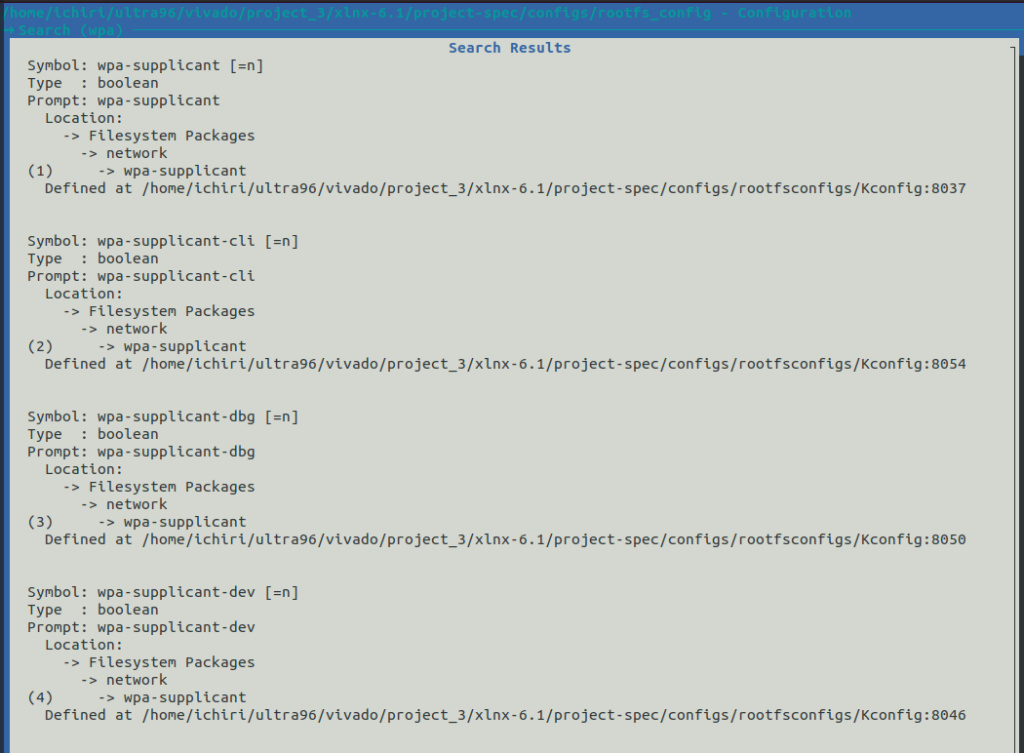
petalinux-config -c rootfs 設定
WILC3000の説明書を見たら、wpa_supplicantを使っているので、petalinux-config -c rootfsの設定は、メニュートップから『Filesystem Packages』〜『network』〜『wpa-supplicant』とはいり、
- wpa-supplicantを[=y]
- wpa-supplicant-cliを[=y]
- wpa-supplicant-passphraseを[=y]と設定
以下の図は変更前で[=n]となっています。
デバイスツリー記述
<PETA_PROJ_DIR>/project-spec/meta-user/recipes-bsp/device-tree/filesディレクトリにある、system-user.dtsiに以下を記述して上書きしています。 chip_en_gpioを2回書いていますが、どちらが正しいか検証できていません。 またbluetoothも検証できていませんが、Wifiは動いているので将来時間があったら、検証して必要であれば修正しいたいと思います。
/include/ "system-conf.dtsi"
/ {
};
&sdhci1 {
    status = "okay";
    bus-width = <0x4>;
    pinctrl-names = "default";
    pinctrl-0 = <&pinctrl_sdhci1_default>;
    xlnx,mio_bank = <0>;
    non-removable;
    disable-wp;
    #address-cells = <1>;
    #size-cells = <0>;
};
&wlcore{
        compatible    = "microchip,wilc3000";
        irq-gpios     = <&gpio 76 GPIO_ACTIVE_HIGH>; /* MIO76 WLAN_IRQ    1V8 */

        reset-gpios   = <&gpio  7 GPIO_ACTIVE_HIGH>; /* MIO7  RADIO_RST_N 1V8 */
        post-power-on-delay-ms = <0x0a>;
        chip_en-gpios = <&gpio  8 GPIO_ACTIVE_HIGH>; /* MIO8  RADIO_EN    1V8 */
        status        = "okay";
        reg           = <0>;
        bus-width     = <4>;
};

&sdio_pwrseq{
    chip_en_gpios=<&gpio 8 1>;
};


&uart0 {
    bluetooth {
        compatible = "microchip,wilc3000";
    };
};
因みに、PetaLinuxでビルドしたら、<PETA_PROJ_DIR>/images/linuxにsysttem.dtbが更新されるので、a.dtsにして、上記のsystem-user.dtsiの内容が反映されているか確認しています。
dtc -I dtb -O dts system.dtb -o a.dts
Makefile変更
- ここまでで一度ビルドして、Ultra96v2で走らせてみて、シェルが立ち上がったら
- sudo find -name wilc*.koしたら、enableにしたwilc-sdio.koが現れなかった。WILC_SDIOを[=y]にしていたらKernelイメージに組込まれるのでwilc-sdio.koは現れないが、[=m]としたので現れないのはおかしいと思いMakefileを確認。
- ~/ultra96/vivado/project_3/linux-xlnx/drivers/net/wireless/microchip/Makefileを確認すると、WILCが[=m]になってても認識しないようになっていた。だからmicrochipのwilc-sdio.koが生成されないだな。(WILC1000が選択されていたらwilc1000ディレクトリのMakefileを見てくれるようになっていたが、新しいwilcソース群を入れたので、WILC1000はKernel Configurationには表示されません)
- そこで以下の様に変更
# SPDX-License-Identifier: GPL-2.0
obj-$(CONFIG_WILC)              += wilc1000/

# obj-$(CONFIG_WILC1000)                += wilc1000/
xilinx_zynqmp_defconfig変更
<linux-xlnx>/arch/arm64/configs/xilinx_zynqmp_defconfigに以下を設定。 これはどうして必要かわかっていません。 kernel設定でも[=m]として、ルートファイルシステムにwilc_sdio.koファイルが存在したので、[=y]のKernelに組込まれるのではなく、[=m]モジュールとして実行ビルドされています。
CONFIG_WILC_SDIO=y
wilc3000 Firmware
ChatGPTで聞いたら、firmwareが無いときもwilc_send_config_pktエラーとなるとあったので以下からダウンロードして、マニュアルに記述されているようにwilc3000_wifi_firmware.binとwilc3000_ble_firmware.binをmicroSDのルートFSの『/lib/firmware/mchp/』ディレクトリにコピーした。
Avnetのパッチを当てる
以下をダウンロードして、/wilc1000/ディレクトリの上のディレクトリにコピーして、パッチを当てる。 やっぱりAvnetのパッチのオリジナルのwilcソースが古い為、ところどころパッチに失敗しています。 そのままビルドして使ってみるとWifiは認識されませんでした。 そこでパッチファイルを見ながら8箇所を手作業でソースを修正してビルドするとWifiは認識されました。 私がパッチをあてて動作しているwilcドライバーのソースはここ(いちりのGitHub)に上げています。
Avnetのパッチは下のURLです。
下がパッチを実行した結果です。 FAILEDのところを見て修正していきました。WILCソースだけではUltra96v2では動作しません。 何故か、MIOのピンアサイメントが異なっていたり、電源シーケンスが不要だったり(デバイスツリーで対応)、テーブルデーターの持ち方だったり修正されています。
$ cd <VIVADO_PROJ_DIR>/linux-xlnx/drivers/net/wireless/microchip
$ cp ~/Downloads/0001-ultra96-modifications-15.6.patch .
$ patch -d wilc1000 < ./0001-ultra96-modifications-15.6.patch

patching file Kconfig
patching file Makefile
Hunk #1 FAILED at 1.
1 out of 2 hunks FAILED -- saving rejects to file Makefile.rej
patching file cfg80211.c
Hunk #1 FAILED at 1859.
Hunk #2 succeeded at 1903 (offset 6 lines).
Hunk #3 succeeded at 1916 (offset 6 lines).
Hunk #4 succeeded at 1942 (offset 6 lines).
Hunk #5 succeeded at 1954 (offset 6 lines).
Hunk #6 succeeded at 2201 with fuzz 1 (offset -13 lines).
1 out of 6 hunks FAILED -- saving rejects to file cfg80211.c.rej
patching file debugfs.h
patching file netdev.c
Hunk #1 succeeded at 189 (offset 1 line).
Hunk #2 succeeded at 717 (offset -16 lines).
Hunk #3 succeeded at 732 (offset -16 lines).
Hunk #4 succeeded at 1296 (offset -26 lines).
Hunk #5 succeeded at 1333 (offset -27 lines).
patching file netdev.h
patching file power.c
patching file sdio.c
Hunk #1 succeeded at 454 (offset 25 lines).
Hunk #2 FAILED at 452.
Hunk #3 succeeded at 585 (offset 27 lines).
Hunk #4 FAILED at 576.
Hunk #5 succeeded at 724 (offset 29 lines).
2 out of 5 hunks FAILED -- saving rejects to file sdio.c.rej
patching file wlan.c
Hunk #1 succeeded at 805 (offset -10 lines).
Hunk #2 FAILED at 906.  <--------変更したけど正しいかどうかわからない
Hunk #3 succeeded at 1178 (offset -53 lines).
Hunk #4 succeeded at 1353 (offset -50 lines).
Hunk #5 succeeded at 1369 (offset -50 lines).
1 out of 5 hunks FAILED -- saving rejects to file wlan.c.rejproject-spec/configs/configファイルやproject-spec/configs/configureディレクトリ内のファイル
patching file wlan.h
Hunk #1 FAILED at 245.
1 out of 1 hunk FAILED -- saving rejects to file wlan.h.rej
patching file wlan_cfg.c
Hunk #1 FAILED at 394.
Hunk #2 FAILED at 403.
2 out of 2 hunks FAILED -- saving rejects to file wlan_cfg.c.rej
wlan0を起動
いよいよWifiを起動して見ます。
xlnx-6:~$ lsmod
Module                  Size  Used by
wilc_sdio             102400  0   //<--------デバイスドライバーのwilc_sdioが動作しています
uio_pdrv_genirq        16384  0

xlnx-6:~$ ifconfig                //<--------まだwlan0はできていません
lo        Link encap:Local Loopback
          inet addr:127.0.0.1  Mask:255.0.0.0
          inet6 addr: ::1/128 Scope:Host
          UP LOOPBACK RUNNING  MTU:65536  Metric:1
          RX packets:2 errors:0 dropped:0 overruns:0 frame:0
          TX packets:2 errors:0 dropped:0 overruns:0 carrier:0
          collisions:0 txqueuelen:1000
          RX bytes:140 (140.0 B)  TX bytes:140 (140.0 B)

xlnx-6:~$ sudo ifconfig wlan0 up   //<--------wlan0起動
Password:

xlnx-6:~$ ifconfig
lo        Link encap:Local Loopback
          inet addr:127.0.0.1  Mask:255.0.0.0
          inet6 addr: ::1/128 Scope:Host
          UP LOOPBACK RUNNING  MTU:65536  Metric:1
          RX packets:2 errors:0 dropped:0 overruns:0 frame:0
          TX packets:2 errors:0 dropped:0 overruns:0 carrier:0
          collisions:0 txqueuelen:1000
          RX bytes:140 (140.0 B)  TX bytes:140 (140.0 B)

wlan0     Link encap:Ethernet  HWaddr F8:F0:05:C4:18:BE     //<--------wlan0起動しています
          inet6 addr: fe80::faf0:5ff:fec4:18be/64 Scope:Link
          UP BROADCAST RUNNING MULTICAST  MTU:1500  Metric:1
          RX packets:0 errors:0 dropped:0 overruns:0 frame:0
          TX packets:11 errors:0 dropped:0 overruns:0 carrier:0
          collisions:0 txqueuelen:1000
          RX bytes:0 (0.0 B)  TX bytes:974 (974.0 B)

xlnx-6:~$ sudo ifconfig wlan0 down           //<--------wlan0終了
[  136.554612] wilc_sdio mmc1:0001:1 wlan0: Failed to send setup multicast     //<--------wlan0のIP設定がまだなので終了のmuticastが失敗していると思います

xlnx-6:~$ ifconfig
lo        Link encap:Local Loopback
          inet addr:127.0.0.1  Mask:255.0.0.0
          inet6 addr: ::1/128 Scope:Host
          UP LOOPBACK RUNNING  MTU:65536  Metric:1
          RX packets:2 errors:0 dropped:0 overruns:0 frame:0
          TX packets:2 errors:0 dropped:0 overruns:0 carrier:0
          collisions:0 txqueuelen:1000
          RX bytes:140 (140.0 B)  TX bytes:140 (140.0 B)
Wifiは起動していますが、IPアドレスがありません。
Wifi接続
/etc/network/interfaces
しかし上記のままではIPアドレスが与えられていないので、デバイスとしては起動しましたが、まだWifiとしてネットや他のデバイスとアクセスできません。 私の場合、IPアドレスをBuffaloのWifiルーターに自動割付して貰う為に、/etc/network/interfacesファイルを以下のように設定しました。
# Wireless interfaces
iface wlan0 inet dhcp
        wireless_mode managed
        wireless_essid any
        wpa-driver wext
        wpa-conf /etc/wpa_supplicant.conf
        dns-nameservers 8.8.8.8 8.8.4.4
/etc/wpa_supplicant.conf
次に、/etc/wpa_supplicant.confを以下のように設定しました。 wpa_supplicantはWifiルーターとWPA暗号化認証をするツールです。
- ssid — Wifi接続用としてルーターのラベルに書かれていました。
- #pskの行はコメントアウトしています。 Wifi接続用としてルーターのラベルに暗号化キーとして書かれていました。 ルーター設定ログインのパスワードではありません。 これを、wpa_passphraseで暗号化して、下のpskに貼り付けます。 #の行は削除してもいいですが、私の場合、念の為残しておきます。
- psk—暗号化された記号 (暗号化方法は、この下にあります)
- key_mgmt — 私のルーターのラベルやログインしてシステム情報を確認すると、WPA2-PSK AESと書かれていました。 key_mgmtではWPA2-PSKと設定できませんので、WPA-PSKとして、WPA2-PSKでAESの場合、pairwiseとgroupをCCMPにすれば良いらしいのでその様に設定しました。
- #proto—コメントアウトしています。 記述しなければWPAとWPA2で探してくれるそうです。
- (注意)Linuxをビルドし直して試すと、wpa_supplicantが消えてしまうので、私は以下の内容を別名のファイルに入れておき、電源を入れた時にwpa_supplicant.confをコピーして作るようにしています。
ctrl_interface_group=0
update_config=1
ap_scan=1
country=JP
network={
    ssid="Buffalo-your-ssid"
    key_mgmt=WPA-PSK
    #proto=WPA2
    pairwise=CCMP
    group=CCMP
    #psk="kvjvr4...your--psk"
    psk=9d4cxxxxxxxxxxxxxxxxdb8f87b35b9ad2da12b83bc588bedaa965c5ebfde9b3f44
}
wpa_passphrase
ssidとpskを””でくくって、wpa_passphraseコマンドで暗号化します。 下の『your-ssid』と『your-psk』の部分は、あなたのWifiルータに書かれているものに置き換えてください。
$ wpa_passphrase "your-ssid" "your-psk"
network={停止
        ssid="your-ssid"
        #psk="your-psk"
        psk=9d4cxxxxxxxxxxxxxxxxdb8f87b35b9ad2da12b83bc588bedaa965c5ebfde9b3f44    // <----この部分を使います。
}
起動
まずifupで動かしてみます。 確認は非推奨のifconfigでなくipで確認。
$ sudo ifup wlan0
Successfully initialized wpa_supplicant
[  460.694577] power up request for already powered up source Wifi
ioctl[SIOCSIWENCODEEXT]: Invalid argument
ioctl[SIOCSIWENCODEEXT]: Invalid argument
udhcpc: started, v1.35.0
udhcpc: broadcasting discover
udhcpc: broadcasting discover
udhcpc: broadcasting select for 192.168.1.10, server 192.168.1.1
udhcpc: lease of 192.168.1.10 obtained from 192.168.1.1, lease time 172800
/etc/udhcpc.d/50default: Adding DNS 192.168.1.1

$ ip addr
1: lo: <LOOPBACK,UP,LOWER_UP> mtu 65536 qdisc noqueue state UNKNOWN group default qlen 1000
    link/loopback 00:00:00:00:00:00 brd 00:00:00:00:00:00
    inet 127.0.0.1/8 scope host lo
       valid_lft forever preferred_lft forever
    inet6 ::1/128 scope host
       valid_lft forever preferred_lft forever
2: sit0@NONE: <NOARP> mtu 1480 qdisc noop state DOWN group default qlen 1000
    link/sit 0.0.0.0 brd 0.0.0.0
3: wlan0: <BROADCAST,MULTICAST,UP,LOWER_UP> mtu 1500 qdisc pfifo_fast state UP group default qlen 1000
    link/ether f8:f0:05:c4:18:be brd ff:ff:ff:ff:ff:ff
    inet 192.168.11.10/24 brd 192.168.11.255 scope global wlan0
       valid_lft forever preferred_lft forever
    inet6 2404:7a85:4e0:b800:faf0:5ff:fec4:18be/64 scope global dynamic mngtmpaddr
       valid_lft 86396sec preferred_lft 14396sec
    inet6 fe80::faf0:5ff:fec4:18be/64 scope link
       valid_lft forever preferred_lft forever
ping
sudo ifup wlan0の状態でGoogleにpingしてみました。 中止しないと永遠にpingが続くのでCtrl+Cで中止。
$ ping www.google.com

PING www.google.com (142.250.206.196): 56 data bytes
64 bytes from 142.250.206.196: seq=0 ttl=120 time=12.211 ms
64 bytes from 142.250.206.196: seq=1 ttl=120 time=16.123 ms
64 bytes from 142.250.206.196: seq=2 ttl=120 time=11.588 ms
64 bytes from 142.250.206.196: seq=3 ttl=120 time=12.010 ms
64 bytes from 142.250.206.196: seq=4 ttl=120 time=11.748 ms
64 bytes from 142.250.206.196: seq=5 ttl=120 time=11.430 ms
^C
--- www.google.com ping statistics ---
6 packets transmitted, 6 packets received, 0% packet loss
round-trip min/avg/max = 11.430/12.518/16.123 ms
ssh
sshも繋がりました。(*これは2回目のsshなので、『footprint…』で『yes』を入力するメッセージが出ていません)
$ sudo ssh ichiri@192.168.1.9
ichiri@192.168.11.9's password:
Welcome to Ubuntu 20.04.5 LTS (GNU/Linux 5.15.0-73-generic x86_64)

 * Documentation:  https://help.ubuntu.com
 * Management:     https://landscape.canonical.com
 * Support:        https://ubuntu.com/advantage

61 updates can be applied immediately.
To see these additional updates run: apt list --upgradable

New release '22.04.2 LTS' available.
Run 'do-release-upgrade' to upgrade to it.

Your Hardware Enablement Stack (HWE) is supported until April 2025.
Last login: Mon Jun 12 15:29:48 2023 from 192.168.1.10
ichiri@ichiri-H670:~$
wpa_supplicantで接続
wpa_supplicantでのDHCPからIPアドレスの取得方法。
p link set wlan0 upで追加してからのdhclientはできませんが、wpa_supplicantをして最初から入っていたudhcpcを実行するとIPアドレスを取得できました。
$ sudo wpa_supplicant -B -P/run/wpa_supplicant.wlan0.pid -iwlan0 -Dnl80211,wext -c/etc/wpa_supplicant.conf
Successfully initialized wpa_supplicant

$ sudo udhcpc -i wlan0
udhcpc: started, v1.35.0
udhcpc: broadcasting discover
udhcpc: broadcasting select for 192.168.1.10, server 192.168.1.1
udhcpc: lease of 192.168.1.10 obtained from 192.168.1.1, lease time 172800
/etc/udhcpc.d/50default: Adding DNS 192.168.1.1
おしまい
エラー sstate-cache Unable to find file …. anywhere
PetaLinuxで最初にLinuxをビルドする時このエラーがでます。(3度しましたが、3度とも最初はこのエラーが出てビビリます。)
- petalinux-buildで以下の様なエラーが5個。
- ビルドが続くので中断せずそのまま止まるまで続行すると
- 次回から消える。 ビルドが速すぎるとキャッシュsstateにファイルを移動するより先にビルドが走りエラーとなる。
ERROR: quilt-native-0.67-r0 do_populate_lic_setscene: Fetcher failure: Unable to find file file://68/09/sstate:quilt-native::0.67:r0::10:68094bb59aac0842794ce60d042b228489f39eefaad4dc3cc86a94fc96f64e4c_populate_lic.tar.zst;downloadfilename=68/09/sstate:quilt-native::0.67:r0::10:68094bb59aac0842794ce60d042b228489f39eefaad4dc3cc86a94fc96f64e4c_populate_lic.tar.zst anywhere. The paths that were searched were:
    /home/ichiri/ultra96/vivado/project_3/6.1/build/sstate-cache
以下、いちりのメモ
以下はまとまっていませんが、私が将来Wifi関連で見直しできるように残しておきます。
wpa_cli使い方
$ wpa_supplicant -Dnl80211 -iwlan0 -c/etc/wpa_supplicant.conf
Successfully initialized wpa_supplicant
nl80211: deinit ifname=wlan0 disabled_11b_rates=0
wlan0: Failed to initialize driver interface
wlan0: CTRL-EVENT-DSCP-POLICY clear_all

xlnx-6:/$ sudo wpa_cli status
Password:
Selected interface 'wlan0'
bssid=c4:36:c0:57:cf:c0
freq=2447
ssid=Buffalo-G-CFC0
id=0
mode=station
pairwise_cipher=CCMP
group_cipher=CCMP
key_mgmt=WPA2-PSK
wpa_state=COMPLETED
ip_address=192.168.11.10
p2p_device_address=f8:f0:05:c4:18:be
address=f8:f0:05:c4:18:be
uuid=0ff72694-c513-5ff1-b30d-d70a021cda1c
もろもろメモ
$ sudo udhcpc -q
udhcpc: SIOCGIFINDEX: No such device

ioctlでデバイス情報取得に使われている
       SIOCGIFINDEX
              インターフェースの interface index を取得し、 ifr_ifindex に入れて返す。
struct ifreq ir;
int soc = socket(AF_INET, SOCK_STREAM, 0);
ioctl(soc, SIOCGIFINDEX, &ir);


$ sudo wpa_supplicant -B -P/run/wpa_supplicant.wlan0.pid -iwlan0 -Dnl80211,wext -c/etc/wpa_supplicant.conf
Successfully initialized wpa_supplicant

$ sudo  wpa_cli -iwlan0 -p/var/run/wpa_supplicant  //<---cli モードに入る
> status
> scan
> scan_results
> add_network     //<--- ID 番号が付与される  remove_network ID
> set_network 0 ssid "testt"   //<---0は、上記で付与されたID
> set_netowrk 0 psk "xxxxxxxx"
> set_netowrk 0 key_mgmt WPA-PSK
> save_config
> list_networks
> enable_network 0
> select_nettwork 0
> disconnect
> reconnect

$ which wpa_supplicant
/sbin/wpa_supplicant


$ sudo killall wpa_supplicant

 sudo ifup wlan0
Password:
Successfully initialized wpa_supplicant
ioctl[SIOCSIWENCODEEXT]: Invalid argument
ioctl[SIOCSIWENCODEEXT]: Invalid argument


udhcp lease file  /var/lib/misc/udhcpd.leases

iw, iwconfig, dhclient installation
iw, arp command
arp ifconfig, route, netstat は非推奨

Deconfiguring network interfaces... ifdown: interface lo not configured
ifdown: interface eth0 not configured
done.

$ sudo ip link set wlan0 down
$ sudo ip addr add 192.168.11.32/255.255.255.0 dev wlan0:0  //dhcp未使用時はこれで設定。
$ ip r // route list
$ ip n //ARPテーブル/NDキャッシュの表示

$ networkctl
      rootfs   busybox    kernel
dpkg  No    yes --> aptが後継
apt   No   no---> Debian系
rpm   Yes   yes---> yumが後継
yum   no        no ---> dnfが後継
dnf   yes
curl  yes     no --- API使用。 多様な認証。 多様なセキュリティ通信SCP, FTPS、HTTPS含む。 JSON,XML
wget  yes     yes--- Webサイトの全リンクファイル群一括ダウンロード。 不安定通信対応。 HTTP、HTTPS、FTPのみ。 Wget2がある。


sudo wpa_supplicant -B -P/run/wpa_supplicant.wlan0.pid -iwlan0 -Dnl80211,wext -c/etc/wpa_supplicant.conf

sudo wpa_supplicant -B -Dnl80211,wext -iwlp10s0b1 -c<(wpa_passphrase $SSID $PASSWORD)
udhcpc -i wlan0    は以下スクリプトを自動的に走らせて、GW情報を書き換えてしまう。
/usr/share/udhcpc/default.script
/etc/udhcpc.d/50default

dnf
Error: There are no enabled repositories in "/etc/yum.repos.d", "/etc/yum/repos.d", "/etc/distro.repos.d".
CONFIG_imagefeaturimae-package-mangement=y
sudo dnf update    // まずこれが必要¥
yes
sudo dnf repoquery  //次にこれ
sudo dnf install packagegroup-petalinux-matchbox  //いろいろ174個程インストールされた
curl not resolve とでたので
/etc/resolv.confに以下を入れてreboot
nameserver 8.8.8.8


ctrl_iface no  no no
wps   no  no  no
p2p   no   no no
iw    no   no  no
systemctl no -- no
networkmanager no -- no
以下、私のトラブル備忘録
エラー xilinx_defconfig not present
petalinux-buildやpetalinux-config -c rootfsで以下のエラー
ERROR: linux-xlnx-6.1.5-xilinx-v2023.1+git999-r0 do_kernel_configme: A KBUILD_DEFCONFIG 'xilinx_defconfig' was specified, but not present in the source tree (/home/ichiri/ultra96/vivado/project_3/6.1/my/linux-6.1.30/arch/arm64/configs/)
ERROR: linux-xlnx-6.1.5-xilinx-v2023.1+git999-r0 do_kernel_configme: ExecutionError('/home/ichiri/ultra96/vivado/project_3/6.1/build/tmp/work/zynqmp_generic_xczu3eg-xilinx-linux/linux-xlnx/6.1.5-xilinx-v2023.1+git999-r0/temp/run.do_kernel_configme.17176', 1, None, None)
ERROR: Logfile of failure stored in: /home/ichiri/ultra96/vivado/project_3/6.1/build/tmp/work/zynqmp_generic_xczu3eg-xilinx-linux/linux-xlnx/6.1.5-xilinx-v2023.1+git999-r0/temp/log.do_kernel_configme.17176
ERROR: Task (/home/ichiri/ultra96/vivado/project_3/6.1/components/yocto/layers/meta-xilinx/meta-xilinx-core/recipes-kernel/linux/linux-xlnx_2023.1.bb:do_kernel_configme) failed with exit code '1'
解決策
- xilinx_zynqmp_virt_defconfigを見つけてコピーした
- grepでxilinx_defconfigが記述されているファイルを見つけ、あたりをつけて、xilinx_defconfig部分をxilinx_zynqmp_virt_defconfigに変更したら、petelinux-config -c rootfsが立ち上がった。 miniとvirtがあるが、virtはqemu用と拡張
sudo tar -zxvf rootfs.tar.gz -C /media/ichiri/ROOTFS
linux Kernel Archives から6.1.30をダウンロードしてPetaLinuxで使おうとしたら上記の解決策で、petalinux-config -c rootfのエラーは解決したが、linux-xlnxからKernelソースをダウンロードしてpetalinux-config -c kernelとしたら同じエラーが出た。 これはlinux-xlnx.incの中身をxilinx_zynqmp_virt_defconfigに書き換えたからだった。 linx-xlnxソースのディレクトリを見ると、xilinx_zynqmp_defconfigが既に含まれていたので、linux-xlnx.incの中身をxilinx_zynqmp_defconfigに書き換えたら、petalinux-config -c kernelは立ち上がった。
また、Linux Kernel Archivesの6.1.30の場合、petalinux-config -c kernelで(1024) Size in Mega Bytesは表示されなかったが、xilinx_zynqmp_defconfigにCONFIG_CMA_SIZE_MBYTES=256の記載があるのでlinux-xlnxでは表示された。
エラー sanity check
linux-xlnx_2023.1.bb 内の『LINUX_VERSION = “6.1.30”』を6.1.5に変更したが駄目だった。
ERROR: linux-xlnx-6.1.5-xilinx-v2023.1+git999-r0 do_kernel_version_sanity_check: Package Version (6.1.5-xilinx-v2023.1+git999) does not match of kernel being built (6.1.30). Please update the PV variable to match the kernel source or set KERNEL_VERSION_SANITY_SKIP="1" in your recipe.
ERROR: linux-xlnx-6.1.5-xilinx-v2023.1+git999-r0 do_kernel_version_sanity_check: ExecutionError('/home/ichiri/ultra96/vivado/project_3/6.1/build/tmp/work/zynqmp_generic_xczu3eg-xilinx-linux/linux-xlnx/6.1.5-xilinx-v2023.1+git999-r0/temp/run.do_kernel_version_sanity_check.69656', 1, None, None)
ERROR: Logfile of failure stored in: /home/ichiri/ultra96/vivado/project_3/6.1/build/tmp/work/zynqmp_generic_xczu3eg-xilinx-linux/linux-xlnx/6.1.5-xilinx-v2023.1+git999-r0/temp/log.do_kernel_version_sanity_check.69656
ERROR: Task (/home/ichiri/ultra96/vivado/project_3/6.1/components/yocto/layers/meta-xilinx/meta-xilinx-core/recipes-kernel/linux/linux-xlnx_2023.1.bb:do_kernel_version_sanity_check) failed with exit code '1'
Linux Kernel Archivesの6.1.30のソースでビルドを試みたプロジェクトディレクトリで、linux-xlnxの外部ソース6.1.5を指定して実行した時のエラー。 新しいPetaLinuxプロジェクトディレクトリをcreateして、linux-xlinxを指定すると以下のエラーは出ない。
ERROR: linux-xlnx-6.1.30-xilinx-v2023.1+git999-r0 do_kernel_version_sanity_check: Package Version (6.1.30-xilinx-v2023.1+git999) does not match of kernel being built (6.1.5). Please update the PV variable to match the kernel source or set KERNEL_VERSION_SANITY_SKIP="1" in your recipe.
ERROR: linux-xlnx-6.1.30-xilinx-v2023.1+git999-r0 do_kernel_version_sanity_check: ExecutionError('/home/ichiri/ultra96/vivado/project_3/6.1/build/tmp/work/ultra96_zynqmp_xczu3eg-xilinx-linux/linux-xlnx/6.1.30-xilinx-v2023.1+git999-r0/temp/run.do_kernel_version_sanity_check.107762', 1, None, None)
ERROR: Logfile of failure stored in: /home/ichiri/ultra96/vivado/project_3/6.1/build/tmp/work/ultra96_zynqmp_xczu3eg-xilinx-linux/linux-xlnx/6.1.30-xilinx-v2023.1+git999-r0/temp/log.do_kernel_version_sanity_check.107762
ERROR: Task (/home/ichiri/ultra96/vivado/project_3/6.1/components/yocto/layers/meta-xilinx/meta-xilinx-core/recipes-kernel/linux/linux-xlnx_2023.1.bb:do_kernel_version_sanity_check) failed with exit code '1'
KERNEL_VERSION_SANITY_SKIP=”1″ 設定
今回は上記の様に新しいプロジェクトディレクトリを作っても上記エラーが消えなかった。 しかし<PETA_PROJ>/project_spec/meta-user/recipes-kernel/linux/linux-xlnx_%.bbappendにKERNEL_VERSION_SANITY_SKIP=”1″を設定したらエラーがでなくなってビルドできた。 よかった。
Prefered Warning
linux-xlnxからcloneして、既存のディレクトリでビルドしようとしたsudo tar -zxvf rootfs.tar.gz -C /media/ichiri/ROOTFSら『prefered … not available』が多く表示されたが、petalinuxのプロジェクトディレクトリを新しくして,cloneしたlinux-xlnxを指定しても『prefered … not available』は表示されなかった。 Linux Kernel Archivesのソースでビルドで最初にビルドしたとき、Xilinxの仕組みと不整合が起きてその情報が保持されてしまう様な感じである。(xlnx_rebase-6.1_LTSはLinux version 6.1.5-xilinx-v2023.1だったから上記のWarningが出ないのか?)
WARNING: preferred version 6.1.5-xilinx-v2023.1% of linux-xlnx not available (for item virtual/kernel)
WARNING: versions of linux-xlnx available: 6.1.30-xilinx-v2023.1+git999
WARNING: preferred version 6.1.5-xilinx-v2023.1% of linux-xlnx not available (for item kernel-modules)
WARNING: versions of linux-xlnx available: 6.1.30-xilinx-v2023.1+git999
WARNING: preferred version 6.1.5-xilinx-v2023.1% of linux-xlnx not available (for item kernel-image-fitimage)
WARNING: versions of linux-xlnx available: 6.1.30-xilinx-v2023.1+git999
WARNING: preferred version 6.1.5-xilinx-v2023.1% of linux-xlnx not available (for item kernel-image-image.gz)
WARNING: versions of linux-xlnx available: 6.1.30-xilinx-v2023.1+git999
WARNING: preferred version 6.1.5-xilinx-v2023.1% of linux-xlnx not available (for item kernel-image-vmlinux)
WARNING: versions of linux-xlnx available: 6.1.30-xilinx-v2023.1+git999
WARNING: preferred version 6.1.5-xilinx-v2023.1% of linux-xlnx not available (for item kernel-base)
WARNING: versions of linux-xlnx available: 6.1.30-xilinx-v2023.1+git999
WARNING: preferred version 6.1.5-xilinx-v2023.1% of linux-xlnx not available (for item kernel-image-image)
WARNING: versions of linux-xlnx available: 6.1.30-xilinx-v2023.1+git999
WARNING: preferred version 6.1.5-xilinx-v2023.1% of linux-xlnx not available (for item kernel-module-nfsd)
WARNING: versions of linux-Microchipのwilc firmwareをダウンロード
xlnx available: 6.1.30-xilinx-v2023.1+git999
WARNING: preferred version 6.1.5-xilinx-v2023.1% of linux-xlnx not available (for item kernel-module-bridge)
WARNING: versions of linux-xlnx available: 6.1.30-xilinx-v2023.1+git999
WARNING: preferred version 6.1.5-xilinx-v2023.1% of linux-xlnx not available (for item kernel-module-sd-mod)
WARNING: versions of linux-xlnx available: 6.1.30-xilinx-v2023.1+git999xilinx_zynqmp_defconfigにCONFIG_CMA_SIZE_MBYTES=256
WARNING: preferred version 6.1.5-xilinx-v2023.1% of linux-xlnx not available (for item kernel-module-loop)
WARNING: versions of linux-xlnx available: 6.1.30-xilinx-v2023.1+git999
WARNING: preferred version 6.1.5-xilinx-v2023.1% of linux-xlnx not available (for item kernel-module-scsi-debug)
WARNING: versions of linux-xlnx available: 6.1.30-xilinx-v2023.1+git999
WARNING: preferred version 6.1.5-xilinx-v2023.1% of linux-xlnx not available (for item kernel-module-algif-hash)
WARNING: versions of linux-xlnx available: 6.1.30-xilinx-v2023.1+git999
WARNING: preferred version 6.1.5-xilinx-v2023.1% of linux-xlnx not available (for item kernel-module-tun)
WARNING: versions of linux-xlnx available: 6.1.30-xilinx-v2023.1+git999
WARNING: preferred version 6.1.5-xilinx-v2023.1% of linux-xlnx not available (for item kernel-module-ipv6)
WARNING: versions of linux-xlnx available: 6.1.30-xilinx-v2023.1+git999
WARNING: preferred version 6.1.5-xilinx-v2023.1% of linux-xlnx not available (for item kernel-module-dm-mod)
WARNING: versions of linux-xlnx available: 6.1.30-xilinx-v2023.1https://github.com/plcs2eco/wilc_ultra96v2/tree/main+git999
WARNING: preferred version 6.1.5-xilinx-v2023.1% of linux-xlnx not available (for item kernel-module-unix)
WARNING: versions of linux-xlnx available: 6.1.30-xilinx-v2023.1+git999
WARNING: preferred version 6.1.5-xilinx-v2023.1% of linux-xlnx not available (for item kernel-module-autofs4)
WARNING: versions of linux-xlnx available: 6.1.30-xilinx-v2023.1+git999
WARNING: preferred version 6.1.5-xilinx-v2023.1% of linux-xlnx not available (for item kernel-module-sch-fq-codel)
WARNING: versions of linux-xlnx available: 6.1.30-xilinx-v2023.1+git999
WARNING: preferred version 6.1.5-xilinx-v2023.1% of linux-xlnx not available (for item kernel-module-binfmt-misc)
WARNING: versions of linux-xlnx available: 6.1.30-xilinx-v2023.1+git999
WARNING: preferred version 6.1.5-xilinx-v2023.1% of linux-xlnx not available (for item kernel-module-raid10)
WARNING: versions of linux-xlnx available: 6.1.30-xilinx-v2023.1+git999
WARNING: preferred version 6.1.5-xilinx-v2023.1% of linux-xlnx not available (for item kernel-module-linear)
WARNING: versions of linux-xlnx available: 6.1.30-xilinx-v2023.1+git999
WARNING: preferred version 6.1.5-xilinx-v2023.1% of linux-xlnx not available (for item kernel-module-raid0)
WARNING: versions of linux-xlnx available: 6.1.30-xilinx-v2023.1+git999
                        :
                        :
                        :
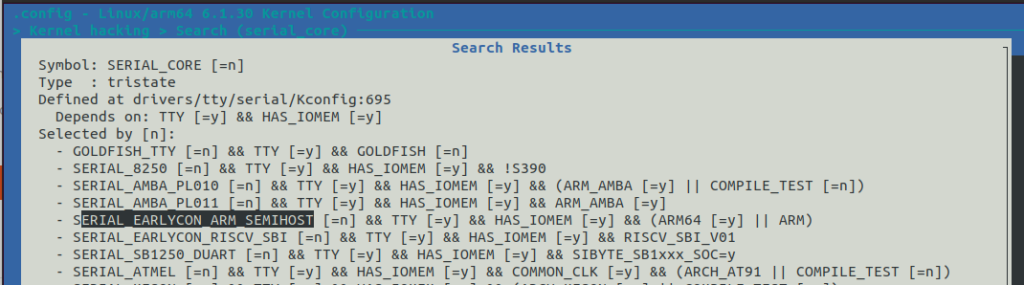
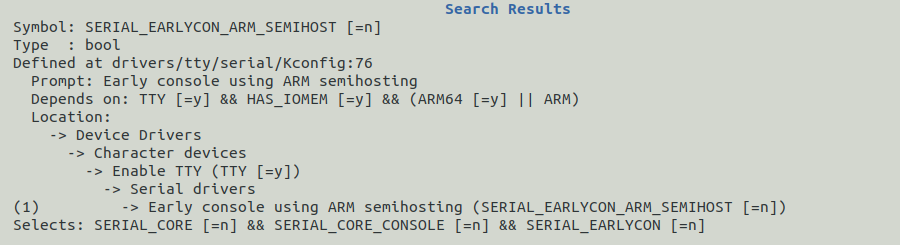
earlycon設定方法
Starting Kernelで止まるので、petalinux-config -c kernelで以下を設定。 そもそもStarting Kernelでとまるのは、XilinxのLinuxソースを使っていなかったから。 XilinxのLinuxソース(xlnx-linux)をGitHubから取ってきてビルドすればStarting Kernelで止まらないし、eralyconもデフォルトで[=y]になっていた。
Starting Kernelで止まる
- Linux Kernel Archivesから6.1.30のソースをダウンロードしてビルドした場合、Starting Kernelで止まる。
- ここから下はLinux Kernel Archivesから6.1.30のソースをダウンロードしてビルドした時の事。
- early_printkはaarch64では使えず、serial_earlyconで代用できるとの事なので設定してみる。
- するとWaiting /dev/mmcblk0p2を認識していない
- 最終は、linux-xlnxをダウンロードしてビルドで解決。
     :
     :
ff000000.serial: ttyPS1 at MMIO 0xff000000 (irq = 15, base_baud = 6249999) is a xuartps
ff010000.serial: ttyPS0 at MMIO 0xff010000 (irq = 16, base_baud = 6249999) is a xuartps
printk: console [ttyPS0] enabled
printk: console [ttyPS0] enabled
printk: bootconsole [cdns0] disabled
printk: bootconsole [cdns0] disabled
clk: Not disabling unused clocks
Waiting for root device /dev/mmcblk0p2...
- しかしu-bootからはmicroSDは見えているので、microSDは正常
- /dev/mmcblk0p2と表示されるのはマウントされていないのか? 正常な/etc/fstabと比べてみる
ZynqMP> mmc info
Device: mmc@ff160000
Manufacturer ID: 3
OEM: 5344
Name: SL32G
Bus Speed: 50000000
Mode: SD High Speed (50MHz)
Rd Block Len: 512
SD version 3.0
High Capacity: Yes
Capacity: 29.7 GiB
Bus Width: 4-bit
Erase Group Size: 512 Bytes
両方の/etc/fstabファイルでは、mmcblk0p1はコメントアウトされているが、mmcblk0p2はない
# uncomment this if your device has a SD/MMC/Transflash slot
#/dev/mmcblk0p1       /media/card          auto       defaults,sync,noauto  0  0
boot.scrにbootargs rootfs=ext4 root=/dev/mmcblk0p2 rw rootwaitを記載して、earlyconのKernel CMDにも表示されたが、やはりWaiting for root device /dev/mmcblk0p2…は解消されない。
Linux Archive Kernelでビルドした時、Starting Kernelで止まる現象解決用に以下を試してみるが解決せず。
1. petalinux-config ---> DTG Settings ---> (zcu100-revc) MACHINE_NAME
2. petalinux-config ---> u-boot Configuration ---> (xilinx_zynqmp_zcu100_revC_defconfig) u-boot config target
3. petalinux-config ---> Yocto Settings ---> (ultra96-zynqmp) YOCTO_MACHINE_NAME

コメント