
Zynq UltraScale+用に、PetaLinuxをインストールしてみます。
PetaLinuxとは
YoctoをベースにZynqやVersalやMicroBlaze向けにカスタマイズしていて、Linuxディストリビューション、ブートローダー、ルートファイルシステム、アプリケーションパッケージを一括ビルドするXilinxの統合ツールソフトウェア。 クロスコンパイラ入っているみたいで、SDK(Sysroot)のビルドもでき、QEMUも内蔵されています。
ダウンロード
- Xilinx ダウンロードサイトに行く(https://japan.xilinx.com/support/download/index.html/content/xilinx/ja/downloadNav/embedded-design-tools.html)
- 『PetaLinux』のタブをクリックする
- 『2023.1』を選択
- 『PetaLinux インストーラー』をクリックしてダウンロードする
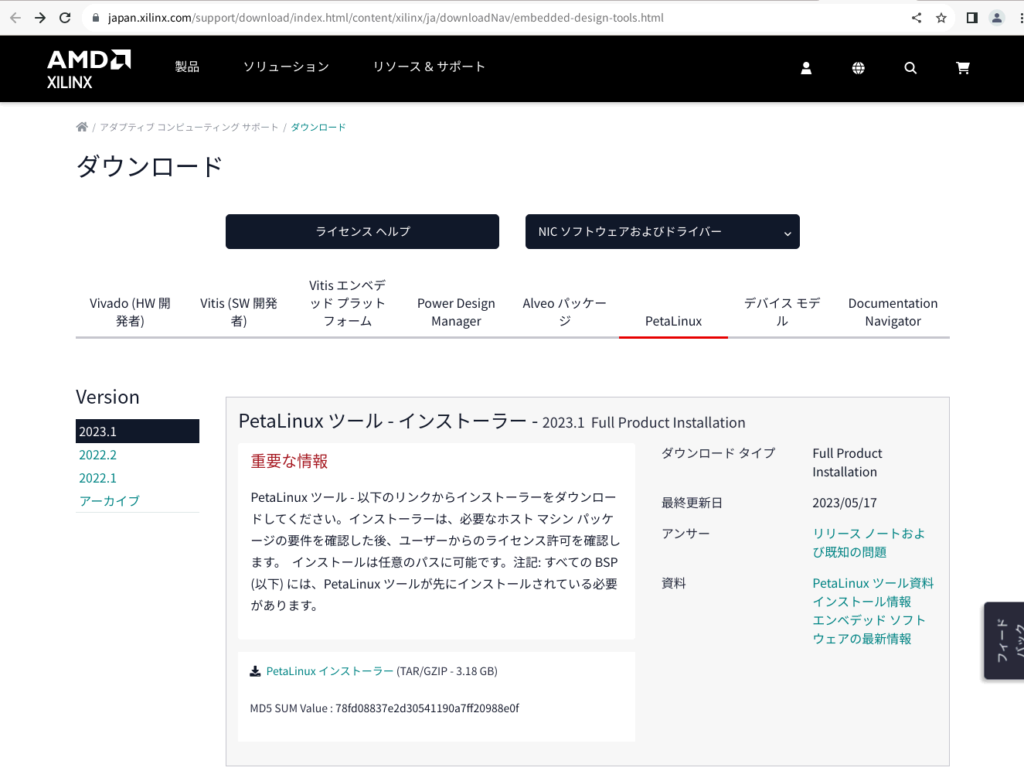
- パスワードを聞かれるので、AMDのログインパスワードを入力する
- 画面が変わると、一番下までスクロールし『Download』ボタンをクリックしてダウンロード。3,2GBあるので時間がかかりました。
- ダウンロード完了したら、以下の『2023.1』はスキップして『インストール』までに進む
2023.1
Vitis Unified Software Platform 2023.1版をダウンロードしてVitisをインストールしていたら、同じxsetupからPetaLinuxを選んで実行するとPetaLinux2023.1インストーラーがダウンロードされる。
$ cd /tools/Xilinx/Downloads/2023.1
$ sudo ./xsetup
『PetaLinux』を選択して『Next』
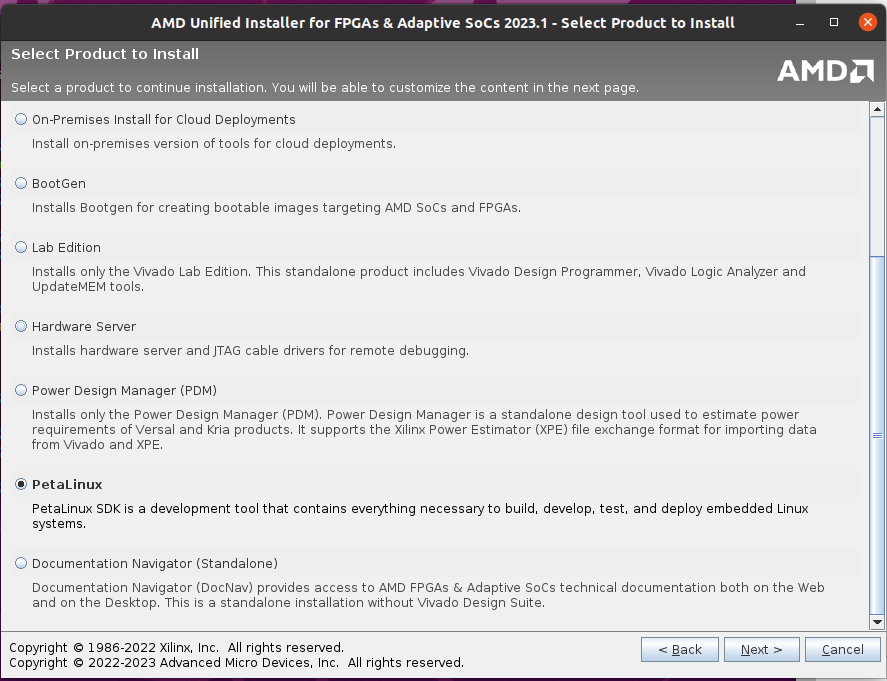
私は、『Zynq UltraScale+』と『Zynq-7000』を使いたいので『PetaLinux All platforms』を選択して『Next』

- 『Agree』して、『Next』〜次のページでDirectoryもそのままで『Nextt』。
- インストーラー『petalinux-v2023.1-final-installer.run』が入った。
$ cd tools/Xilinx/PetaLinux/2023.1/bin
$ ls -l
total 3332324
-rw-rw-rw- 1 root root         57  5月 20 13:46 petalinux_installation_log
-rwxr-xr-x 1 root root 3412288971  5月  2 14:26 petalinux-v2023.1-final-installer.run
インストール
注意1:ルート権限ではインストール出来ないので、必ずローカルユーザーでインストールしてください。 間違ってルート権限でインストールしてしまった時は、生成されたpetalinux_installation_logファイルを削除してからインストールしてください。
注意2:ダウンロードしたファイル名を確認して実行してください。 以下は私がダウンロードしたファイル名ですが、もしかしたら特に、『v2022.2-10141622』辺り若干異なるかもしれません。
インストール前準備
- まず、下の例のように必要なライブラリを『sudo apt install -y …』でインストールする。
- uBuntuの場合、初期設定はbashでなくdashなので、bashに変更する。
- (2023.11.16) apt installにdevice-tree-compileを追加しました。 petalinux-buildでkernelをビルドする時にエラーになるため。
$ whoami  //ユーザー確認
ichiri

// **********************************************
// # whoami  //rootユーザーの場合は、プロンプトが$でなく#表示です。
// root     //rootと表示されたら、一般ユーザーに切り替えて下さい。
// **********************************************

//どこでもいいのですが、実行場所を分かりやすくするためホームディレクトリに移動します。
$ cd ~
//必要ライブラリをインストール
$ sudo apt install -y python gawk gcc git make net-tools libncurses5-dev tftpd zlib1g:i386 libssl-dev flex bison libselinux1 gnupg wget diffstat chrpath socat xterm autoconf libtool tar unzip texinfo zlib1g-dev gcc-multilib build-essential screen pax gzip device-tree-compile


// /bin/sh が dash or bash かを確認
$ ls -l /bin/sh
lrwxrwxrwx 1 root root 4 10月 24 08:26 /bin/sh -> dash

// dash になっている場合は、以下のコマンドで表示されたダイアログで「No」を選択
$ sudo dpkg-reconfigure dash
Removing 'diversion of /bin/sh to /bin/sh.distrib by dash'
Adding 'diversion of /bin/sh to /bin/sh.distrib by bash'
Removing 'diversion of /usr/share/man/man1/sh.1.gz to /usr/share/man/man1/sh.distrib.1.gz by dash'
Adding 'diversion of /usr/share/man/man1/sh.1.gz to /usr/share/man/man1/sh.distrib.1.gz by bash'

// /bin/sh を再度確認する
$ ls -l /bin/sh
lrwxrwxrwx 1 root root 4  3月 15 15:12 /bin/sh -> bash
インストール
インストール時、Agreement等何度も聞かれますが、以下の通り進めれば簡単にインストールできます。
- ダウンロードしたディレクトリに移動
- ダウンロードした『petalinux-v2022.2 ….installer.run』ファイルに実行権限を与える
- インストールしたいディレクトリを作成。 (これをしなかったら ERROR: Failed to create the installation directory: /tools/Xilinx/petalinuxでインストール出来ませんでした)
- そのディレクトリが現在のユーザー権限でアクセスできるように sudo chown USER_NAME:GROUP_NAME ディレクトリ名で設定。 私の場合、ユーザー名もグループ名もichiriなので、ichiri:ichiriとしています。(これをしなかったら、ERROR: Access Denied: No access permissions to the directorでインストール出来ませんでした)
- –dirオプションで先程作ったディレクトリを指定してインストール
- 私の場合、既に/tools/Xilinxの下にVitisやVivadoがあるので、同じディレクトリにpatalinuxを入れています。
- しかし、PetaLinuxのマニュアルによるとPetaLinuxのインストール先は、/home/user_nameの下のディレクトリにインストールするようにと記載されています。
- 『Press Enter to display the license agreements』と表示されるので『ENTER』
- 『/tmp/tmp.2YMmblyK8J/Petalinux_EULA.txt』と表示されるので『ENTER』
- License Agreementのtxtファイルがviewerで開き、画面の下に『:』が表示されているので、『q』
- Do you accept Xilinx End User License Agreement? [y/N] >と表示されるので、『y』->『ENTER』
- また、License Agreementで、/tmp/tmp.yampVV6szq/Third_Party_Software_End_User_License_Agreement.txtと表示されるので、『ENTER』
- また、License Agreementのtxtファイルがviewerで開き、画面の下に『:』が表示されているので、『q』
- Do you accept Third Party End User License Agreement? [y/N] >と表示されるので、『y』->『ENTER』
// ダウンロードしたディレクトリに移動
$ cd ~/Downloads
// 実行できる権限付与する
$ chmod 755 ./petalinux-v2023.1-05012318-installer.run

// インストールしたいディレクトリ作成して、権限を変えて、ディレクトリを指定して実行
$ sudo mkdir /tools/Xilinx/PetaLinux
$ sudo chown ichiri:ichiri /tools/Xilinx/PetaLinux
$ ./petalinux-v2023.1-05012318-installer.run --dir /tools/Xilinx/PetaLinux

INFO: Checking installation environment requirements...
WARNING: This is not a supported OS
INFO: Checking free disk space
INFO: Checking installed tools
INFO: Checking installed development libraries
INFO: Checking network and other services
INFO: Checking installer checksum...
INFO: Extracting PetaLinux installer...

LICENSE AGREEMENTS

PetaLinux SDK contains software from a number of sources.  Please review
the following licenses and indicate your acceptance of each to continue.

You do not have to accept the licenses, however if you do not then you may
not use PetaLinux SDK.

Use PgUp/PgDn to navigate the license viewer, and press 'q' to close

Press Enter to display the license agreements
Do you accept Xilinx End User License Agreement? [y/N] > y
Do you accept Third Party End User License Agreement? [y/N] > y
INFO: Installing PetaLinux...
INFO: Checking PetaLinux installer integrity...
INFO: Installing PetaLinux SDK to "/tools/Xilinx/PetaLinux/."
INFO: Installing buildtools in /tools/Xilinx/PetaLinux/./components/yocto/buildtools
INFO: Installing buildtools-extended in /tools/Xilinx/PetaLinux/./components/yocto/buildtools_extended
INFO: PetaLinux SDK has been installed to /tools/Xilinx/PetaLinux/.
2023.1 インストール『sudo apt install -y …』
2022.2と同じように、
- ライブラリーをインストールしておく
- bashに変更する
- PetaLinuxがインストールするディレクトリをchownでrootから一般ユーザー(私の場合、ichiri:ichiri)に変更しておく。 インストールするディレクトリはdefaultではインストーラーのあるディレクトリです。 私はインストーラーを『/tools/Xilinx/PetaLinux/2023.1/』に移動させてインストールしました。
$ cd ~
$ sudo apt install -y python gawk gcc git make net-tools libncurses5-dev tftpd zlib1g:i386 libssl-dev flex bison libselinux1 gnupg wget diffstat chrpath socat xterm autoconf libtool tar unzip texinfo zlib1g-dev gcc-multilib build-essential screen pax gzip

$ sudo dpkg-reconfigure dash  //<---Noを選ぶとbashになる。

$ cd /tools/Xilinx/
$ sudo chown -R ichiri:ichiri PetaLinux  //<== ichiri:ichiriの代わりに、自分のユーザー名を入れる。 whoamiで確認できる。
- インストーラーがあるディレクトリに移動して
- インストーラーとインストールログファイル/binの上に移動させて
- インストーラーを実行
- ライセンスアグリーメントを聞いてくるので
- Press Enter to display the license agreements ENTER
- Petalinux_EULA.txt でENTER ->q- > y
- Third_Party_Software_End_User_License_Agreement.txtでENTER->q->y
- y
- is not empty y (多分ここでディレクトリを指定できるのかもしれません。)
$ cd /tools/Xilinx/PetaLinux/2023.1/bin
$ mv peta* ..
$ ./petalinux-v2023.1-final-installer.run
起動
起動するか確認します。
- まずホームディレクトリに移動します。
- そこで、PetaLinuxのコマンドの一つ『petalinux-config -h』を実行。 この場合、まだ『setting.sh』を実行していないので、『petalinux-config: command not found』となります。
- 次に、『source <PETA_INSTALL_DIR>/settings.sh』を実行します。
- その後、再度『petalinux-config -h』を実行します。
- 『settings.sh』を実行したので、petalinux-configのヘルプが表示され、PetaLinuxが正常にインストールされ、動作することが確認できました。(実際ビルドして動作させてみないとちゃんとインストールされているかどうか解りませんが、ここで出来るのはこの程度です。)
- ERRORが表示されていますが、本来PetaLinuxのコマンドはPetaLinuxのプロジェクトディレクトリ下で実行るので、ERRORが表示されました。 今回は、確認だけなのでこれでOKです。
- 『settings.sh』は、PetaLinuxを走らせる環境設定(主に各種PATH)をします。 これはPCを終了すると消えるので、起動したら必ず実行する必要があります。
$ cd ~
$ petalinux-config -h
petalinux-config: command not found

//私は、/tools/Xilinx/PetaLinux/にインストールしたので。 (*2023.1は/tools/Xilinx/PetaLinux/2023.1/settings.sh)
$ source /tools/Xilinx/PetaLinux/settings.sh
PetaLinux environment set to '/tools/Xilinx/PetaLinux'
WARNING: This is not a supported OS
INFO: Checking free disk space
INFO: Checking installed tools
INFO: Checking installed development libraries
INFO: Checking network and other services

$ petalinux-config -h
petalinux-config             (c) 2005-2022 Xilinx, Inc.

ERROR: You are not inside a PetaLinux project. Please specify a PetaLinux project!
Configures the project or the specified component with menuconfig.

Usage:
  petalinux-config [options] {--component <COMPONENT> |--get-hw-description[=SRC]}

Options:
  -h, --help                      show function usage
  -p, --project <PROJECT>         path to PetaLinux SDK project.
                                  default is the working project
  --silentconfig      		  takes the default configuration and skips the GUI.
  -c, --component <COMPONENT>     Specify the component
                                  If no component is specified, it will do
                                  top level project configuration .
                                  If you specify a component,it will
                                  configure it with menuconfig and saves
                                  user's config fragments in meta-user.
                                  E.g. -c rootfs, -c busybox
  --get-hw-description [SRC]      get hardware description.
                                  if [SRC] is specified, look in that
                                  location for an Vivado export to SDK directory.
                                  Otherwise, this MUST be run from
                                  WITHIN the vivado export to SDK directory.
  -v, --verbose                   verbose mode

Note: There is no validation for configurable components. User can provide
      any component, bitbake will throw error for invalid components.

ichiri@ichiri-VPCF128FJ:~$
これで、petalinux-コマンドを実行出来るようになりました。
おしまい
その他
メモ用です。 知識が付いてきたら追々整理していきます。
PetaLinuxプロジェクト作成
- petalinux-createコマンドでプロジェクトディレクトリを作ります。
- zynqMPはZynq UltraScale+の場合です。
- 『petalinux-create –type project –template zynqMP –name プロジェクト名』 とすると、実行したディレクトリ下にプロジェクト名のディレクトリが生成され、各種ファイルやディレクトリが配置されます。
- 個人的にはVivadoで生成した.xsaファイルのあるディレクトリの下にプロジェクトディレクトリを作っています。
$ cd ~/ultra96/vivado/project_2_ultra96_xsa_tutorial
$ petalinux-create --type project --template zynqMP --name ultra96_peta_project

INFO: Create project: ultra96_peta_project
INFO: New project successfully created in
参考
PetaLinux ツール資料リファレンス ガイド UG1144 (v2021.1)
PetaLinux Tools Documentation: Reference Guide (UG1144) 2022-10-19
Ultra96用Vitisプラットフォームの作り方(BASE編)
起動用コマンド
Vivado、Vitis、PetaLinux、XRTを起動する前に実行しなければならないスクリプト。
$ source <VIVADO_INSTALL_DIR>/settings64.sh
$ source <VITIS_INSTALL_DIR>/settings64.sh
$ source <PETA_INSTALL_DIR>/settings.sh    //<-------PetaLinux用
$ source <XRT_INSTALL_DIR>/setup.sh
memo
- PetaLinuxはYoctoをベースにカスタマイズされたツール
- Sysroot生成
- U-BOOTイメージ変更
- QENUも入っている
- 遠隔管理用の統合Webserverも追加
- JTAG経由での起動・検証ーーーJTAGからboot.scr 読めそう
- カスタムBSP生成ツールもあるのかな?
- ブートローダ(FSBLも)、Kernel、ルートFS、ライブラリを自由に設定できる
コマンド
PetaLinux commands UG1144 2022-10-19
$ petalinux-                // <---一覧表示
petalinux-create
petalinux-config
petalinux-build
petalinux-build  --sdk         //<---sysroot生成
petalinux-build -x mrproper    //<--ビルドしたプロジェクトをクリーンアップ
petalinux-boot
petalinux-boot --jtag
petalinux-boot --qemu --u-boot //<--QEMUで実行出来る
petalinux-boot --qemu --kernel //<--QEMUで実行出来る
petalinux-package
petalinux-package --sysroot -s
petalinux-package --wic  // BOOT.BINが必要。 images/linux ディレクトリで実行。
petalinux-util
petalinux-upgrade
petalinux-devtool

$ petalinux-build -c rootfs -x distclean
$ petalinux-config -c rootfs   // <--- これでrootfsの設定が出来る。
$ petalinux-config -c kernel  // <--- これでKernelの設定が出来る。 5分くらいかかった。
- 別ディレクトリから実行する際は、-p <PETA_PROJ_DIR> を指定して実行。
- -h ヘルプ
- -v 詳細表示
使い方
  petalinux-build [options]

オプション:
  -h, --help                         ヘルプ
  -p, --project <PROJECT>            path to PetaLinux SDK project.
                                     Default is working project.
  -c, --component <COMPONENT>        Specify the component
                                     指定したコンポーネントと依存関係をビルドする
                                     E.g. -c rootfs
                                     E.g. -c myapp
  -x, --execute <tasks of bitbake>   Specify a bitbake task of the component
				     To know the list tasks for a component:
				     E.g. -x do_listtasks
  -f, --force			     Force run a specific task ignoring the stamps
				     Force run has to be for a component or its tasks
				     E.g. -c myapp -f
				     E.g. -c myapp -x compile -f
  -v, --verbose                      詳細のコンパイルメッセージ表示
  -s, --sdk                          Build SDK ==> do_populate_sdk
  -e, --esdk                         Build Minimal eSDK ==> do_populate_sdk_ext
  -a|--archiver                      This will create archiver.tar.gz in the images/linux folder
				     which contains sources and licenses.

EXAMPLES:

Build the project:
  $ petalinux-build
  the bootable images are in <PROJECT>/images/linux/.

Build project with archiver:
  $ petalinux-build -a | --archiver

Build SDK :
  $ petalinux-build --sdk | -s
  the equivalent bitbake task is do_populate_sdk,
  built sdk is deployed at <PROJECT>/images/linux/sdk.sh

Build Minimal eSDK :
  $ petalinux-build --esdk | -e
  the equivalent bitbake task is do_populate_sdk_ext
  built esdk is deployed at <PROJECT>/images/linux/esdk.sh
  This can be imported to petalinux tool with user source changes

Build SDK with archiver:
  $ petalinux-build --sdk --archiver

Build kernel only:
  $ petalinux-build -c kernel

Compile kernel forcefully:
  $ petalinux-build -c kernel -x compile -f

Deploy kernel forcefully:
  $ petalinux-build -c kernel -x deploy -f

Build kernel and update the bootable images:
  $ petalinux-build -c kernel
  $ petalinux-build -x package

Build rootfs only:
  $ petalinux-build -c rootfs

Build myapp of rootfs only:
  $ petalinux-build -c myapp

List all rootfs sub-components:
  $ petalinux-build -c rootfs -h

Clean up u-boot and build again:
  $ petalinux-build -c u-boot -x distclean
  ## above command will remove tmp files and sstate cache of u-boot.
  $ petalinux-build -c u-boot

Clean up the project build and build again:
  $ petalinux-build -x distclean    //<---これをしたらmenuconfigの設定はは消える。
  ## above command will remove tmp files and sstate cache files.
  $ petalinux-build

Clean up the project build and the generated bootable images:
  $ petalinux-build -x mrproper    //<---これをしてもmenuconfigは残っていた。 5分ほどかかる。
  ## above command will remove tmp files, <PROJECT>/images/,  <PROJECT>/build/ 		and <PROJECT>/components/plnx_workspace directories
petalinux-config -c rootfs で組み込めるでもの
- このファイルは編集してはいけないが、<PETA_PROJ_DIR>/project-spec/configsの下のrootfs_configでopensshなどがあるのがわかる。 ファイルの先頭に『Configuration』とあるので、どうもこれがメインのconfigurationのよう。 抜粋ですが、以下のようなものを組み込めそうです。 nodejsやaptはないですが、赤字の部分は嬉しい。
- Openssh
- BusyBox
- minicom
- sudo
- init-itupdown
- bash
- tar, gzip,zip, unzip
- shadow
- dtc
- curl
- ethtool
- subversion
- wget
- git
- grep
- opencv
- slqite3
- apache2
- python3
- rmp — Redhat Package Manager, CentOSで使用されてた。 もしかしたら、PetaLinuxでDebian系でビルドする時にaptが選べるのかもしれない。
- configファイルは、misc/config System Configuration
NodeJS追加方法
実際検証していないのでメモです。
Add IMAGE_INSTALL_append = ” nodejs” project-spec/meta-user/recipes-core/images/petalinux-image-full.bbappendEnable the support in petalinux-config -c rootfs -> user packages -> (*) nodejs
デバイスツリー連結方法
Vivadoで作成したdtbにはFPGA部の情報が無いので、自分で記述してマージするらしい。(2016年の情報なので、今は自動化されているかもしれない)
uEnv.txt読み込む方法
boot.scrが生成されていますが、そのソースコードがどれか分っていません。 いざとなったら色々試してみますが、もしuEnv.txtが使えたら便利なので一応メモしています。 しかし、U-BOOT-2021以降でuEnv.txtを使おうとした時、どう設定しても使えず、boot.scrを使ってたので、もしかしたら以下内容は動作しないかもしれません。 最近のXilinxのマニュアルでも、boot.scrだけでuEnv.txtは書かれていないので、boot.scrしか使えないと思います。
configs/zynq_zybo_defconfig の最後に以下を追加してuEnv.txtを読み込むようにする。(2016年なので動作するかどうかわからない) ここに詳細が書かれている。
  :
 中略
  :
CONFIG_OF_EMBED=y
zynq-common.hの変更も
- #define CONFIG_CMD_BOOTZ を追加。bootzを使えるようにする。
- bootenv=uEnv.txt\0 に変更
- どうもCONFIG_SPL_BUILDがないとBOOTENVは無さそう。 ZynqはsplでなくfsblなのでBOOTENV使え無さそう。
- #define CONFIG_BOOTCOMMAND も変更してrun importbootenv
BitBake
Kernelイメージやrootfs等のビルドツール。 YoctoとOpenEmbeddedで管理されている。
BuildrootではGNU Makeを使うが、Yoctoはbitbakeを使う。
GNU Makeとの違い
- 依存やファイルロケーションやチェックサム等のメタ情報を含んだレシピを元にビルドする
- Fetcherライブラリも含まれていてGitやwebsiteなどからソースを取ってこれる
- サーバー・クライアント抽象化できコマンドラインを使用できる
Poky
Yocto専用のLinuxディストリビューション名。
boot.scr場所
<PETA_PROJ_DIR>/images/linux/に生成される。
Zynqはu-boot.imgでなくBOOT.binを使う? 具体的に何が違う?
Petalinux2019かPetalinux2020くらいから、FAT32の領域にboot.bin, image.ub(Kernelイメージ?)に加えてboot.scrを入れて起動する。
dts場所
プロジェクトのデバイスツリー?
ダウンロードしなくても、avnet-ultra96-rev1.dtsiも入っている。 PetaLinuxを再ビルドした時に自動生成されたみたい。
./components/plnx_workspace/device-tree/device-tree/
-rw-r--r-- 1 ichiri ichiri   10929  3月 23 16:21 avnet-ultra96-rev1.dtsi
-rw-r--r-- 1 ichiri ichiri    9495  3月 23 16:22 device-tree.mss
-rw-r--r-- 1 ichiri ichiri 4788756  3月 23 16:21 hardware_description.xsa
drwxr-xr-x 3 ichiri ichiri    4096  3月 23 16:22 include
-rw-r--r-- 1 ichiri ichiri    2646  3月 23 16:22 pcw.dtsi
-rw-r--r-- 1 ichiri ichiri  950358  3月 23 16:21 psu_init.c
-rw-r--r-- 1 ichiri ichiri  950716  3月 23 16:21 psu_init_gpl.c
-rw-r--r-- 1 ichiri ichiri 1630154  3月 23 16:21 psu_init_gpl.h
-rw-r--r-- 1 ichiri ichiri 1629550  3月 23 16:21 psu_init.h
-rw-r--r-- 1 ichiri ichiri   50587  3月 23 16:21 psu_init.html
-rw-r--r-- 1 ichiri ichiri  859449  3月 23 16:21 psu_init.tcl
-rw-r--r-- 1 ichiri ichiri     245  3月 23 16:23 system-conf.dtsi
-rw-r--r-- 1 ichiri ichiri     531  3月 23 16:23 system-top.dts
-rw-r--r-- 1 ichiri ichiri    6303  3月 23 16:21 zynqmp-clk-ccf.dtsi
-rw-r--r-- 1 ichiri ichiri   31233  3月 23 16:21 zynqmp.dtsi
ユーザーが変更を加えられるデバイスツリー?
./project-spec/meta-user/recipes-bsp/device-tree/files
-rw-r--r-- 1 ichiri ichiri  168  3月 15 16:43 pl-custom.dtsi
-rw-r--r-- 1 ichiri ichiri  146  3月 23 16:52 system-user.dtsi  // <--ここにzoclの設定など追記した。
一般的なデフォルトデバイスツリーライブラリ
Beagle Boneblackなどいろんな機種のdtsやdtsiがある。
./build/tmp/work/zynqmp_generic-xilinx-linux/u-boot-xlnx/v2021.01-xilinx-v2022.2+gitAUTOINC+b31476685d-r0/git/arch/arm/dts/
最終生成されるdtb system.dtb
./images/linux/
This is not supported OS
- 意図したわけではないのですが、uBuntu20.04.6だからか、このWarningがでます。
- サポートされているのは、20.04では.4までと記載されています。
- 今のところ、uBuntu 20.04.6でもビルドできています。
$ source /tools/Xilinx/PetaLinux/settings.sh
PetaLinux environment set to '/tools/Xilinx/PetaLinux'
WARNING: This is not a supported OS
INFO: Checking free disk space
INFO: Checking installed tools
INFO: Checking installed development libraries
INFO: Checking network and other services

コメント