
同一デバイス(Zynq ultrascale+ Petalinxボード)内でPythonのopcuaライブラリを使ってCODESYS Control(Runtime)のPLCプログラムの変数を取得する。
PetalinuxにインストールしたCODESYS ControlのデモバージョンでもOPC-UAサーバーはCODESYS Controlを起動した2時間は動作するので今回はそのOPC-UAサーバーを使用しています。
概要
- ボードにインストールしたCODESYS ControlにOPC UA Serverを設定します。
- 次にWindows PCにUA Expertを使って、アクセスしたいNodeIdを取得します。
- ボードに記述するPythonプログラムのopcuaライブラリの関数に取得したNodeIdを張り付けてCODESYS ControlのOPC UAサーバーと通信します。

OPC-UAサーバー設定
まず、ボード側のCODESYS Control側のOPC-UAサーバーを設定します。
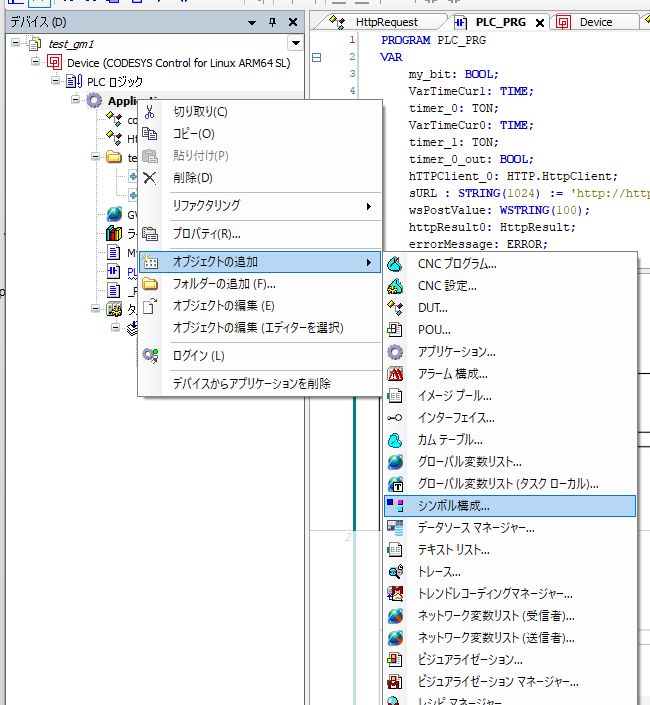
- Application上で右クリックして『オブジェクトの追加』
- 『シンボル構成』を選択して追加(Symbol Configuration)
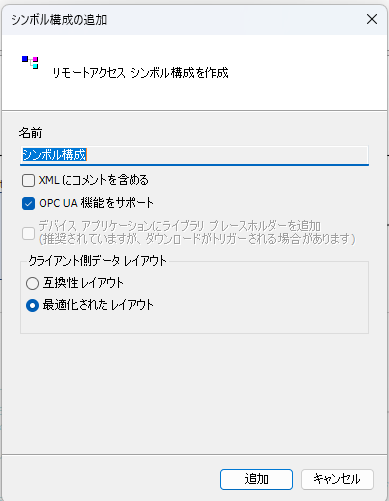
以下のダイアログボックスが表示されるので『OPC UA機能をサポートする』にチェックをいれたまま『追加』をクリックします。
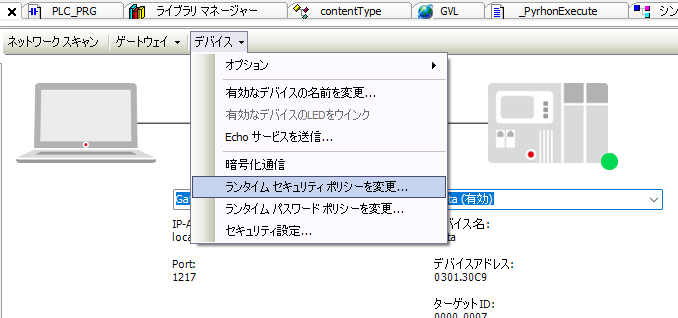
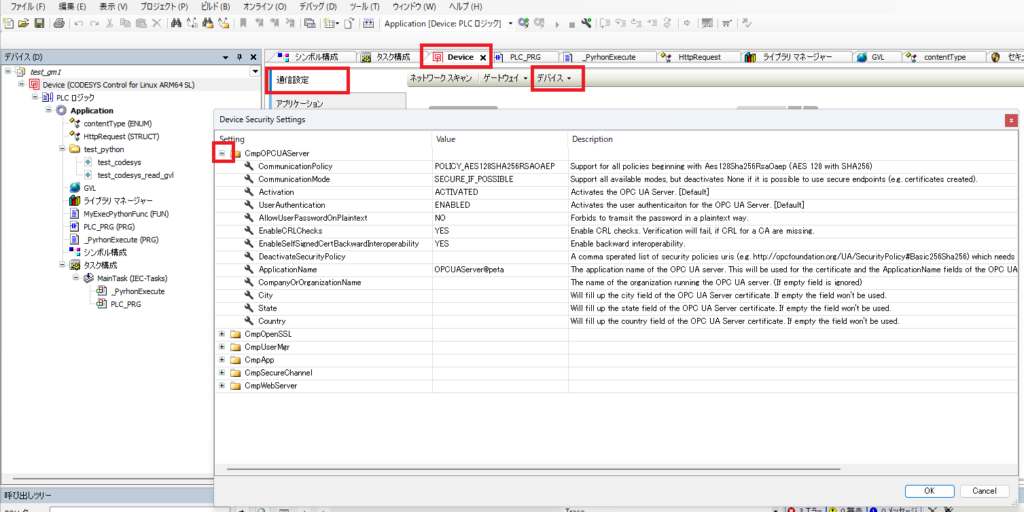
『Device』タブ~『デバイス』タブ~『ランタイムセキュリティポリシーを変更』を選択
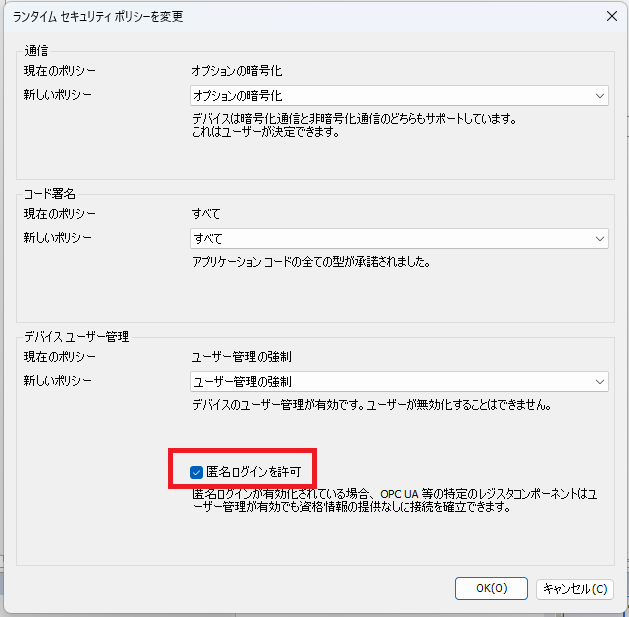
『匿名ログインを許可』(Anonymous)にチェックを入れて『OK』をクリック。
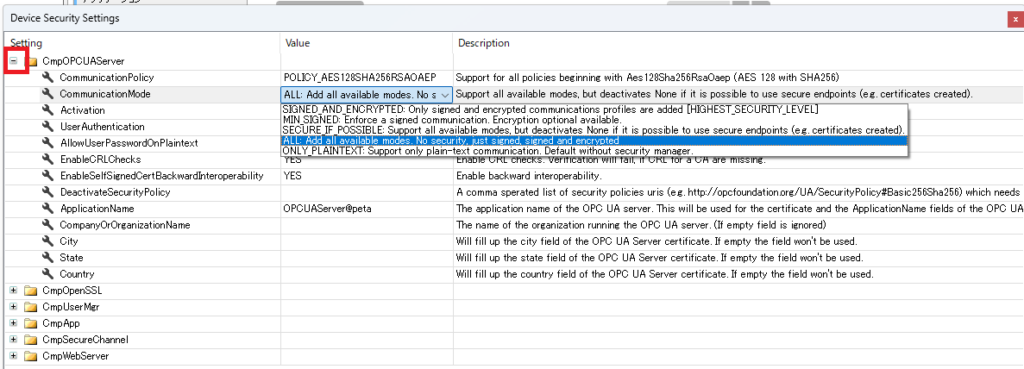
再度『デバイス』~『セキュリティ設定』を選択します。
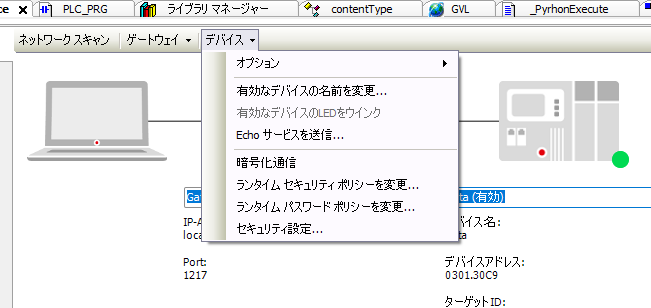
そこでCmpOPCUAServerの左の『+』をクリックして展開し、『CommunicationMode』で『All: Add all available mode ….』を選択します。
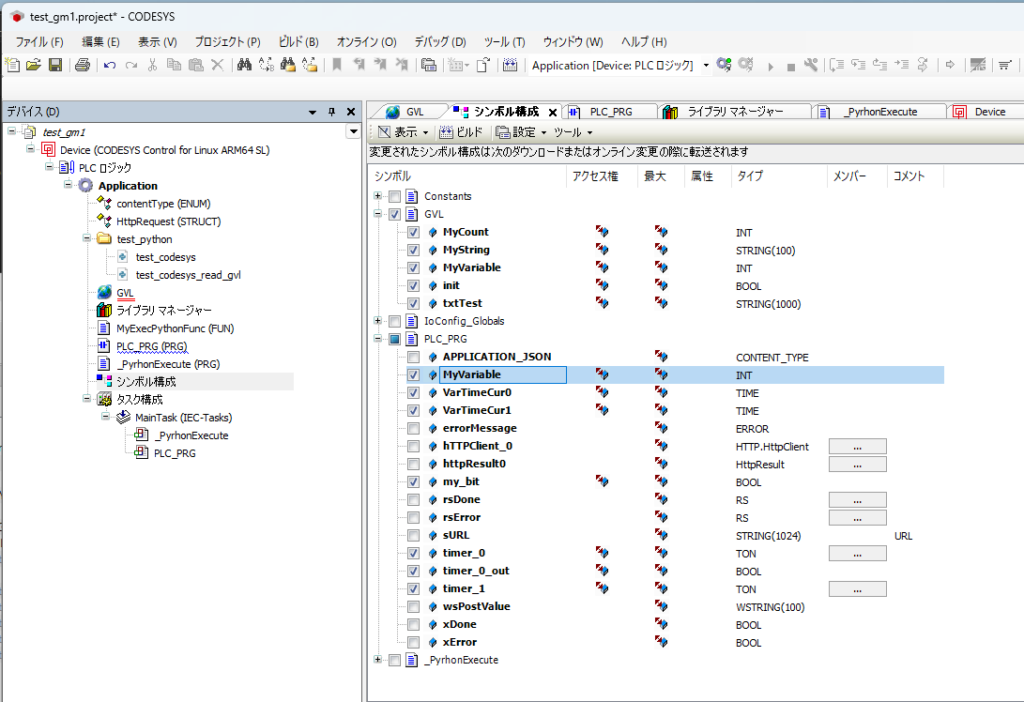
- 次にOPC-UAで送受信許可する変数を選択します。
- 変数を選択する前にプログラムを一旦ビルドします。 ビルドをしていないと作成した変数が反映されず選択できません。
- 左のナビゲーターから『シンボル構成』をダブルクリックすると、『シンボル構成』タブが開きます。(シンボル構成タブが既にあればそのタブをクリック)
- そして送受信許可する変数にチェックを入れます。
UA ExpertでNodeIdを確認
Pythonのopcuaライブラリではアクセスする変数のNodeIdを指定しなければなりません。 Read/Writeしたい変数のNodeIdを取得するために、UA Expertを使用します。
- Windows PCにUA Expertをインストールします。
- UA Expertを立ち上げて
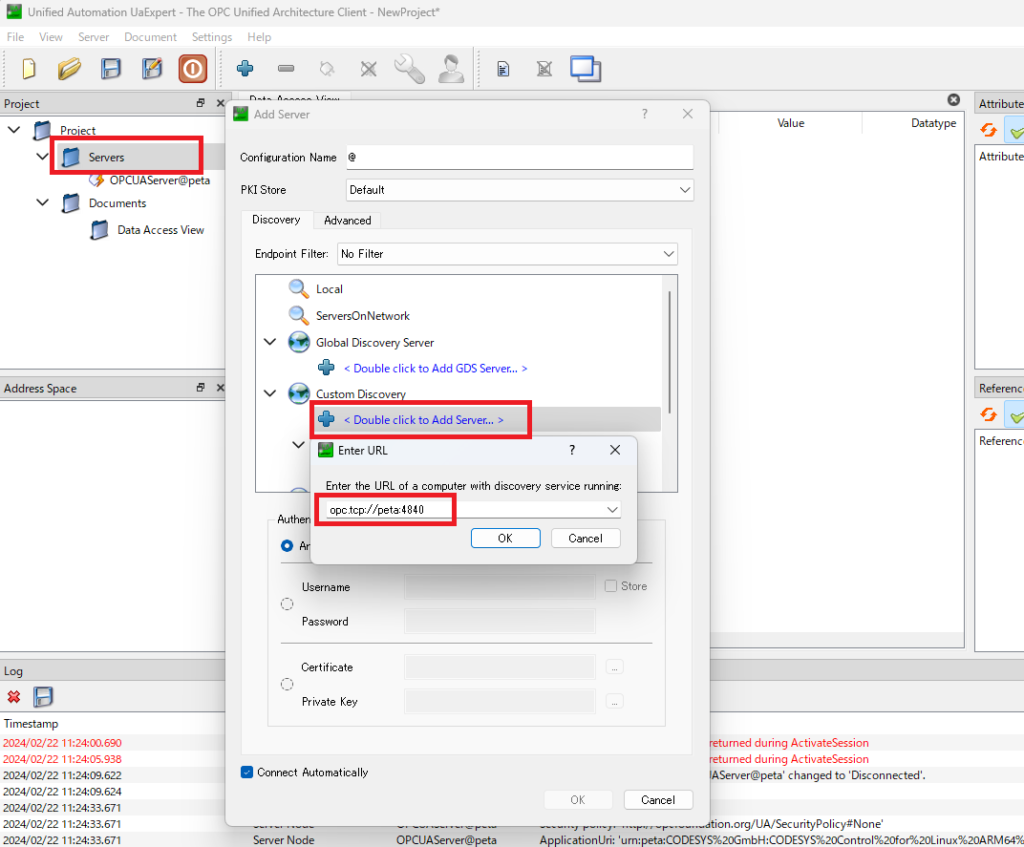
- Project Viewのしたの『Servers』を右クリックして『Add』を選択
- Add Serverのダイアログボックスが表示されるので、Custom Discoveryの下の『Double click to Add Server …』をクリックして
- Enter URLでOPC-UA ServerのURLを入力してOK
- URLは、CODESYS Controlを立上て、『$ cat /var/opt/codesys/codesyscontrol.log』を見ると表示されています。 私の場合Device User Nameをpetaとしたのでpetaと表示されています。 ポート番号はCODESYS Controlではデフォルトで4840と決まっているようです。
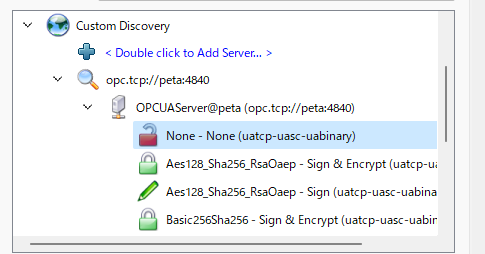
OPCUAServer@petaが現れるのでダブルクリックすると接続する。
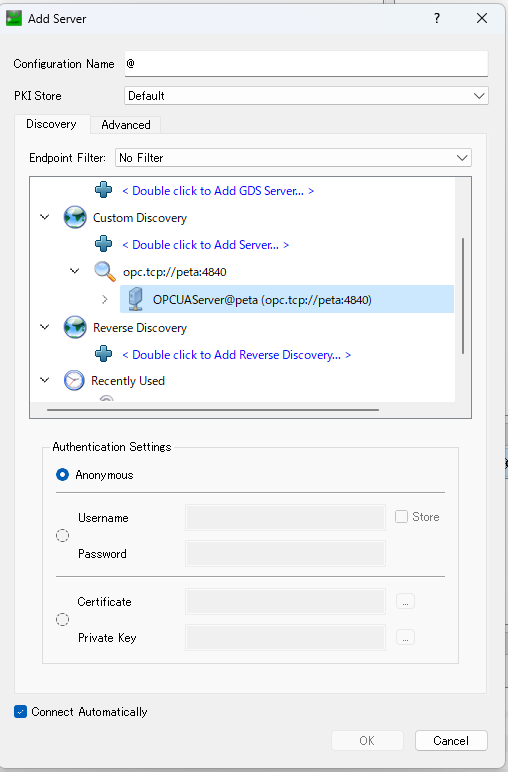
【注意】ダブルクリックで接続できない時は、以下のNoneをダブルクリックして接続する。
- 接続すると、Address SpaceにObjectsが表示されるので、『Objects』~『DeviceSet』~『CODESYS Control for Linux ARM64 SL』~『Resources』~『Application』と階層を開いていく。
- 『GlobalVars』と『Programs』の中に選択できる変数があるのでそれを見る
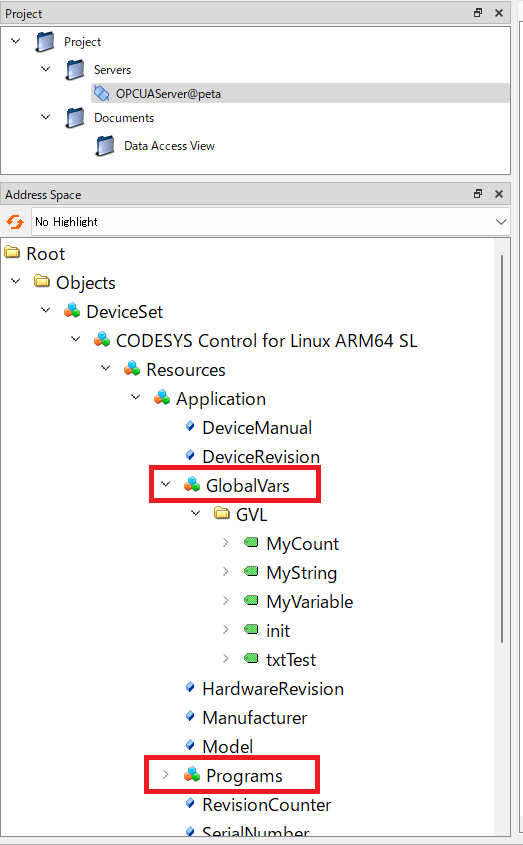
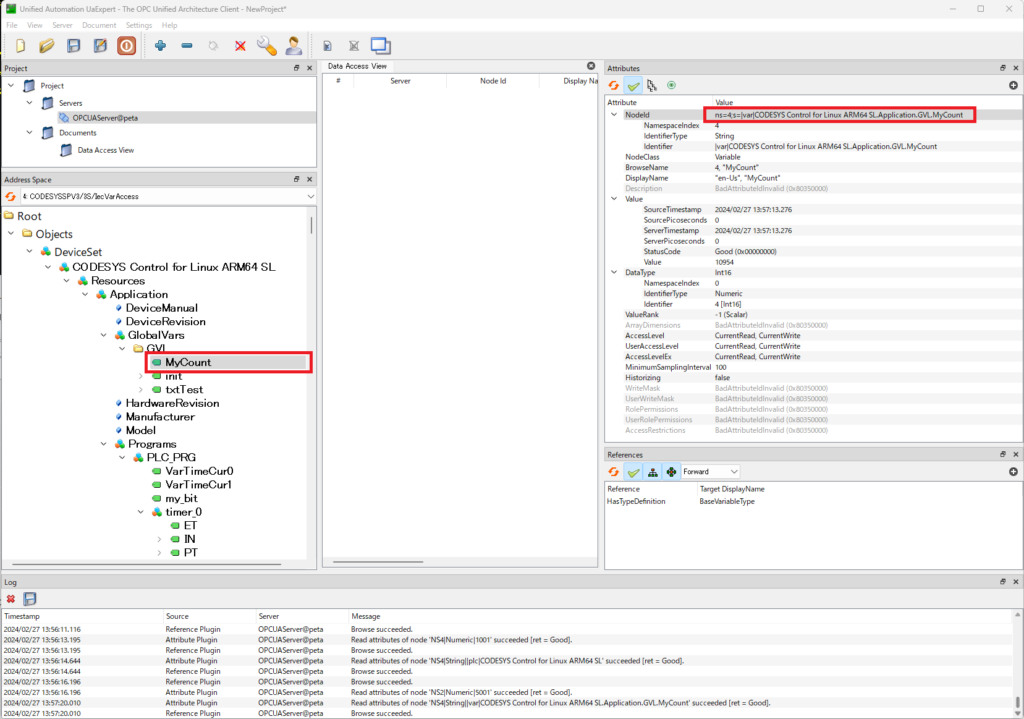
- 例えば『MyCount』をクリックするとその属性(Attribute)が表示される。
- Pythonプログラムのopcua関数に、ここで表示されるNodeIdを入れて、どの変数にアクセスするかを指定するのでNodeIdは重要です。
- NodeId上で右クリックしてNodeIdをコピーして、Pythonプログラムで変数を読む場合に簡単に張り付けれます。
Pythonプログラム
- Pythonプログラムで使用するopcuaライブラリに入力するMyCountのnodeIdをUA Expertで取得したら、client.get_node()の引数に””を付けて入れる。
- 『pip install opcua』でopcuaライブラリをインストールしておきます。
- Pythonプログラム
- urlを設定する。 CODESYS Controlと同じボード内で実行する時は『127.0.0.1』を使います。 localhostは非推奨なので使いません。 127.0.01の代わりに『peta』を使うと、socket.pyが『127.0.1.1』に置き換えてしまうので通信できませんでした。
- Windows PC等、異なるデバイスからの通信の場合は、IPアドレスを使用します。
- 上でコピーしたnodeIdを使う。
from opcua import Client

# Establish connection to the OPC UA server
url = "opc.tcp://127.0.0.1:4840"  # URL of your CODESYS OPC UA server
client = Client(url)

try:
    client.connect()
    print("Connected to OPC UA server")

    # Browse the objects and print their node ids
    print("Browsing Objects node ...")
    objects = client.get_objects_node()
    print("Children of Objects node:")
    for node in objects.get_children():
        print(node)

    # Read a specific node (replace 'ns=2;s=YourNode' with your actual node)
    node_to_read = client.get_node("ns=4;s=|var|CODESYS Control for Linux ARM64 SL.Application.GVL.MyCount")
    value = node_to_read.get_value()
    print("Value of YourNode:", value)

finally:
    client.disconnect()
複数の値の読込方法
- 配列にua.NodeID.from_string()を入れて、その引数にnodeIdを入れていく。
- 5つの値の獲得はClinent.uaclient.get.attribute 1回の実行ですが、内部でどのようになっているかは解かりません。
- 値を取り出すのは、forで回さなければなりません。
from opcua import Client,ua
import time

# Establish connection to the OPC UA server
url = "opc.tcp://127.0.0.1:4840"  # URL of your CODESYS OPC UA server
client = Client(url)

try:
    client.connect()
    print("Connected to OPC UA server")

    # Browse the objects and print their node ids
    print("Browsing Objects node ...")
    objects = client.get_objects_node()
    print(objects)
    print("Children of Objects node:")
    for node in objects.get_children():
        print(node)

    nodeids = [ua.NodeId.from_string("ns=4;s=|var|CODESYS Control for Linux ARM64 SL.Application.PLC_PRG.VarTimeCur0"),
               ua.NodeId.from_string("ns=4;s=|var|CODESYS Control for Linux ARM64 SL.Application.PLC_PRG.VarTimeCur1"),
               ua.NodeId.from_string("ns=4;s=|var|CODESYS Control for Linux ARM64 SL.Application.GVL.MyVariable"),
               ua.NodeId.from_string("ns=4;s=|var|CODESYS Control for Linux ARM64 SL.Application.GVL.MyString"),
               ua.NodeId.from_string("ns=4;s=|var|CODESYS Control for Linux ARM64 SL.Application.GVL.MyCount")]
    # nodeids = [ua.NodeId.from_string("ns=2;i=5001"), ua.NodeId.from_string("ns=2;i=6078")]
    # The below is to measure the time of 1000 reads.
    start=time.time()
    for i in range(1000):
        results = client.uaclient.get_attributes(nodeids, ua.AttributeIds.Value)
        for item in results:
            print("No.",i,":",item.Value._value)

    end=time.time()
    print((end-start),"sec")
    print(end)

finally:
    client.disconnect()
    print("Disconnected from OPC UA server")
Zynq Ultrascale+ Petalinuxボードにインストール
- インストールする際、メモリが足りなくなるので、Codesys Runtimeを止める。
- 更にVSCodeを使うとメモリを食うので、VSCodeは使用せず、ターミナルでSSH接続しpip installで各ライブラリをインストールする。
- ターミナルからSSH接続でPythonプログラムを起動する。
- ある日突然『crypto』も必要になった。
$ pip install opcua
$ pip install cryptography
$ pip install crypto
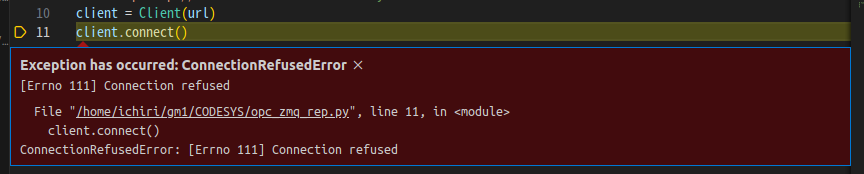
PythonでConnection refused
これはCODESYS Controlが起動していない時に発生します。CODESYS Controlが起動していないので、CODESYS Control内のOPC UA Serverも起動していないのでOPC UA ClientであるPythonからconnect()しようとしても出来ないのです。 最初びびったので備忘録として残しておきます。
Manage Certificate
CODESYS Developmentで

『Device』タブ~『通信設定』~『デバイス』タブ~『セキュリティ設定』で『+』をクリックでOPCUAのセキュリティ設定が見れる
- 『表示』~『セキュリティ画面』
- 『Devices』タブ~
 ~『Device』をクリック
 - 『OPC UA Server』をクリック
- Informationの左のアイコンをクリック
- Keyを2048に変更すると
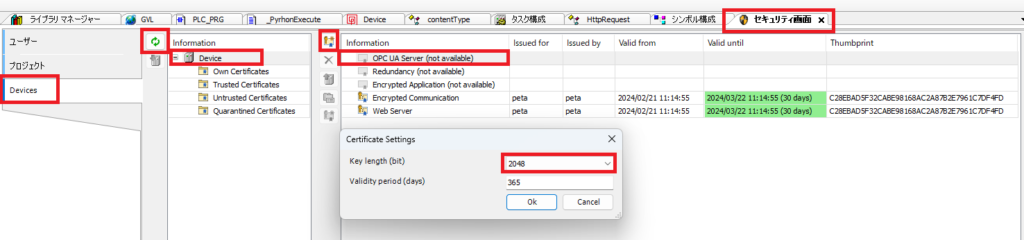
- ThumbprintがIssue(発行)されるので
- xマークのしたのアイコンをクリックして証明書をデバイスからUploadしてPCに.cerファイルとして保存する。

cat /var/opt/codesys/codesyscontrol.logを見ても
となっているのでOPC-UAサーバーは動作していると思う。
2024-02-21T07:02:46Z, 0x00000124, 1, 0, 0, No certificate for the OPC UA server available.
2024-02-21T07:02:46Z, 0x00000124, 1, 0, 0, Security policy allows plain text communication. Secure communication is deactivated.
2024-02-21T07:02:46Z, 0x00000124, 1, 0, 0, **************************************************************
2024-02-21T07:02:46Z, 0x00000124, 1, 0, 0,     OPC UA Server Started:
2024-02-21T07:02:46Z, 0x00000124, 1, 0, 0,     Hostname: peta, Port: 4840
2024-02-21T07:02:46Z, 0x00000124, 1, 0, 0,     URL: opc.tcp://peta:4840
2024-02-21T07:02:46Z, 0x00000124, 1, 0, 0,     Loopbackadapter activated.
2024-02-21T07:02:46Z, 0x00000124, 1, 0, 0,     All available networkadapters are used.
2024-02-21T07:02:46Z, 0x00000124, 1, 0, 0, **************************************************************
2024-02-21T07:02:46Z, 0x00000124, 1, 0, 0, Provider 'CODESYS_DefaultProvider' (version 0x305131e) registered at the OPC UA server.
2024-02-21T07:02:46Z, 0x000000a6, 1, 0, 0, Not able to read file of Run/Stop switch. Functionality of component disabled
2024-02-21T07:02:46Z, 0x00000001, 1, 0, 0, =========================================================================
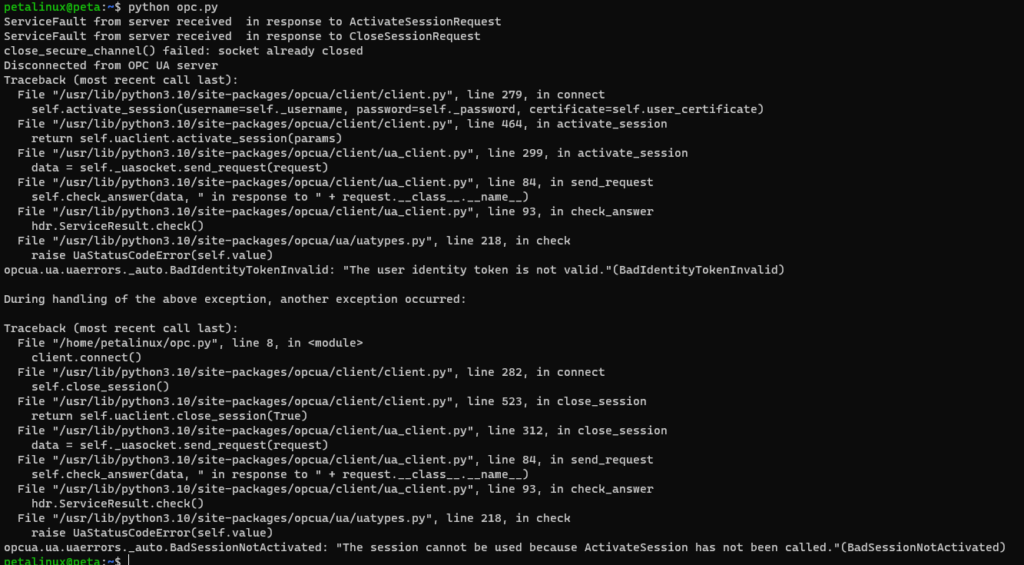
Traceback (most recent call last):
  File "/home/petalinux/opc.py", line 8, in <module>
    client.connect()
  File "/usr/lib/python3.10/site-packages/opcua/client/client.py", line 272, in connect
    self.connect_socket()
  File "/usr/lib/python3.10/site-packages/opcua/client/client.py", line 307, in connect_socket
    self.uaclient.connect_socket(self.server_url.hostname, self.server_url.port)
  File "/usr/lib/python3.10/site-packages/opcua/client/ua_client.py", line 266, in connect_socket
    return self._uasocket.connect_socket(host, port)
  File "/usr/lib/python3.10/site-packages/opcua/client/ua_client.py", line 155, in connect_socket
    sock = socket.create_connection((host, port), timeout=self.timeout)
  File "/usr/lib/python3.10/socket.py", line 845, in create_connection
    raise err
  File "/usr/lib/python3.10/socket.py", line 833, in create_connection
    sock.connect(sa)
ConnectionRefusedError: [Errno 111] Connection refused

During handling of the above exception, another exception occurred:

Traceback (most recent call last):
  File "/usr/lib/python3.10/site-packages/opcua/client/client.py", line 299, in disconnect
    self.close_secure_channel()
  File "/usr/lib/python3.10/site-packages/opcua/client/client.py", line 343, in close_secure_channel
    return self.uaclient.close_secure_channel()
  File "/usr/lib/python3.10/site-packages/opcua/client/ua_client.py", line 282, in close_secure_channel
    return self._uasocket.close_secure_channel()
  File "/usr/lib/python3.10/site-packages/opcua/client/ua_client.py", line 223, in close_secure_channel
    future = self._send_request(request, message_type=ua.MessageType.SecureClose)
  File "/usr/lib/python3.10/site-packages/opcua/client/ua_client.py", line 72, in _send_request
    self._socket.write(msg)
AttributeError: 'NoneType' object has no attribute 'write'

During handling of the above exception, another exception occurred:

Traceback (most recent call last):
  File "/home/petalinux/opc.py", line 24, in <module>
    client.disconnect()
  File "/usr/lib/python3.10/site-packages/opcua/client/client.py", line 301, in disconnect
    self.disconnect_socket()
  File "/usr/lib/python3.10/site-packages/opcua/client/client.py", line 310, in disconnect_socket
    self.uaclient.disconnect_socket()
  File "/usr/lib/python3.10/site-packages/opcua/client/ua_client.py", line 269, in disconnect_socket
    return self._uasocket.disconnect_socket()
  File "/usr/lib/python3.10/site-packages/opcua/client/ua_client.py", line 167, in disconnect_socket
    self._socket.socket.shutdown(socket.SHUT_RDWR)
AttributeError: 'NoneType' object has no attribute 'socket'
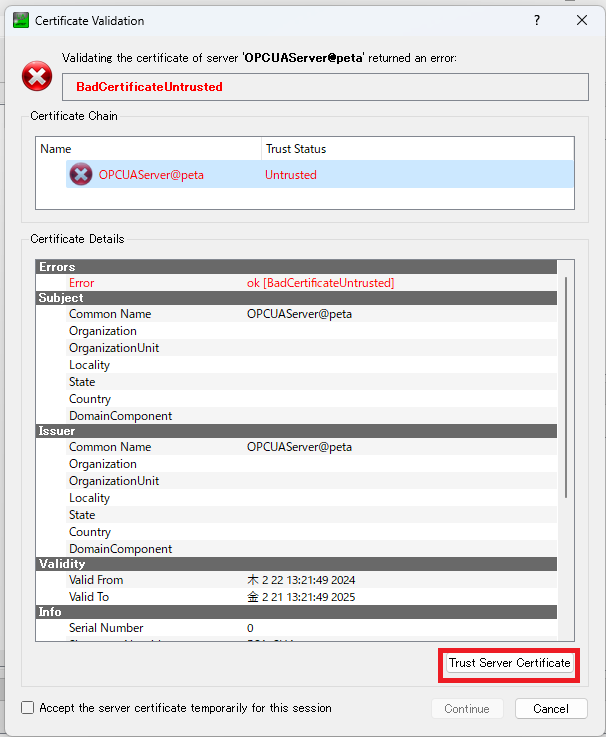
私の備忘録1(UA Expert証明書)
証明書をLoadしてする方法のはずですが、Adress Spaceに変数等も取り込まれずうまくいきませんでした。 しかし将来の私の備忘録として残しています。
- OPCUAServer@petaで右クリックして『Properties』を選択
- Server InformationのEndpoint URLが正しいか確認して、『Reverse Connect』にチェックを入れる。 (Reverse Connectにチェックを入れないと、Load fileを選択できない。
- するとServer Certificateが表示されるので、『Load file』でCODESYS Developmentで保存した.cerファイルを選択する
- Authentication settingsは『Anonynous』のままで『OK』で接続される
- 次回この画面に来たときは、同じ設定でもOKがグレーアウトされているが、Anonynmousと違う設定を選択して、再度Anonymousを選択したらOKを押せるようになる。
まだTrustされていないので、LoadしたCertificateをTrustにします。
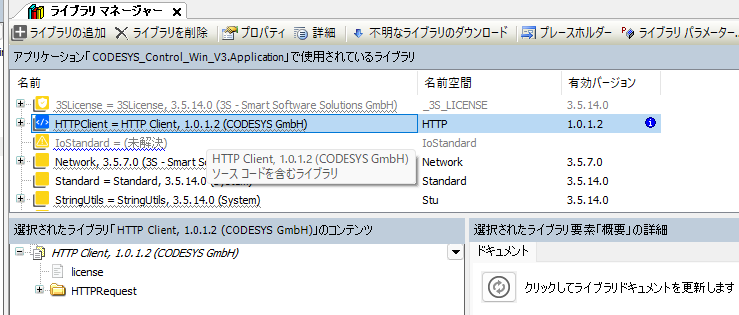
私の備忘録2 HTTPClient.libraryを追加する方法(動作させれなかった。将来再挑戦。)
- 再挑戦用のメモ
- ライブラリのリポジトリからインストールでファイルを選択すると追加される。(なのでHTTP Clientはデモモードでも使えそう)
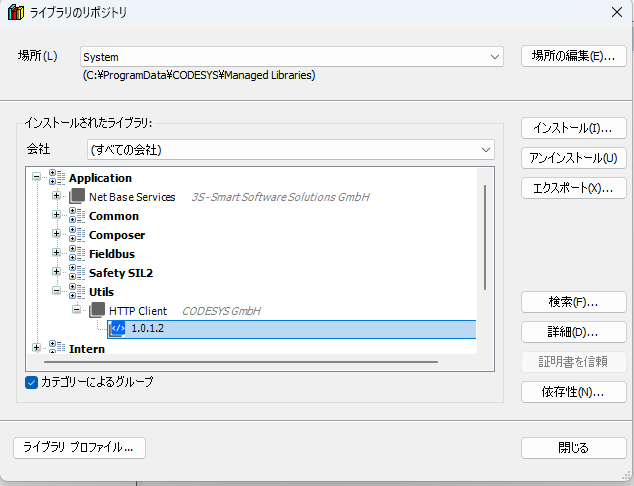
するとHTTPClientに『ソースコードを含むライブラリ』と表示された

コメント
助かりました。
C#でクライアントアプリを作っていて、Codesysのサーバーと接続しようとしていたのですが
セキュリティ設定で引っかかっていました。
こちらを拝見してcodesysでサーバーのセキュリティ設定を解除する方法がわかり接続することができました。
ありがとうございました。
お役に手ててよかったです。
ご丁寧にコメント頂きありがとうございます。