
ここではPythonでコンポーネントを作ってGreengrassがインストールされているCore Deviceで起動させます。 ここではコンポーネントを作成して起動する2つの方法を進めます。 (コンポーネントとDeployの意味は『その2』を参照してください。)
- デバイスに保存してDeployする
- 最初は理解しやすいように簡単な方法です
- デバイス内でプログラム作成して
- デバイスのコンソールでaws cliを使ってデバイス内でDeployします。
- s3に保存してDeployする
- デバイス内でプログラム作成して
- さらにDeploy時の動作などを指定するrecipe.jsonも作成して
- gdk(Greengrass development kit)を使って
- コンポーネントのビルド
- s3への格納を自動にします
- AWS IoT画面からコンポーネントをDeployします
- 実際にはこの方法が最適
- コンポーネントをDeployするデバイスが1万台でもDeployは1回だけ
- コンポーネントとDeployのRevision管理ができる
コンポーネント用語
- コンポーネント
- コンポーネントにはPython等のプログラムとプログラム起動する際の動作設定recipe.jsonが含まれます。
- コンポーネントには4つのタイプがあります
- Necleus (
aws.greengrass.nucleus)- NecleusはAWSが提供しているコンポーネントです。 Greengrassサービスのコアとなる部分なので私たちが変更したりできません。
- プラグイン (
aws.greengrass.plugin)- AWSが提供しているシステムコンポーネント。 初期設定Deployに取り込まれるものもあれば、自分で選択して追加する事が出来ます。 しかし変更不可で、自動的にバージョンアップされ、その際はGreengrassも勝手に再起動されるので、Greengrassを再起動させないようにプラグインのバージョンを指定する方法もあります。
- ジェネリック (
aws.greengrass.generic)- これが私たちが使えるカスタムコンポーネントで、このページで実行するコンポーネントタイプです。
- Lambda (
aws.greengrass.lambda)- これも私たちが使えるコンポーネントの1つのタイプです。 Lambdaの場合はLambda関数をイベントで実行する方法で、別途Lambdaランチャーコンポーネントを使用して、イベントを設定して実行します。 ここでは説明していません。
- Necleus (
- コンポーネント名は3階層で以下の様に名付けられる
- 組織形態.組織名.パッケージ名前
- 例えば組織形態が商用であればcom。 このページでもcomとします。(商用ではないですが)
- 組織名は大体会社名。 このページではexampleとします。
- パッケージ名はHelloWorld等。
- なのでコンポーネント名は、com.example.HelloWorld になります。
- awsが提供しているコンポーネントはaws.greengrass.xxxx等になっています。
- デバイス内でビルド前のコンポーネントを作成するディレクトリは以下の構成で決まっています。
- ~/greengrassv2/artifacts/コンポーネント名/バージョン/ この下にpythonファイルを格納する。
- ~/greengrassv2/recipes/コンポーネント名/バージョン/ この下にrecipe.jsonファイルを格納する。 (私の場合ややこしいのでrecipe.jsonもpythonファイルと同じディレクトリに格納していています。)
- artifactとは成果物の事で、コンポーネントのソースコードや起動時の挙動設定のrecipe.json等になります。
- 複数のコンポーネントを作成する場合は、artifactsとrecipesディレクトリの下にコンポーネントディレクトリを作っていきます。 通常artifacts
- ビルドしたコンポーネントの場合はそこにRevisionもdirectory化して格納します。例えばs3の場合、作成してあるbucketの下に以下の様に格納されます。
- bucket名/コンポーネント名/Revision番号/コンポーネント名.zip
- 例えば、mybucket-ichiri-ap-northeast-1-id/com.example.HelloWorld/1.0.31/com.example.HelloWorld.zip
- Deploy(Deployment)
- Deployは動詞で、各コンポーネントの起動を各recipe.jsonや設定に基づき立上、エラーになった時の処理やデバッグ用のログ記録します。
- DeploymentはDeployの名詞
- 各DEPLOYMENTの状態表示
- Queued
- Deploymentの準備中。 IN-PROGRESSになる前の状態。
- In progress, IN–PROGRESS
- Deploymentが完了して成功する迄の間の場合の表示。
- 最初の文字以外小文字はAWSコンソール上の表示、全て大文字はデバイス上でgreengrass-cliを使った場合の表示。
- しかし、greengrass-cliを使ってDeployの状態をモニターした際ではDeployしたコンポーネントの一つでもエラー等で失敗した場合、RUNNINGに移行せずIN-PROGRESSのままになります。 なのでIN-PROGRESSが何分も続くようであればどれかコンポーネントが失敗していると思うので、デバイスのコンソールから各コンポーネントを確認する必要があります。
- Failed
- AWSコンソール上ではどれかコンポーネントが失敗したらFAILEDと表示されます。
- AWSコンソールとgreengrass-cliでの表示が異なるのが紛らわしい。
- AWSコンソールでは各コンポーネントの状態は確認できず、greengrass-cliで確認が必要。
- Succeeded
- 実行したDeployでのコンポーネントが全て起動した場合のAWSコンソール上の表示。
- 同じデバイスに対して既に異なるコンポーネントをDeployしていて、そのコンポーネントが失敗していても、今回のDeployが成功したらSucceededとなる。
- Queued
- 各コンポーネントの状態
- RUNNING
- Deploymentが成功して正常動作している事。 Deployは色々な処理をしているのでDeployしてコンポーネントが動作し始めるまで数十秒から数分かかる事もあるようです。
- デバイスのコンソールから各コンポーネントを確認した時に表示されます。
- BROKEN
- デバイスのコンソールから各コンポーネントを確認した時、エラーで動作していないコンポーネントに表示されます。
- この場合は、コンポーネントのログを見てデバッグします。
- RUNNING
- 各Core Deviceの状態
- Unhealthy
- AWS IoTでCore Deviceの状態をモニターした時に、そのCore Device上のコンポーネントが1つでも失敗していた時に表示されます。
- 多分他の問題発生時でもUnhealtyと表示されると思いますが、ここではコンポーネントに関連した内容を記してます。
- Unhealthy
HelloIchiri
ファイル作成
- Greengrassが動作しているCore Deviceでコンポーネントを作成し、Core DeviceからDeployします。
- まずコンポーネント用のディレクトリを作ります。
mkdir -p ~/greengrassv2/artifacts/com.example.HelloIchiri/1.0.0
- 上記で作成したディレクトリに以下のpythonファイルとrecipe.jsonを格納する。
import sys
import datetime

message="HI, %s!" % sys.argv[1]
message += " Greetings from your first Greengrass HAHAHAHAHAHAHA."
print(message,datetime.datetime.now())
上記の3行目は引数を取り込んで%sに代入されます。
{
  "RecipeFormatVersion": "2020-01-25",
  "ComponentName": "com.example.HelloIchiri",
  "ComponentVersion": "1.0.0",
  "ComponentConfiguration": {
    "DefaultConfiguration": {
      "Message": "Ichiri2"
    }
  },
  "Manifests": [
    {
      "Platform": {
        "os": "all"
      },
      "Lifecycle": {
        "run": "python3 -u ~/greengrassv2/artifacts/com.example.HelloIchiri/1.0.0/hello_ichiri.py {configuration:/Message}"
      }
    }
  ]
}
- recipe.jsonの通りに設定されます。
- RecipeFormatVersionの行は固定です。 この行は必須。
- ComponentNameがAWS上に表示されます。 またs3上に転送した時にディレクトリ名とzipファイル名に使われます。
- ComponentVersionがAWS表示されs3上のディレクトリ名に使われます。
- ComponentConfigurationのMessageが、runの部分でpyファイルの引数となっています。 この場合ichiri2がhello_ichiri.pyに受け渡されてHI, ichiri2!とprintされます。
デバイスからDeploy
- 初めてのDeployの場合は-mオプションなしのgreengras-cli deployment createコマンドでDeployします。
- この時、recipe.jsonのPATHを指定します。
- recipe.jsonにPythonプログラムのrun時の絶対パス指定しているので、–artifactDir以下は不要ですが、この値を取り込んでrecipe.jsonの内容を変更せずに異なる場所のPythonプログラムを実行できるので一応残しておきます。
- greengrass-cliはデバイス内のコマンドなので、実行されたデバイスにでDeployされます。
$ sudo greengrass-cli deployment create \
--recipeDir ~/greengrassv2/artifacts/com.example.HelloIchiri/1.0.0/recipe.json \
--artifactDir ~/greengrassv2/artifacts/com.example.HelloIchiri/1.0.0
コンポーネントが既にAWS IoTに存在してComponentsで確認できる場合、以下の様にしてどのデバイスに対しても複数のコンポーネンを指定してDeployする事も可能です。
//コンポーネント等も選んでデプロイ出来るみたい。
$ aws greengrassv2 create-deployment \
  --target-arn "arn:aws:iot:ap-northeast-1:<account_id>:thing/GG-gm1-00" \
  --components '{
    "aws.greengrass.Cli": {
      "componentVersion": "2.12.1"
    }
  }'
Deploy後のgreengrassサービスのログ確認
- 上記のDeployをする際2つのコンソールを開いておいて2つのログを確認します。
- 一つはgreengrass.logこれでそのDeploymentがどのように実行されているか分かります。
- そのDeploymentで他のコンポーネントの状況も表示されます。
- tailコマンドの-fオプションはリアルタイムに表示します。
- 抜ける時はCtrl+C
- 長い間放置しておくとログを表示しない場合があるのでその場合は、再起動。
- -fの代わりに-n 100とすると過去100行のログを表示します。
$ sudo tail -f /greengrass/v2/logs/greengrass.log
Deploy後のコンポーネントのログ確認
- もう一つは対象のコンポーネントのログです。
- このログにprint文の内容が表示されます。
- ログは最初非常に見ずらいですが、以下の様に構成されているので見るところは限られています。
- ログの時間
- ログの種類
- [INFO]ーー問題なし。 print文はここに表示されます。
- [WARN]ーー警告。 最悪対処しなくてもOKです。
- [ERROR]ーーこれは対処しないと動作しません。
- pool-3-thread-xx:これが今回のログの始まり。
- com.example.HelloIchiri: stdout. HI, Ichiri2! Greetings from your first Greengrass HAHAHAHAHAHAHA. 2024-05-20 06:56:28.680356.の部分は
- com.example.HelloIchiriから『HI, ichiri2…2024-05-20 06:56:28.680356.』がstdout(print文等の標準出力)に出力されたと表示しています。
- 何回もログを見ていたらすぐ見慣れてきます。
$ sudo tail -f /greengrass/v2/logs/com.example.HelloIchiri.log

2024-05-20T06:56:28.564Z [INFO] (pool-3-thread-69) com.example.HelloIchiri: shell-runner-start. {scriptName=services.com.example.HelloIchiri.lifecycle.run, serviceName=com.example.HelloIchiri, currentState=STARTING, command=["python3 -u /home/petalinux/greengrassv2/artifacts/com.example.HelloIchiri/1.0...."]}
2024-05-20T06:56:28.680Z [INFO] (Copier) com.example.HelloIchiri: stdout. HI, Ichiri2! Greetings from your first Greengrass HAHAHAHAHAHAHA. 2024-05-20 06:56:28.680356. {scriptName=services.com.example.HelloIchiri.lifecycle.run, serviceName=com.example.HelloIchiri, currentState=RUNNING}
2024-05-20T06:56:28.706Z [INFO] (Copier) com.example.HelloIchiri: Run script exited. {exitCode=0, serviceName=com.example.HelloIchiri, currentState=RUNNING}
(参考) Greengrassサービス起動時のログ確認
- Greengrassを起動させた時のログ。 その2で使用しますが、Deploy時は既にGreengrassが立ち上がっているのでこれは使用しません。
- このログは電源を切ると消えて最初からログが始まるみたい。
- スペースかPageDnを押すと改ページ出来る。 PageUPで戻れる。 『q』でコンソールに抜ける(exit)。
$ sudo journalctl -u greengrass
Deployment確認
起動したDeploymentの状態を確認します。
- core device名を指定する方法が現在起動状況を表示するのでデバッグに役立ちます。 AWSコンソールの表示と同じSUCEESSFUL、FAILEDなどで表示されます。
- greengrass-cliコマンドと違いawsコマンドはAWSクラウドに対してのコマンドです。 結果はクラウドからの返信を受けて表示されます。 なのでデバイス内でなくアカウント内で、しかもgreengrass以外のサービスにも対応しています。
$ aws greengrassv2 list-effective-deployments \
--core-device-thing-name GG-gm1-00
以下の方法はアカウント内で過去にDeployしたDeploymentsが表示されます。 どのThing名に対して現在ACTIVE(使用中)なのかINACTIVE(未使用中)で表示されます。 これはDeployment番号を検索する際にも便利です。
$ aws greengrassv2 list-deployments
Deployment-idの確認はAWS IoTでも確認できます。
『IoT』~『Deployment』~『IoT job』~『Job document』
コンポーネント確認
デバイス内の現在のDeploymentで実行されているコンポーネント名、バージョン、状態(State)、Configurationの値の一覧が表示されます。 今回のcom.example.HelloIchiriはprintして終了(exit)するので以下を実行するとFINISHEDとなる。
$ sudo greengrass-cli component list
コンポーネントの停止、再起動
- FINISHEDのコンポーネントのrestart(再起動)です。 restartはありますがstartはありません。
- while文等でRUNNING状態のコンポーネントのstop(停止)です。
- コンポーネントのデバッグ時にめっちゃ使います。
- HelloIchiriは実行後してすぐ終了するのでstopは出来ません。
- BROKEN、Failedの状態のコンポーネントはrestart出来ません。 BROKEN、Failedの場合コンポーネントをDeploymentから削除した後、コンポーネントの追加か、コンポーネント能作おjでDeployment自体もなくなってしまったときは再度Deployすると再実行出来ます。
$ sudo greengrass-cli component restart --names "com.example.HelloIchiri"
$ sudo greengrass-cli component stop --names "com.example.HelloIchiri"

//以下の方法だと起動数秒後に自動的に止まるので便利。
$ sudo greengrass-cli component restart --names "com.example.HelloIchiri" && sleep 2 && sudo greengrass-cli component stop --names "com.example.HelloIchiri"
コンポーネント追加
既存のDeploymentがある場合にコンポーネントを追加する時は–mergeオプションを使います。
$ sudo greengrass-cli deployment create \
--recipeDir ~/greengrassv2/artifacts/com.example.HelloIchiri/1.0.0/recipe.json \
--artifactDir ~/greengrassv2/artifacts/com.example.HelloIchiri/1.0.0 \
--merge com.example.HelloIchiri=1.0.0
コンポーネント削除
特定のコンポーネントをDeploymentから削除する場合は、–removeオプションを使います。 削除すると再度同じバージョンのコンポーネントをDeploy出来ます。 この場合、他のidやgroup等を指定していないので、デバイス内のDeployの中から指定したコンポーネント削除します。 しかしそのコンポーネントの状態がBROKENの場合はgreengrass-cliではremoveできず、AWS IoTのコンソールからDeploymentのAction->Reviseでremoveしたいコンポーネントのチェックを外してDeployする必要があります。
$ sudo greengrass-cli deployment create \
--remove com.example.HelloIchiri
Deployment削除
Deployment自体を削除(Cancel)する場合、Deployした時表示されたDeployment idを指定してCancelします。
$ aws greengrassv2 cancel-deployment \
--deployment-id 22515de1-df9b-48bb-b840-2c22eb199a6b
トラブル解決
私の場合、uBuntuでは以下の問題は発生しませんでしたが、Petalinuxでは問題があり以下の方法で解決しました。 これらの問題が発生せずにコンポーネントを起動できている場合は読み飛ばしてください。
(1) java command not found
systemctl status greengrass.serviceを見るとloadedとなっていて、activeにならなかった。 その為、デプロイしてもRUNNINGにならず、ずっとIN_PROGRESSだった。 そこで(1) のコマンドでログメッセージを見ると最初はjava command not foundとなり、javaのPATHが通っておらず、greengrass.serviceにEnvironment=”PATH=/usr/lib/jvm/java-11-amazon-corretto/bin:/usr/local/binを追加した。 すると今度は、『Suppressed: java.io.IOException: Failed to create user with adduser , command : adduser -S ggc_user』と出たので/usr/sbinへのPATHが通っていないので、以下の様にまとめてPATHにディレクトリを追加した。 greengrass.serviceのPATHは/etc/environmentや/etc/profileのPATHを反映しないらしい。 geengrass
[Unit]
Description=Greengrass Core
After=network.target

[Service]
Environment="PATH=/usr/lib/jvm/java-11-amazon-corretto/bin:/usr/local/bin:/usr/bin:/bin:/usr/local/sbin:/usr/bin:/bin:/usr/sbin:/sbin:/opt/xilinx/bin:/usr/local/sbin:/usr/sbin:/sbin"
Type=simple
PIDFile=/greengrass/v2/alts/loader.pid
RemainAfterExit=no
Restart=on-failure
RestartSec=10
ExecStart=/bin/sh /greengrass/v2/alts/current/distro/bin/loader
KillMode=mixed

[Install]
WantedBy=multi-user.target
(2) UNAUTHORIZED_NUCLEUS_MINOR_VERSION_UPDATE
今回はAWSに保護サイトのサンプルでデプロイしたので、aws.greengrass.Nucleus-2.11.3の指定でデプロイしたので止まっていた。 なのでインストールしたaws.greengrass.Nucleus-2.12.1の番号に変えて再度デプロイしたらRUNNINGとなった。 DeployするときNucleusと書かれているコンポーネントが
2023-12-20T02:37:07.384Z [ERROR] (pool-2-thread-9) com.aws.greengrass.deployment.DeploymentService: Deployment task failed with following errors. {DeploymentId=arn:aws:greengrass:ap-northeast-1:<account_id>:configuration:thing/GG-gm1-00:9, detailed-deployment-status=FAILED_NO_STATE_CHANGE, deployment-error-types=[REQUEST_ERROR], GreengrassDeploymentId=18483e48-767e-45ca-8c82-496610c8503e, serviceName=DeploymentService, currentState=RUNNING, deployment-error-stack=[DEPLOYMENT_FAILURE, UNAUTHORIZED_NUCLEUS_MINOR_VERSION_UPDATE]}
com.aws.greengrass.componentmanager.exceptions.PackagingException: The deployment attempts to update the nucleus from aws.greengrass.Nucleus-2.12.1 to aws.greengrass.Nucleus-2.11.3 but no component of type nucleus was included as target component, please add the desired nucleus version as top level component if you wish to update the nucleus to a different minor/major version
java.lang.RuntimeException: Unable to create ipc client
AWSのサンプルプログラムを走らそうとgreengrass-cli deployment createとしたら、このエラーで止まりました。 このエラーは上記の2つの対策を施すと解決しました。
java.lang.RuntimeException: Unable to create ipc client
        at com.aws.greengrass.cli.adapter.impl.NucleusAdapterIpcClientImpl.getIpcClient(NucleusAdapterIpcClientImpl.java:509)
        at com.aws.greengrass.cli.adapter.impl.NucleusAdapterIpcClientImpl.createLocalDeployment(NucleusAdapterIpcClientImpl.java:198)
        at com.aws.greengrass.cli.commands.DeploymentCommand.create(DeploymentCommand.java:137)
        at java.base/jdk.internal.reflect.NativeMethodAccessorImpl.invoke0(Native Method)
        at java.base/jdk.internal.reflect.NativeMethodAccessorImpl.invoke(NativeMethodAccessorImpl.java:62)
        at java.base/jdk.internal.reflect.DelegatingMethodAccessorImpl.invoke(DelegatingMethodAccessorImpl.java:43)
        at java.base/java.lang.reflect.Method.invoke(Method.java:566)
        at picocli.CommandLine.executeUserObject(CommandLine.java:1952)
        at picocli.CommandLine.access$1100(CommandLine.java:145)
        at picocli.CommandLine$RunLast.executeUserObjectOfLastSubcommandWithSameParent(CommandLine.java:2332)
        at picocli.CommandLine$RunLast.handle(CommandLine.java:2326)
        at picocli.CommandLine$RunLast.handle(CommandLine.java:2291)
        at picocli.CommandLine$AbstractParseResultHandler.execute(CommandLine.java:2159)
        at picocli.CommandLine.execute(CommandLine.java:2058)
        at com.aws.greengrass.cli.CLI.main(CLI.java:59)
Caused by: software.amazon.awssdk.crt.CrtRuntimeException: socket connection refused. AWS_IO_SOCKET_CONNECTION_REFUSED(1047)
        at software.amazon.awssdk.crt.eventstream.ClientConnection.connect(ClientConnection.java:174)
        at software.amazon.awssdk.eventstreamrpc.EventStreamRPCConnection.connect(EventStreamRPCConnection.java:92)
        at com.aws.greengrass.cli.adapter.impl.NucleusAdapterIpcClientImpl.connectToGGCOverEventStreamIPC(NucleusAdapterIpcClientImpl.java:526)
        at com.aws.greengrass.cli.adapter.impl.NucleusAdapterIpcClientImpl.getIpcClient(NucleusAdapterIpcClientImpl.java:503)
        ... 14 more
peta:/$ java.lang.RuntimeException: Unable to create ipc client
Configuration変更
各コンポーネントはrecipe.jsonで記述したDefaultConfiguration(初期設定)値があります。 com.example.HelloIchiriではDefaultConfigurationのMessageに『ichiri2』と入っています。 この値は、Configuration{“Message”:この値}に入ります。 今回設定はMessageだけですが、いくつでも設定する事が出来ます。 この設定値ichiri2からichiri3-20340521に変更します。
- RESETで既に入っている値を消します。
- [“”]とすると全ての設定値を初期値に戻します。
- [“Message”,”xxx”,”yyy”, …]と指定する事も出来ます。
- MERGEで値の追加(上書き)をします。
{
  "com.example.HelloIchiri":{
    "RESET":[""],
    "MERGE": {
      "Message": "ichiri3-20240521"
    }
  }
}
Deployしているコンポーネントとバージョンを指定してMergeします。 実行したらコンポーネントを確認してみます。
$ sudo greengrass-cli deployment create \
--merge com.example.HelloIchiri=1.0.0 \
--update-config ~/greengrassv2/artifacts/com.example.HelloIchiri/1.0.0/config-update.json

$ sudo greengrass-cli component list
Components currently running in Greengrass:
Component Name: com.example.HelloIchiri
    Version: 1.0.0
    State: RUNNING
    Configuration: {"Message":"ichiri3-20240521"} <==ここ
com.example.Publish
ここでは、AWS IoT Coreにメッセージを送信(Publish)します。
- gdk(greengrass development kit)をインストール
- com.example.Publish作成
- s3 bucketを作成
- s3へのファイル書き込み権限をCore DeviceのCertificateにAttachされている元のRole(Certificate<-Policy<-RoleAlias<-Role)に追加する。 (allow s3:put*)
- デバイスでgdkでコンポーネントをビルドして
- デバイスからgdkでコンポーネントをs3に格納(publish)して
- AWS IoTでDeployして確認
- コンソールからコンポーネントをCore DeviceにDeployします
- そしてAWS IoTのTestでPublishされた値をモニターします。
gdkインストール
最新VersionはGitHubリポジトリを見てください。 以下は現時点での最新1.6.2にしています。 gdk –helpが実行できたら完了です。 gdk command not foundになったら、 /home/を PATH に追加してみてください。<user_name>/.local/bin
$ python3 -m pip install -U git+https://github.com/aws-greengrass/aws-greengrass-gdk-cli.git@v1.6.2

$ gdk --help
gitがないというエラーになる場合は以下のようにgitをインストールしてから再度実行してください。
$ sudo apt update
$ sudo apt install git
com.example.Publish作成
$ mkdir ~/greengrassv2/artifacts/com.example.Publish
“ichiri2/topic”というTopicにMessageをPublishします。
import time
import json
import awsiot.greengrasscoreipc
from awsiot.greengrasscoreipc.model import (
    QOS,
    PublishToIoTCoreRequest
)

TIMEOUT = 10
topic = "ichiri2/topic"
qos = QOS.AT_LEAST_ONCE

ipc_client = awsiot.greengrasscoreipc.connect()

print("? publisher start.")

for i in range(5):
    message = {
        "key1": "ichiri2",
        "key2": "male",
        "key3": "Japan",
        "counter": i
    }

    request = PublishToIoTCoreRequest()
    request.topic_name = topic
    request.payload = json.dumps(message).encode('utf-8')
    request.qos = qos

    operation = ipc_client.new_publish_to_iot_core()
    operation.activate(request)
    future = operation.get_response()
    future.result(TIMEOUT)

    print("? publish :{}".format(message))
    time.sleep(5)
- gdkを使う場合、recipe.jsonのManifestsの後に[ ]が必要。これは通常os:linuxとos:windowsなど、osの違いを配列にする為に使用されるが、linuxしか使わない場合でもgdkは配列番号(indices)を取得しようとするので、[ ]をつけて配列を与えてあげないとgdk component buildでエラーになる。
- main.py実行される前に『install』で必要なライブラリをpipでインストールする。
- 複数ライブラリをインストールする場合は、awsiotsdkに半角スペース区切りでライブラリ名を連ねていく。
- s3://BUCKET_NAME/COMPONENT_NAME/COMPONENT_VERSIONの値は、AWSでこのコンポーネントをDeployした際にGreengrassに引き渡されて、Greengrassがそのディレクトリにzipファイルを取りに行きます。
- その後、Greengrassがzipを解凍し、{artifacts:decompressedPath}の値を受け渡します。
- accessControlでは全てのTopicに対してPublishとSubscribeできるように”*”を指定しています。
{
    "RecipeFormatVersion": "2020-01-25",
    "ComponentName": "com.example.Publish",
    "ComponentVersion": "1.3.0",
    "ComponentType": "aws.greengrass.generic",
    "ComponentDescription": "This publishes value to topic.",
    "ComponentPublisher": "ichiri",
    "ComponentConfiguration": {
        "DefaultConfiguration": {
          "accessControl": {
            "aws.greengrass.ipc.mqttproxy": {
              "com.example.Publish:publish:1": {
                "operations": [
                  "aws.greengrass#PublishToIoTCore",
                  "aws.greengrass#PublishToTopic",
                  "aws.greengrass#SubscribeToTopic"
                ],
                "resources": [
                  "*"
                ]
              }
            }
          }
        }
    },
    "Manifests": [
      {
        "Lifecycle": {
          "install": "python3 -m pip install --user awsiotsdk --upgrade",
          "run": "python3 -u {artifacts:decompressedPath}/com.example.Publish/main.py"
        },
        "Artifacts": [
          {
            "Uri": "s3://BUCKET_NAME/COMPONENT_NAME/COMPONENT_VERSION/com.example.Publish.zip",
            "Unarchive": "ZIP"
          }
        ]
      }]
  }
- gdkでビルドやPublishする為のConfigurationファイルを作成します。
- NEXT_PATCHとしておくと、自動的にRevision番号をインクリメントして、Bucketにディレクトリを作成して格納してくれます。 そしてAWSのコンポーネントのバージョンの表示も自動的に更新されます。
ichiri_topic/003″
18 ]
s3 bucketを作成
もしかしたらCore DeviceのRoleにs3:CreateBucket権限があれば自動的に作成してくれたかもしれませんが、念のため作成しておきます。Tokyoリージョンに以下の3つを『-』でつなぎ合わせた名前のBucketを作らないといけません。
- gdk-config.jsonのbucketに記述した名前
- リージョン名、Tokyoリージョンなので、ap-northeast-1
- 12桁のアカウントID
なので私の場合bucket名はこんな感じになります。
mybucket-tokyo-ichiri-ap-northeast-1-123456789012
s3へのファイル書き込み権限
- 『IAM』に移動
- 『Roles』選択
- 『その2』で作った『GreengrassV2TokenExchangeRole』を選択
- このRoleのAliasがPolicyに変換され、Core DeviceのCertificateにAttachされているので、このRoleに権限を追加されると、Core Deviceの権限となる。
- 『Add permssions』~『Attach policies』
- 『AmazonS3FullAccess』にチェックを入れ『Add permissions』
- FullAccessは危険ですが、ここでは一つ一つ検証できないので一旦FullAccessを選択しておきます。 慣れてきたら必要な権限だけに絞って行ってください。
デバイスでgdkでコンポーネントをビルド~s3へPublish
- pyファイル、recipe.json、gdk-config.jsonが全て格納されてディレクトリに移動します。(上記では~/greengrassv2/artifacts/com.example.Publish/に格納しています。)
- gdkは実行されたディレクトリ内のgdk-config.jsonを探します。
- これでコンポーネントがビルドされs3にPublishされます。
$ cd ~/greengrassv2/artifacts/com.example.Publish/
$ gdk component build & gdk component publish
- s3に見に行ってみましょう。
- mybucket-tokyo-ichiri-ap-northeast-1-123456789012/の下に、com.example.Publish/1.0.0/com.example.Publish.zipが格納されていると思います。
- ソースコードを変更して、再度build & publishをすると/1.0.1/が作成されています。
- recipe.jsonの1.3.0のマイナーバージョンの3が何故採用されないのかはわかっていません。
AWS IoT Core
- AWS IoT Coreページを2つ開きます。
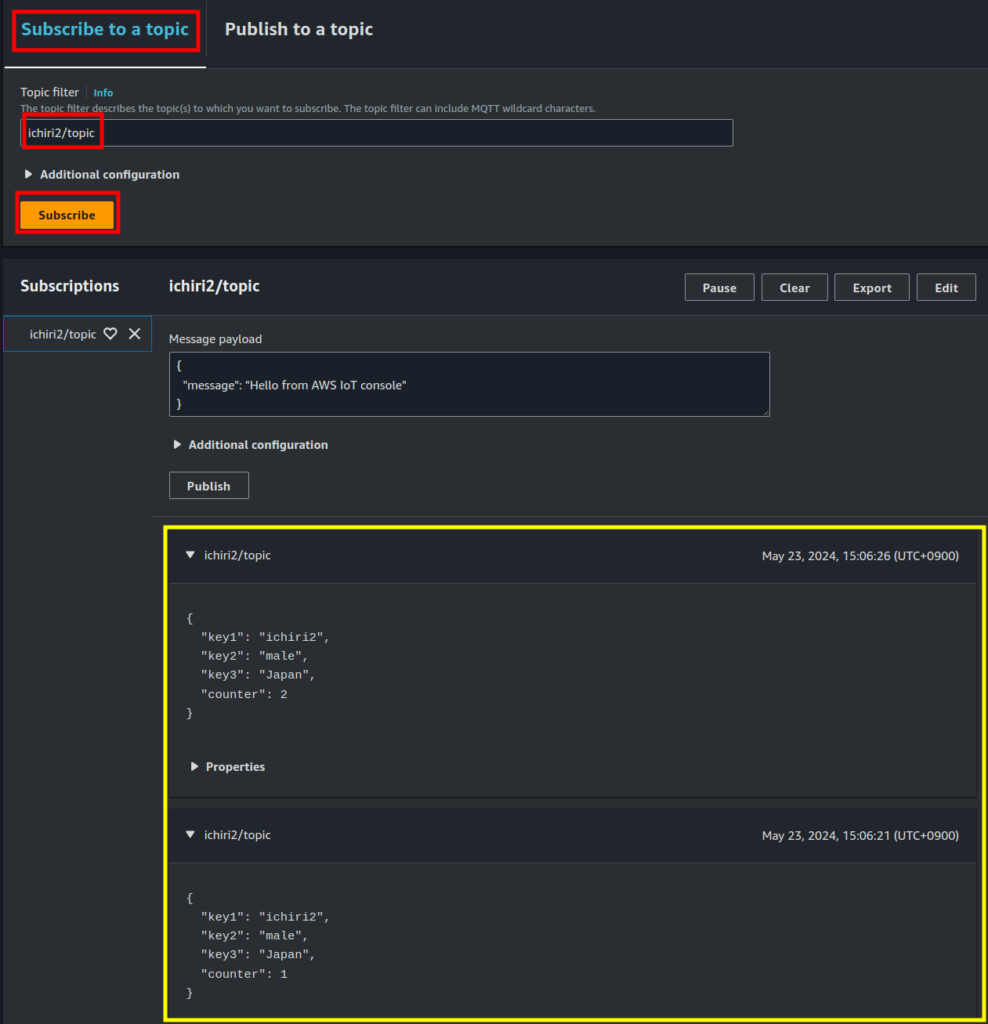
- 一つ目は、左のメニューの『MQTT test client』をクリック
- 『Subscribe to a topic』で”ichiri2/topic”と入力。(Pythonプログラムで指定したTopic名。MQTTの仕様では最大255文字。 今回の例は2階層ですが10階層にしても構いません。 例えば、拠点名/ビル名/フロア/エリア/装置名/デバイス/信号名/Attributeなど。 MQTTは受信時に階層ごとにワイルドカード『*』を使って受信することも可能です。)
- 実際にcom.example.Publishを実行したら黄色枠の部分にメッセージ内容が表示されます。
- この画面は開いたままにしておきます。
コンポーネントをAWS IoTからDeploy
- もう一つの画面を開いて『IoT』に移動
- 『Manage』~『Greengrass devices』~『Components』をクリック
- 『com.example.Publish』をクリック
- 右上にある『Deploy』をクリック
- 『Create new deployment』を選択し『Next』。
- もし既存Deploymentにコンポーネントを追加したい場合は『Add to existing deployment』を選択して、表示されているDeploymentをクリック。 しかし今回は新規でするので『Create new deployment』をします。
- Deployment nameを記述して、作成してあるThing groupを選択して『Next』
- もし『Target has a configuration』と表示されたら既にそのThing groupにはDeploymentが存在するので、『Next』を押すと既存のDeploymentと共にDeployしたコンポーネントは削除され、新たにDeploymentが起動されます。 新たにDeploymentを作るときaws.greengrass.Cliやaws.greengrass.Nucleus等を選び直さないといけないので、『Revise deployment』をクリックします。 これで既存のDeploymentにcom.example.Publishを追加して起動してくれます。
- 『Next』〜『Next』〜『Next』〜『Next』
- 画面をスクロールダウンして一番下の右にある『Deploy』をクリック
- 更新ボタン
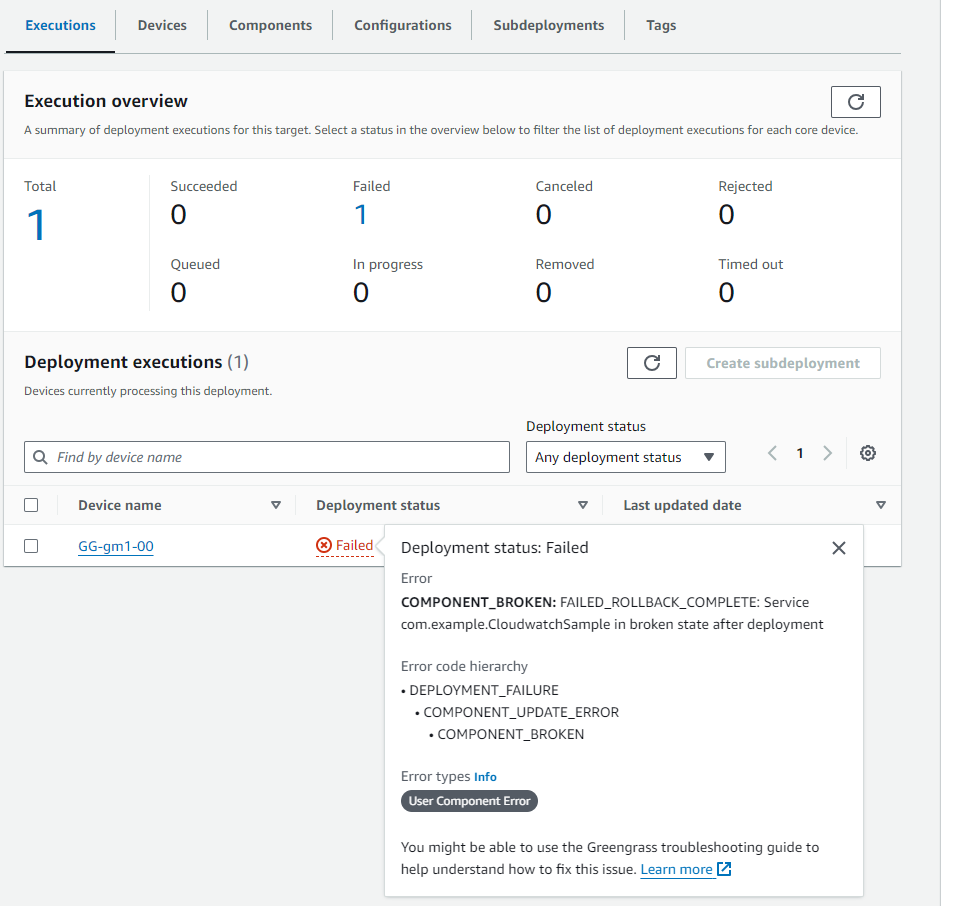
 をクリックして進捗や結果を表示します。 Succeededになればコンポーネントは正常に動作完了しました。
 - Succeededになったら既にPublishは終わっているので、MQTT test clientを見てみましょう。 受信していれば成功です。
- FailedとなったらFailedにカーソル焦点を当てるとFailedの原因が表示されます。 何のことか分かりにくいのですがヒントにはなります。(以下はcom.example.CloudwatchSmapleというコンポーネント実行時なのでcom.example.Publishと表示されていません。)
- Failedの場合、com.example.Publish.logのログを見てみましょう。
$ sudo tail -n 200 /greengrass/v2/logs/com.example.Publish.log

$ sudo tail -f /greengrass/v2/logs/com.example.Publish.log
成功後再度restartしたい場合は以下でrestartできます。
$ sudo greengrass-cli component restart --names "com.example.Publish"

$ sudo greengrass-cli component restart --names "com.example.Publish" && sleep 2 && sudo greengrass-cli component stop --names "com.example.Publish"
com.example.Subscribe
- Publishと一緒です。
- recipeはJSONでもYAMLでもよいので今回はrecipe.yaml形式にします。
$ mkdir ~/greengrassv2/artifacts/com.example.Subscribe
最初コンポーネントがうまく動作しなかったのでrecipe.yamlを何度も変更してDeployしていましたが、変更した部分が採用されなかったので、AWS IoTからDeployment~Reviseで一旦com.example.Subscribeコンポーネントを削除して、再度Deployしたら新しいrecipe.yamlが採用されました。バグかなぁ。
---
RecipeFormatVersion: "2020-01-25"
ComponentName: "com.example.Subscribe"
ComponentVersion: "1.0.0"
ComponentType: "aws.greengrass.generic"
ComponentDescription: "This subscribes value from topic."
ComponentPublisher: "ichiri"
ComponentConfiguration:
  DefaultConfiguration: AWS IoTからDeploy
    accessControl:
      aws.greengrass.ipc.mqttproxy:
        com.example.Subscribe:mqttproxy:1:
          operations:
          - "aws.greengrass#PublishToIoTCore"
          - "aws.greengrass#SubscribeToIoTCore"
          resources:
          - "*"
Manifests:
- platform:
    os: "linux"
  Lifecycle:
    install: "python3 -m pip install --user awsiotsdk --upgrade"
    run: "python3 -u {artifacts:decompressedPath}/com.example.Subscribe/main.py"
  Artifacts:
  - Uri: "s3://BUCKET_NAME/COMPONENT_NAME/COMPONENT_VERSION/com.example.Subscribe.zip"
    Unarchive: "ZIP"
import time
import awsiot.greengrasscoreipc
import awsiot.greengrasscoreipc.client as client
from awsiot.greengrasscoreipc.model import (
    IoTCoreMessage,
    QOS,
    SubscribeToIoTCoreRequest
)

TIMEOUT = 10
topic = "ichiri3/japan"
qos = QOS.AT_MOST_ONCE

ipc_client = awsiot.greengrasscoreipc.connect()

print("? subscriber start.")

class StreamHandler(client.SubscribeToIoTCoreStreamHandler):geengrass
    def __init__(self):
        super().__init__()

    def on_stream_event(self, event: IoTCoreMessage) -> None:
        message = str(event.message.payload, "utf-8")
        print("? payload:{}".format(message))

    def on_stream_error(self, error: Exception) -> bool:
        return True

    def on_stream_closed(self) -> None:
        pass

request = SubscribeToIoTCoreRequest()
request.topic_name = topic
request.qos = qos
handler = StreamHandler()
operation = ipc_client.new_subscribe_to_iot_core(handler)
future = operation.activate(request)
future.result(TIMEOUT)

while True:
    time.sleep(1)

operation.close()
print("? subscriber finish. ***************ichiri*************")
{
    "component": {
      "com.example.Subscribe": {
        "author": "ichiri",
        "version": "NEXT_PATCH",
        "build": {
          "build_system" : "zip"
        },
        "publish": {
          "region": "ap-northeast-1",
          "bucket": "mybucket-tokyo-ichiri"
        }
      }
    },
    "gdk_version": "1.0.0"
  }
com.example.Publishと同様にコンポーネントをビルドしてPublishします。
$ cd ~/greengrassv2/artifacts/com.example.Subscribe/
$ gdk component build & gdk component publish
com.example.Publishと同様にコンポーネントをAWS IoTからDeployします。
MQTT test clientからpublish
前回はデバイス上のcom.example.PublishからpublishされたメッセージをMQTT test clientで受け取りましたが、今度はMQTT test clientでメッセージをpublishしてデバイス上のcom.example.Subscribeで受け取ります。
- 『IoT』に移動
- 『MQTT test clientt』をクリック
- 『Publish to a topic』をクリック
- Topic nameに”ichiri3/japan”と入れる。(main.pyのtopicに指定したのと同じにする)
- Message Payloadの{ }内にJSON形式で記入して『Publish』ボタンをクリック
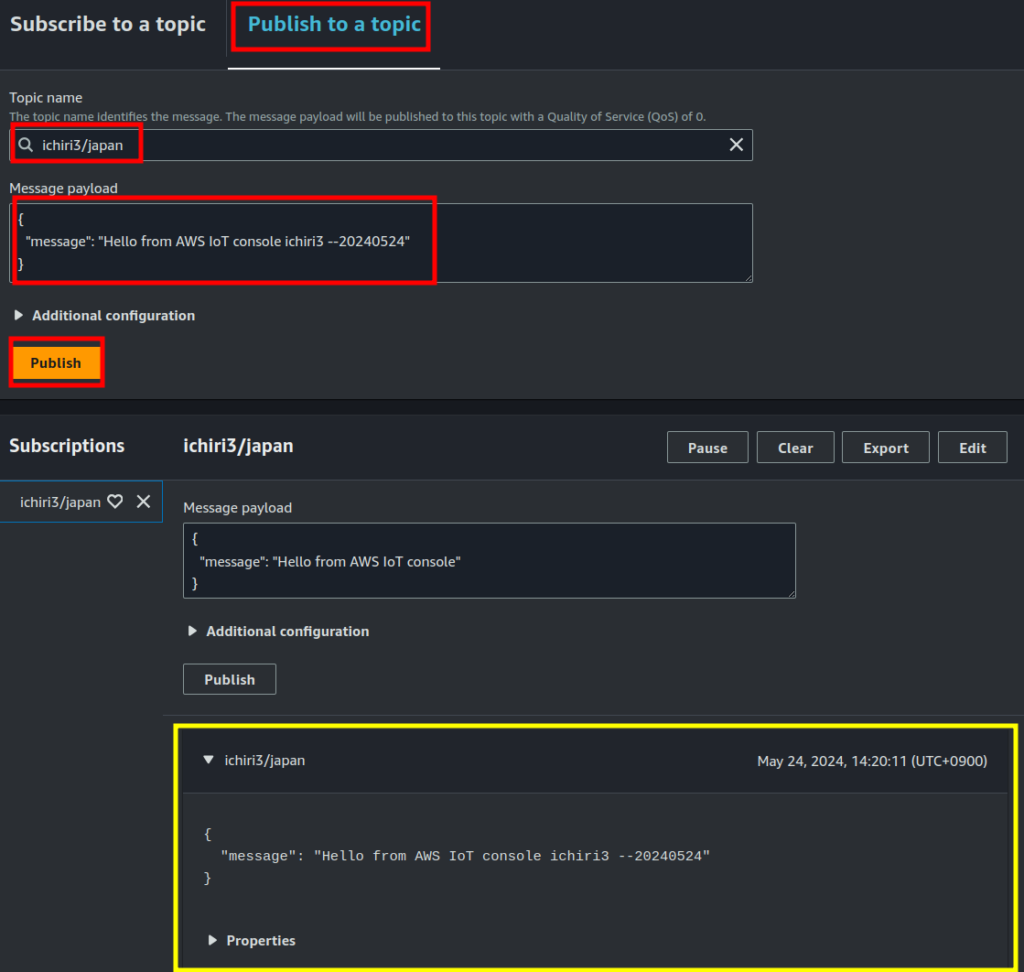
上記の黄色枠は『Publish to a topic』をする前に、『Subscribe to a topic』でTopic nameに”ichiri3/japan”といれ『Subscribe』をクリックしておくと、この黄色枠にAWT IoTのMQTT test clientがPublishしたものを同時にSubscribeして表示しています。 MQTTではPublishされたメッセージはBrokerを通してPublishしたClient含む全てのClientに送信されます。 そのメッセージを受け取るフィルターとなるのがtopicです。 topicはtopic filterとも呼びます。
さて実行出来たらログを見てみます。 Messageの{ }内に書いた『com.example.Subscribe: stdout. “message”: “Hello from AWS IoT console ichiri3 –20240524”.』と表示されていたら無事Subscribe出来ています。
$ sudo tail -n 50 /greengrass/v2/logs/com.example.Subscribe.log

2024-05-24T05:00:09.706Z [INFO] (pool-3-thread-57) com.example.Subscribe: shell-runner-start. {scriptName=services.com.example.Subscribe.lifecycle.install, serviceName=com.example.Subscribe, currentState=NEW, command=["python3 -m pip install --user awsiotsdk --upgrade"]}
2024-05-24T05:00:09.925Z [INFO] (Copier) com.example.Subscribe: stdout. Requirement already satisfied: awsiotsdk in /home/ggc_user/.local/lib/python3.10/site-packages (1.21.5). {scriptName=services.com.example.Subscribe.lifecycle.install, serviceName=com.example.Subscribe, currentState=NEW}
2024-05-24T05:00:10.567Z [INFO] (Copier) com.example.Subscribe: stdout. Requirement already satisfied: awscrt==0.20.10 in /home/ggc_user/.local/lib/python3.10/site-packages (from awsiotsdk) (0.20.10). {scriptName=services.com.example.Subscribe.lifecycle.install, serviceName=com.example.Subscribe, currentState=NEW}
2024-05-24T05:00:10.641Z [INFO] (pool-3-thread-57) com.example.Subscribe: shell-runner-start. {scriptName=services.com.example.Subscribe.lifecycle.run, serviceName=com.example.Subscribe, currentState=STARTING, command=["python3 -u /greengrass/v2/packages/artifacts-unarchived/com.example.Subscribe/..."]}
2024-05-24T05:00:10.679Z [INFO] (Copier) com.example.Subscribe: stdout. ? subscriber start.. {scriptName=services.com.example.Subscribe.lifecycle.run, serviceName=com.example.Subscribe, currentState=RUNNING}
2024-05-24T05:04:00.562Z [INFO] (Copier) com.example.Subscribe: stdout. ? payload:{. {scriptName=services.com.example.Subscribe.lifecycle.run, serviceName=com.example.Subscribe, currentState=RUNNING}
2024-05-24T05:04:00.562Z [INFO] (Copier) com.example.Subscribe: stdout. "message": "Hello from AWS IoT console ichiri3 --20240524". {scriptName=services.com.example.Subscribe.lifecycle.run, serviceName=com.example.Subscribe, currentState=RUNNING}
2024-05-24T05:04:00.562Z [INFO] (Copier) com.example.Subscribe: stdout. }. {scriptName=services.com.example.Subscribe.lifecycle.run, serviceName=com.example.Subscribe, currentState=RUNNING}
表示されなかったときは、com.example.Publish同様以下の手順でみてみましょう。
- $ greengrass-cli component listを確認
- BROKENならコンポーネントが立ち上がっていません。 この原因をgreengrass.logを見て調べます。
- RUNNINGならコンポーネントは立ち上がっています。 トピックの綴が間違っているか、recipe.yamlのaccessControl権限が間違っているか等が考えられます。 greengrass.logを見て調べます。
- sudo tail -n 100 /greengrass/v2/logs/geengrass.log を調べます。
- 私の場合、ここに以下のエラーが出ていました。
- aws.greengrass.ipc.mqttproxyのoperationの中に、使用できないcom.example.Subscribe:publish:1が含まれていると表示されています。 これは前のVersionのrecipe.yamlだったので、コンポーネントを一旦削除して再度Deployして立ち上がりました。
- [ERROR] (Serialized listener processor) com.aws.greengrass.authorization.AuthorizationHandler: load-authorization-config-invalid-operation. Component aws.greengrass.ipc.mqttproxy contains an invalid operation in policy com.example.Subscribe:publish:1. {}
- sudo tail -n 100 /greengrass/v2/logs/com.example.Subscribe.log を調べます。
★コンポーネント用コマンド
よく使うコマンドをまとめておきます。
$ aws greengrassv2 list-effective-deployments --core-device-thing-name GG-gm1-00

//これでDeploymentの各Componentの状態が見れる。 全てRUNNINGかFINISHEDが良い状態(Healthy)。 BROKENならgreengrass.logで詳細確認。
//Confiugration:{"Message":この内容が見れる。}
$ sudo greengrass-cli component list

//Deploy状態を確認。 なにかコンポーネントがDeploy出来なかったらエラーとして表示されます。
$ sudo tail -n 200 /greengrass/v2/logs/greengrass.log


//これでコンポーネントが発行したprint文の出力を見れる。
// -f はprint文実行時にはリアルタイムに表示されますが、過去歴が短いのでエラーを見つけるには適していません。
$ sudo tail -f /greengrass/v2/logs/com.example.Publish.log

// -n 200は最新の200行のログを表示します。 私が使って50や100では短いと感じたので200にしています。
$ sudo tail -n 200 /greengrass/v2/logs/com.example.Publish.log

//コンポーネントの再起動、停止
$ sudo greengrass-cli component restart --names "com.example.Publish"
$ sudo greengrass-cli component stop --names "com.example.Publish"
//以下の方法だと一回いれたら自動的に止まるので便利。
$ sudo greengrass-cli component restart --names "com.example.Publish" && sleep 2 && sudo greengrass-cli component stop --names "com.example.Publish"

//以下はAWS画面の方が簡単なのであまり使いませんがおいておきます。
$ aws greengrassv2 get-core-device --core-device-thing-name GG-gm1-00
$ aws greengrassv2 list-core-devices --thing-group-arn "arn:aws:iot:ap-northeast-1:<account_id>:thing/GG-gm1-00"
aws Battery コンポーネント tutorial
- AWSのTutorial 日本語
- 一応参考までに残しておきます。
- 以下の設定で、『bucket』には既存のBucket名を入れないとエラーになった。
- そして、gdk component publishで発行したら、s3コンソールに表示され、GreengrassのDeploymentのcomponentの選択にも表示された。
- gdk(Greengrass Development Kit)は別途Core Deviceにインストールしなければならない。
{
    "component": {
      "com.example.BatteryAwareHelloWorld": {
        "author": "ichiri",
        "version": "NEXT_PATCH",
        "build": {ClassMethod
          "build_system" : "zip"
        },
        "publish": {
          "region": "ap-northeast-1",
          "bucket": "mybucket-tokyo-ichiri"
        }
      }
    },
    "gdk_version": "1.0.0"
  }
- componentはrecipeを見て実行(Deploy)される。
- 大文字の『BUCKET_NAME/COMPONENT_NAME/COMPONENT_VERSION』の部分は自動的に代入してくれる。
- recipe.json、pyプログラム、gdk-config.jsonは同じディレクトリに入れる事
- そのディレクトリでgdk component buildとすると自動でzipファイルを作り、s3ディレクトリに挙げてくれる。 URLも入れてくれるのでgdkを使うのが便利。
{
  "RecipeFormatVersion": "2020-01-25",
  "ComponentName": "com.example.BatteryAwareHelloWorld",
  "ComponentVersion": "1.0.0",
  "ComponentType": "aws.greengrass.generic",
  "ComponentDescription": "This Hello World component defers updates when the battery level is below a threshold.",
  "ComponentPublisher": "ichiri",
  "ComponentConfiguration": {
    "DefaultConfiguration": {
      "BatteryThreshold": 50,
      "LinuxBatteryFilePath": "/home/ggc_user/virtual_battery.json",
      "WindowsBatteryFilePath": "C:\\Users\\ggc_user\\virtual_battery.json"
    }
  },
  "Manifests": [
    {
      "Platform": {
        "os": "linux"
      },ClassMethod
      "Lifecycle": {
        "install": "python3 -m pip install --user awsiotsdk --upgrade",
        "run": "python3 -u {artifacts:decompressedPath}/com.example.BatteryAwareHelloWorld/main.py \"{configuration:/BatteryThreshold}\" \"{configuration:/LinuxBatteryFilePath}\""
      },
      "Artifacts": [
        {
          "Uri": "s3://BUCKET_NAME/COMPONENT_NAME/COMPONENT_VERSION/com.example.BatteryAwareHelloWorld.zip",
          "Unarchive": "ZIP"
        }
      ]
    },
    {
      "Platform": {
        "os": "windows"
      },
      "Lifecycle": {
        "install": "py -3 -m pip install --user awsiotsdk --upgrade",
        "run": "py -3 -u {artifacts:decompressedPath}/com.example.BatteryAwareHelloWorld/main.py \"{configuration:/BatteryThreshold}\" \"{configuration:/WindowsBatteryFilePath}\""
      },
      "Artifacts": [
        {
          "Uri": "s3://BUCKET_NAME/COMPONENT_NAME/COMPONENT_VERSION/com.example.BatteryAwareHelloWorld.zip",
          "Unarchive": "ZIP"
        }
      ]
    }
  ],
  "Lifecycle": {}
}
以下ファイルを作っておかないとエラーになる。
{
  "battery_level": 50
}
確認の仕方
sudo tail -f /greengrass/v2/logs/com.example.BatteryAwareHelloWorld.log
参考 Deploymentからコンポーネントを削除
コンポーネント本体を削除してしまわないように、Deploymentで起動してた複数のコンポーネントの中から特定のコンポーネントを削除する方法です。
- 『IoT』画面に行きます~『Deployments』~対象のDeploymentをクリック
- 画面右上の『Actions』のプルダウンから『Revise』を選択~『Revise deployment』をクリック~『Next』をクリック
- 現在のこのデバイスで起動されたコンポーネントの一覧が表示されるので、削除したいコンポーネントのチェックを外し『Next』~『Next』~『Next』~『Deploy』
- 上記の『Deploy』で既に起動しているコンポーネントの状態は変更ありません。 例えば再起動とかはされません。 しかしチェックを外したコンポーネントはDeploymentから消えています。
Greengrass上でPythonで環境変数『AWS_IOT_THING_NAME』にアクセスして自分のコアデバイス名を取得できる。
いちりの備忘録
私の備忘録なので無視してください。 将来途中から始める時に使おうと思っています。
awscliでAWS S3にUpload
本来、コンポーネント(Pythonプログラムとjson設定ファイル等)は各ボードに入れるのでなく、s3に格納して起き、ボードやIoT CoreからDeploy時にs3から取得してボードに転送して起動するようにする。 するとボードが1万台存在しても、一回のDeployで起動や更新が可能になる。 ここではボードからs3にUploadする方法を記しています。
s3にartifact(PythonファイルとjsonファイルをUploadする)
$ aws s3 cp hello_world.py s3://mybucket-tokyo-ichiri/myGG/
SQSにpublish
これも一回やってみてメモ残していましたが何の事やらわからないのですがもし今後サイド実行するときにヒントに鳴るかも知れないので一応残しておきます。
$ aws events put-rule \
  --name MyGreengrassTelemetryEventRule \
  --event-pattern "{\"source\": [\"aws.greengrass\"], \"detail\": {\"ThingName\": [\"GG-gm1-00\"]}}"

//以下が表示された
{
    "RuleArn": "arn:aws:events:ap-northeast-1:<account_id>:rule/MyGreengrassTelemetryEventRule"
}
SQSをCreateして、そのarnを代入して実行
$ cd ~/greengrassv2/artifacts/com.example.Publish/
$ gdk component build & gdk component publish
MyEventBridgeRule  <---aws consoleで作成した
MyGreengrassTelemetryEventRule  <--aws cliから作成した
IoT Device Testをインストール
できなかったのであきらめる。
url=$(curl --request GET "https://download.devicetester.iotdevicesecosystem.amazonaws.com/latestidt?HostOs=linux&ProductVersion=2.5.3&TestSuiteType=GGV2" \
--user $AWS_ACCESS_KEY_ID:$AWS_SECRET_ACCESS_KEY \
--aws-sigv4 "aws:amz:ap-northeast-1:iot-device-tester" \
| jq -r '.LatestBk["DownloadURL"]')

コメント