
Greengrasを設定してGreengrassのデーターをDynamoDBに書込んむまでやってみた備忘録です。結構道のりは長いですがやってみます。
- AWSアカウント作成~初期設定(IAM、課金管理)
- IoT Core Thing設定
- Greengrassインストール
- GreengrassコンポーネントPublish/Subscribe
- DynamoDB設計 Table作成
- Lambda データ受取~DynamoDB書込み
- CloudWatchで確認
- DynamoDB画面で確認
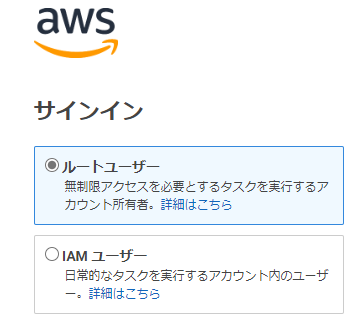
新規アカウント作成
まだテスト段階のやり直しなので、再度12ヵ月無料枠を使用しようとすると、新規アカウントの作り直しが必要になります。 メールアドレス、クレジットカード番号は異なるものにしなければなりません。 AWS全アカウント解約後、新規アカウント作成(以前のユーザー情報が残っていて戻ろうとするので、ブラウザの戻るボタンを押したら、無事新規アカウント作成画面が表示されて新規アカウントを作り直す事ことができました。)
大阪リージョン(ap-northeast-3)
- apne3-az1
- apne3-az2
- apne3-az3
大阪リージョンの方が近く、更に混んでいないのでLatencyが短い。 東京最大1.8ms、大阪最大0.6ms。 しかし2024/1現在IoT Coreは大阪リージョンでは使用できないので、s3だけ大阪リージョンとするクロスリージョンは出来ないので、全てs3も全て東京リージョンを選択していきます。 IoT CoreはGreengrassデバイスでPublishをする場合、s3を使ったコンポーネントのDeployが便利なのでs3のリージョンも同じ東京リージョンを選択しておきます。
- リージョンとは
- AWSクラウドサービスのデータセンターがある地区の事。
- その地区にAZ(Availabiliry Zone)が3ヵ所あり、自動的にデータバックアップしてくれる。
- 東京リージョンとは東京地区に3ヵ所のAZデータセンターがあり、その東京地区に接続します。
- バージニア、オハイオ、オレゴン、ムンバイ、フランクフルト、シンガポール等等ありますが、日本から使うのは主に東京リージョンになります。 日本からバージニアリージョン等使うと、レスポンスが遅くなります。
- 各リージョン毎に料金が異なります。
- クロスリージョンとは
- 例えばIoT Coreは東京リージョンを使い、そのデータを大阪リージョンのs3に保存しようとするとクロスリージョンとなります。
- IoT Coreはクロスリージョン出来ないので全て東京リージョンでまとめる必要があります。
- コンポーネント、Deployとは
- IoT Coreの時に説明します
IAMユーザー登録
新規アカウント作成時はrootユーザーでログインしています。 しかしrootユーザーは間違って全て消してしまったりしてしまうので、通常は別ユーザー(=IAMユーザー:Identity and Access Management)を作成して、IAMユーザーとしてログインします。 IAMは各ユーザーのアクセス・実行権限をサービスやコマンド毎に細かく指定して管理できるようにすることです。 しかしIAMユーザーは最初何の権限も持っていないので権限をAdd(付加)しないと何もできません。 権限は以下の方法で追加できます。 ポリシーには権限を許可(Allow)したり、否認(Deny)したり、制限(Resourceで制限)したりなどの記述ができます。 ポリシーにはawsが用意している1000以上ものポリシーと、自分で作れるcustom managedのポリシーがあります。 まあ何をどう許可するかを記述するものです。
- IAMユーザーにポリシーを追加(複数追加できる)
- ポリシーが付加されたユーザーグループにAdd(付加)する(複数グループに参加できる)
- ポリシーが付加されたロールをAdd(付加)する。(複数ポリシーを付加できる)
- ユーザーグループは10個まで作成できる。
- ロールは無限に作成できる。
- ロールは弁護士等の職業みたいな物。 弁護士が出来る権限があります。 ユーザーグループは、いろんな職業の人があつまるテニスサークルみたいな物。 ユーザーグループとロールでマトリックス的に権限を設定できます。
- Identityがあるが、まだよく理解できていません。
- Resourceとは
- 例えばs3のbucketに書き込みたい時は、s3 bucketへの書き込み権限を付加します。 この時のs3がResourceです。
- Resourceはs3のbucketであったり、IoT CoreやLambdaやEC2やDynamoDBやEC2だったり、IAMだったりします。
IAMユーザーのCost Explorer権限
AWSは知らないうちインスタンスなどいろいろ課金が積み上がり、1ヵ月で何百万円と請求された記事も読んだ事があるので、油断すると危険で毎日使用料を確認しないと怖くて使えません。(私の場合です) 使用料を確認するにはCost Explorerを使用します。 IAMユーザーでCost Explorerで使用料を確認しようとするとCost Explorerにアクセスする各種権限を許可したポリシーをIAMユーザーに付加(Attach Policy)しなければなりません。 しかし、Cost Explorerを見るにはポリシー追加だけではダメで、rootユーザーアカウントで、『IAM user and role access to Billing information』を有効(Activate)にしなければ、Access Deniedで表示されません。(これを見つけるのに手間取りました) rootユーザーとは最初にAWSのアカウント作成時に登録したユーザーで、Eメールアドレスとパスワードでログインします。 IAMユーザーはユーザー番号とパスワードでログインします。
ルートユーザーは全ての権限を無制限に持っているので全
Cost and Usage Reportsのcsvファイルダウンロード
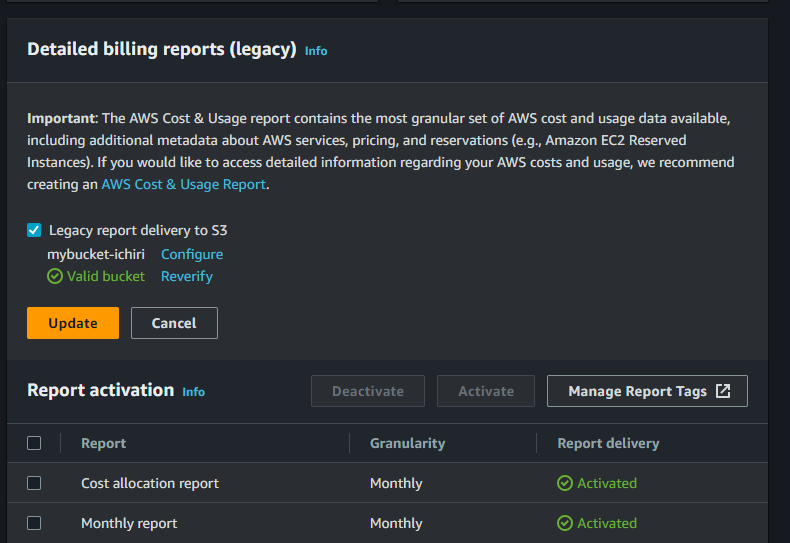
- Cost Explorerではどれだけ使用されたかを見ることができますが、実際何がどれだけ使っているかは見れないので、Cost and Usage Reportを作って、毎日s3に自動的にログが入るように設定しておく必要があります。(Billing and Cost Management>Legacy Pages >Cost and Usage Reports)
- Cost Explorerで費用が掛かりそうになってきたり思いがけない費用が発生していたら、まずこのReportファイルを開いて発生した費用の大きい順にソートして、どのサービスでどんなアクションで費用が発生しているか確認します。 これで何が原因か大体分かるので、費用が発生しなくなる変更を講じます。 これで原因がわからない時は、そのサービスとアクションに関するログを取ると、もっと詳細な情報が取れて、ピンポイントに原因を突き止められるはず。
- その設定は、rootユーザーでログインして設定する。
- s3 Bucketを先に作成しておく。
- 『Create Report』
- Report nameを入力。 私の場合は『MyCostReport』としました。 s3バケットにMyCostReportのフォルダが作成されます。
- 『Configure』をクリックして、Reportを保存するs3バケットを選択して、
- s3 path prefixも入力。 私の場合、『myS3Report』。 これがs3 bucket直下フォルダでDailyとMonthlyの2つのフォルダが生成され、レポートが保存されます。
- s3://mybucket-ichiri/myS3Report/MyCostReport/20241101-20241201/
- s3://mybucket-ichiri/myS3ReportDaily/MyCostReportDaily/20241101-20241201/
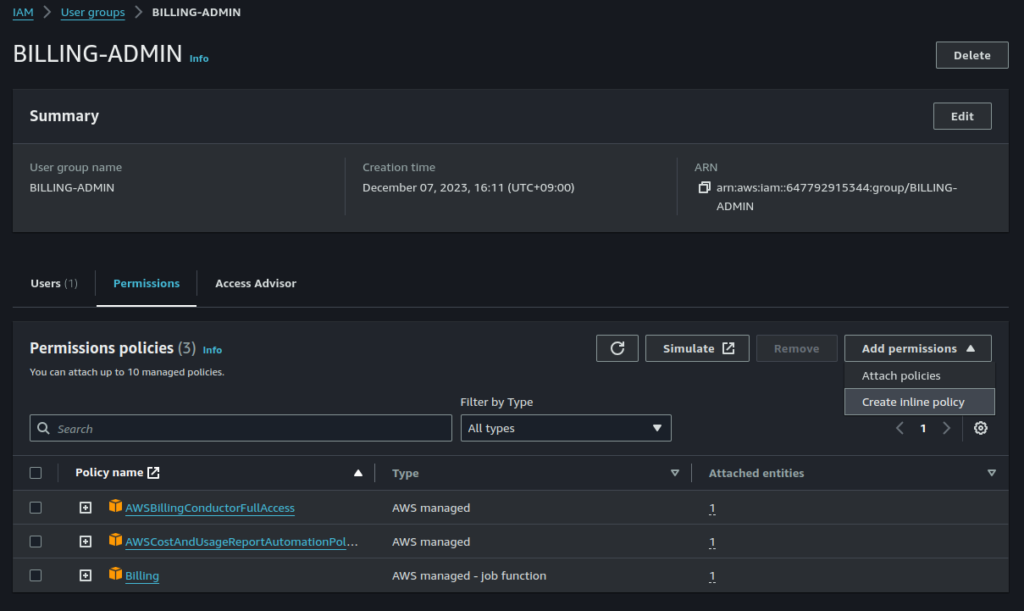
権限も設定します。 以下はBILLING-ADMINというgroupを作って、そこにポリシーを追加しています。 そしてこのBILLING-ADMINと言うグループをIAMユーザーに追加しています。
IoT Core
- NucleusはGreengrass Coreを実行する為の必須コンポーネント。
- Nucleusのバージョンが変更されたり、設定パラメーターが変更されたらGreengrass Coreが自動的に更新されて再起動がかかってしまう。 予期せぬ再起動を防ぐにはデプロイする際優先するコンポーネントバージョンを指定しておく事。
Wizardで接続する
- IoT Core
- systemdでないといけない。 SysVinitなどはダメ。 cat /proc/1/comm で確認できる。
- Get Started with GreengrassでConnect Deviceをクリック
- GM1のコンソールでpingする。 pingが返ってきたら接続は可能。 Proxyがあると自動接続でなく手動で設定しないといけない。以下はProxy無しの手順。
peta:~$ ping a3uk6ib3g81akg-ats.iot.ap-northeast-1.amazonaws.com - Register and secure your deviceで『Create a new thing』を選択し、Thing nameを入れる(GG-gm1-00)
- Choose Platform and SDK
- Linux、Pythonを選択
- connect_device_package.zipをWindows PCにダウンロードして、scpでGM1の~に転送。
- TeraTerm上でunzipして以下のファイルが出来る。
- GG-gm1-00-Policy
- GG-gm1-00.private.key
- GG-gm1-00.cert.pem
- GG-gm1-00.public.key
- start.sh
- Run connection kit
- chmod +x start.sh
- ./start.sh
- これでAWS IoT Root CA CertificateがダウンロードされてAWS SDKもcloneされる。
- そして画面にAWS IoT ブラウザ画面にGM1がpublishしたHello World!が表示されて、TeratermでもHellow Worldを受信する。
Group作成
AWS IoT=> Manage=> All devices=> Thing groups
- Create Thing Group (GGgroup-GM1)
- Create static thing groupを選択 (Dynamicは指定したQueryで自動的にThingをグループにいれて主導でremoveできない。挙動や課金が分からないので今はstaticで進める。)
- 名前にGGgroup-GM1だけ入力して作成する。 Parent groupもattribute等何も入れない。
- AWS IoT=> Manage=> All devices=> Thing groups=> GGgroup-GM1=> Thingsで『Add things』でGG-gm1-00を追加する。
IAM credential作成 (Access Key)
IAM=> Users=> ichiri=> Access keys=> Create access key
- Use caseで『Other』を選択
- Description tag valueには『GG_credentials』(何でもよい)と入れて『Create access key』とすると
- Access KeyとSecrete Access Keyが生成されるが、ここが重要! 『Done』を押してはいけない。
- このページを離れるとSecrete Access Keyは2度と見れないので、csvファイルをダウンロードしておく。 【重要】csvファイルをダウンロードした後に『Done』とする。
- そして以下の実行する。
- *Access keyは複数作れて、使わない時はDeactivateできる。 削除する時はまずDeactivateしてから削除する。
//これらのキーは毎回登録しないといけないので、/etc/environmentに追記。
$ export AWS_ACCESS_KEY_ID=AKIAYNU3XO0IBMVM54DX
$ export AWS_SECRET_ACCESS_KEY=iQ3b8wBHTXkjTwfN4YRmsDwVSlwSTkUbOz6j2LB/

$ cd ~
$ curl -s https://d2s8p88vqu9w66.cloudfront.net/releases/greengrass-nucleus-latest.zip > greengrass-nucleus-latest.zip
$ jarsigner -verify -certs -verbose greengrass-nucleus-latest.zip
jar verified.   //<--これで成功
//Greengrass nucleus の zip ファイルに署名されず失敗した時はjar is unsigned.と表示される

$ unzip greengrass-nucleus-latest.zip -d GreengrassInstaller

$ java -jar ./GreengrassInstaller/lib/Greengrass.jar --version
AWS Greengrass v2.12.1  //<---表示されたので


sudo -E java -Droot="/greengrass/v2" -Dlog.store=FILE \
  -jar ./GreengrassInstaller/lib/Greengrass.jar \
  --aws-region ap-northeast-1\
  --thing-name GG-gm1-00\
  --thing-policy-name GreengrassV2IoTThingPolicy \
  --tes-role-name GreengrassV2TokenExchangeRole \
  --tes-role-alias-name GreengrassCoreTokenExchangeRoleAlias \
  --component-default-user ggc_user \
  --provision true \
  --setup-system-service true \
  --deploy-dev-tools true
//以下のメッセージが出るのでgroupは外した。
//Thing group exists, it could have existing deployment and devices, hence NOT creating deployment for Greengrass first party dev tools, please manually create a deployment if you wish to
  --thing-group-name GGgroup-GM1\
以下の様に表示されたので、awsのIAMロールに行きGreengrassV2TokenExchangeRoleが作成されているのでGreengrassV2TokenExchangeRoleAccessポリシーをAddした。 それでもまだこのメッセージが表示される。
No managed IAM policy found, looking for user defined policy...
IAM policy named "GreengrassV2TokenExchangeRoleAccess" already exists. Please attach it to the IAM role if not already
"GreengrassV2TokenExchangeRoleAccess"ポリシーを、

$ aws iam list-role-policies --role-name GreengrassV2TokenExchangeRole

$ aws iot create-role-alias --role-alias GGCTokenExchangeRoleAlias --role-arn arn:aws:iam::647792915344:role/GreengrassV2TokenExchangeRole

{
    "roleAlias": "GGCTokenExchangeRoleAlias",
    "roleAliasArn": "arn:aws:iot:ap-northeast-1:647792915344:rolealias/GGCTokenExchangeRoleAlias"
}

$
{
  "Version":"2012-10-17",
  "Statement": [
    {
      "Effect": "Allow",
      "Action": "iot:AssumeRoleWithCertificate",
      "Resource": "arn:aws:iot:ap-northeast-1:647792915344:rolealias/GGCTokenExchangeRoleAlias"
    }
  ]
}
$ aws iot create-policy --policy-name GreengrassCoreTokenExchangeRoleAliasPolicy --policy-document file://greengrass-v2-iot-role-alias-policy.json

{
    "policyName": "GreengrassCoreTokenExchangeRoleAliasPolicy",
    "policyArn": "arn:aws:iot:ap-northeast-1:647792915344:policy/GreengrassCoreTokenExchangeRoleAliasPolicy",
    "policyDocument": "{\n    \"Version\":\"2012-10-17\",\n    \"Statement\": [\n      {\n        \"Effect\": \"Allow\",\n        \"Action\": \"i
ot:AssumeRoleWithCertificate\",\n        \"Resource\": \"arn:aws:iot:ap-northeast-1:647792915344:rolealias/GGCTokenExchangeRoleAlias\"\n      }\n
    ]\n  }",
    "policyVersionId": "1"
}
- RoleをRoleAliasに変換して、さらにRoleAliasをPolicyに変換して、Certificateにattachする。
- RoleAliasの確認は、『IoT』~『Security』~『Role aliases』で確認できる。
$ aws iot attach-policy --policy-name GreengrassCoreTokenExchangeRoleAliasPolicy --target arn:aws:iot:ap-northeast-1:647792915344:cert/f9d64d0c480a940ce1ab8bbc8eefff2df6c60e9512fc19102c6aa10e48a086a9
Nucleus警告解消方法
Nucleusがsystem serviceとして起動しているメッセージ表示
Provisioning AWS IoT resources for the device with IoT Thing Name: [GG-gm1-00]...
Found IoT policy "GreengrassV2IoTThingPolicy", reusing it
Creating keys and certificate...
Attaching policy to certificate...
Creating IoT Thing "GG-gm1-00"...
Attaching certificate to IoT thing...
Successfully provisioned AWS IoT resources for the device with IoT Thing Name: [GG-gm1-00]!
Adding IoT Thing [GG-gm1-00] into Thing Group: [GGgroup-GM1]...
IoT Thing Group "GGgroup-GM1" already existed, reusing it
Successfully added Thing into Thing Group: [GGgroup-GM1]
Setting up resources for aws.greengrass.TokenExchangeService ...
Attaching TES role policy to IoT thing...
No managed IAM policy found, looking for user defined policy...
IAM policy named "GreengrassV2TokenExchangeRoleAccess" already exists. Please attach it to the IAM role if not already
Configuring Nucleus with provisioned resource details...
Downloading Root CA from "https://www.amazontrust.com/repository/AmazonRootCA1.pem"
Created device configuration
Successfully configured Nucleus with provisioned resource details!
[ 5455.612192] systemd-sysv-generator[993]: SysV service '/etc/init.d/sshd' lacks a native systemd unit file. Automatically generating a unit file for compatibility. Please update package to include a native systemd unit file, in order to make it more safe and robust.
[ 5455.639846] systemd-sysv-generator[993]: SysV service '/etc/init.d/ppp' lacks a native systemd unit file. Automatically generating a unit file for compatibility. Please update package to include a native systemd unit file, in order to make it more safe and robust.
[ 5455.665777] systemd-sysv-generator[993]: SysV service '/etc/init.d/inetd.busybox' lacks a native systemd unit file. Automatically generating a unit file for compatibility. Please update package to include a native systemd unit file, in order to make it more safe and robust.
[ 5455.692809] systemd-sysv-generator[993]: SysV service '/etc/init.d/watchdog-init' lacks a native systemd unit file. Automatically generating a unit file for compatibility. Please update package to include a native systemd unit file, in order to make it more safe and robust.
[ 5457.537617] systemd-sysv-generator[1006]: SysV service '/etc/init.d/sshd' lacks a native systemd unit file. Automatically generating a unit file for compatibility. Please update package to include a native systemd unit file, in order to make it more safe and robust.
[ 5457.564023] systemd-sysv-generator[1006]: SysV service '/etc/init.d/ppp' lacks a native systemd unit file. Automatically generating a unit file for compatibility. Please update package to include a native systemd unit file, in order to make it more safe and robust.
[ 5457.591162] systemd-sysv-generator[1006]: SysV service '/etc/init.d/inetd.busybox' lacks a native systemd unit file. Automatically generating a unit file for compatibility. Please update package to include a native systemd unit file, in order to make it more safe and robust.
[ 5457.618202] systemd-sysv-generator[1006]: SysV service '/etc/init.d/watchdog-init' lacks a native systemd unit file. Automatically generating a unit file for compatibility. Please update package to include a native systemd unit file, in order to make it more safe and robust.
[ 5459.580573] systemd-sysv-generator[1034]: SysV service '/etc/init.d/sshd' lacks a native systemd unit file. Automatically generating a unit file for compatibility. Please update package to include a native systemd unit file, in order to make it more safe and robust.
[ 5459.607507] systemd-sysv-generator[1034]: SysV service '/etc/init.d/ppp' lacks a native systemd unit file. Automatically generating a unit file for compatibility. Please update package to include a native systemd unit file, in order to make it more safe and robust.
[ 5459.634369] systemd-sysv-generator[1034]: SysV service '/etc/init.d/inetd.busybox' lacks a native systemd unit file. Automatically generating a unit file for compatibility. Please update package to include a native systemd unit file, in order to make it more safe and robust.
[ 5459.661452] systemd-sysv-generator[1034]: SysV service '/etc/init.d/watchdog-init' lacks a native systemd unit file. Automatically generating a unit file for compatibility. Please update package to include a native systemd unit file, in order to make it more safe and robust.
Successfully set up Nucleus as a system service
systemdのserviceが存在しておらずSysVで立ち上げているので警告が出ている。 これを修正するため以下4つのファイルを/etc/systemd/system/に追加して、systemdとして起動するように修正しました。
[Unit]
Description=OpenSSH server daemon

[Service]
ExecStart=/usr/sbin/sshd -D
ExecReload=/bin/kill -HUP $MAINPID
KillMode=process
Restart=on-failure

[Install]
WantedBy=multi-user.target
[Unit]
Description=PPP (Point-to-Point Protocol) Daemon

[Service]
ExecStart=/etc/init.d/ppp start
ExecStop=/etc/init.d/ppp stop
ExecReload=/etc/init.d/ppp reload
Type=forking

[Install]
WantedBy=multi-user.target
[Unit]
Description=inetd (busybox version) Daemon

[Service]
ExecStart=/etc/init.d/inetd.busybox start
ExecStop=/etc/init.d/inetd.busybox stop
ExecReload=/etc/init.d/inetd.busybox reload
Type=forking

[Install]
WantedBy=multi-user.target
[Unit]
Description=Watchdog Init Daemon

[Service]
ExecStart=/etc/init.d/watchdog-init start
ExecStop=/etc/init.d/watchdog-init stop
ExecReload=/etc/init.d/watchdog-init reload
Type=forking

[Install]
WantedBy=multi-user.target
これでsystemdとしてgreengrass.serviceが起動しているか確認します。
$ systemctl status greengrass.service
Necleusを起動する。ターミナルはsuccessfully. で止まって操作できなくなるので、別のターミナルでsshを使い接続。(電源を再起動し、Deployしていたら以下コマンドを実行する)=>greengrass-cli helpコマンドが使えたら以下を使う必要はない。 このloaderはgreengrass.serviceのExecStartで起動される。 altsディレクトリのpermissionを変更(sudo chmod)アクセスできるようになる。
$ sudo /greengrass/v2/alts/current/distro/bin/loader
Launching Nucleus...
Launched Nucleus successfully.
//sudo find -type f -name awsでインストールされたディレクトリのPATHを設定しておく。
echo "export PATH=~/.local/lib/aws/bin:\$PATH" >> ~/.bashrc

$ aws configure
AWS Access Key ID [None]: ここに作成したアクセスキーを入力
AWS Secret Access Key [None]: ここに作成したシークレットアクセスキーを入力
Default region name [None]: ap-northeast-1    //<---東京の場合(IoT CoreはOsakaには無い)
Default output format [None]:    //<----分からないのでEnter

$ aws greengrassv2 list-effective-deployments --core-device-thing-name GG-gm1-00
{
    "effectiveDeployments": [
        {
            "deploymentId": "f79f2867-a516-4837-bb45-37f5cd03610a",
            "deploymentName": "Deployment for GG-gm1-00",
            "iotJobId": "3a1aa798-f755-4ef1-a256-bb67dd3b0a74",
            "targetArn": "arn:aws:iot:ap-northeast-1:647792915344:thing/GG-gm1-00",
            "coreDeviceExecutionStatus": "IN_PROGRESS",
            "creationTimestamp": 1702616750.75,
            "modifiedTimestamp": 1702621611.121
        }
    ]
}
//下の場合[]内に何もないのでDeployment出来ていない。
{
    "effectiveDeployments": []
}

// AWS IoT データエンドポイントのアドレスを取得する
$ aws iot describe-endpoint --endpoint-type iot:Data-ATS
{
    "endpointAddress": "a3uk6ib3g81akg-ats.iot.ap-northeast-1.amazonaws.com"
}

// AWS IoT 認証情報エンドポイントのアドレスを取得する
$ aws iot describe-endpoint --endpoint-type iot:CredentialProvider
{
    "endpointAddress": "c2ym3xergxm1rx.credentials.iot.ap-northeast-1.amazonaws.com"
}
Create / Cancel Deployment
//コンポーネント等も選んでデプロイ出来るみたい。
$ aws greengrassv2 create-deployment \
  --target-arn "arn:aws:iot:ap-northeast-1:647792915344:thing/GG-gm1-00" \
  --components '{
    "aws.greengrass.Cli": {
      "componentVersion": "2.12.1"
    }
  }'

//これをするとDeployが出来る
$ aws greengrassv2 create-deployment --target-arn arn:aws:iot:ap-northeast-1:647792915344:thing/GG-gm1-00

//cancelをするとAWSコンソールからDeployがcancelledと表示されるが、CLI上ではまだeffectiveDeploymentとして残っている。
//この場合、再度create-deploymentをするとAWSコンソール画面にもDeployが表示される。
$ aws greengrassv2 cancel-deployment --deployment-id 22515de1-df9b-48bb-b840-2c22eb199a6b
{
    "message": "SUCCESS"
}

//以下で状態を確認。 COMPLETEDになるとデプロイが正常に完了。 COMPLETEDになるには数十秒かかり、その間IN_PROGRESS。
$ aws greengrassv2 list-effective-deployments --core-device-thing-name GG-gm1-00
{
    "effectiveDeployments": [
        {
            "deploymentId": "22515de1-df9b-48bb-b840-2c22eb199a6b",
            "deploymentName": "Deployment for GG-gm1-00",
            "iotJobId": "595cd9f5-cdde-4ed1-ac9c-9dd16cf4207e",
            "targetArn": "arn:aws:iot:ap-northeast-1:647792915344:thing/GG-gm1-00",
            "coreDeviceExecutionStatus": "IN_PROGRESS",
            "creationTimestamp": 1702866085.994,
            "modifiedTimestamp": 1702866085.994
        }
    ]
}
IN_PROGRESS
COMPLETEDになるには数十秒かかり、その間IN_PROGRESSと表示されるが、IN_PROGRESSがエラーで止まっている時もIN_PROGRESSのままなので、以下コマンドで確認する。
//(1) このログは電源を切ると消えて最初からログが始まるみたい。
//スペースかPageDnを押すと改ページ出来る。 PageUPで戻れる。 『q』でコンソールに抜ける(exit)。
$ sudo journalctl -u greengrass

//(2)
$ sudo tail -n 20 /greengrass/v2/logs/greengrass.log
(1) java command not found
systemctl status greengrass.serviceを見るとloadedとなっていて、activeにならなかった。 その為、デプロイしてもRUNNINGにならず、ずっとIN_PROGRESSだった。 そこで(1) のコマンドでログメッセージを見ると最初はjava command not foundとなり、javaのPATHが通っておらず、greengrass.serviceにEnvironment=”PATH=/usr/lib/jvm/java-11-amazon-corretto/bin:/usr/local/binを追加した。 すると今度は、『Suppressed: java.io.IOException: Failed to create user with adduser , command : adduser -S ggc_user』と出たので/usr/sbinへのPATHが通っていないので、以下の様にまとめてPATHにディレクトリを追加した。 greengrass.serviceのPATHは/etc/environmentや/etc/profileのPATHを反映しないらしい。
[Unit]
Description=Greengrass Core
After=network.target

[Service]
Environment="PATH=/usr/lib/jvm/java-11-amazon-corretto/bin:/usr/local/bin:/usr/bin:/bin:/usr/local/sbin:/usr/bin:/bin:/usr/sbin:/sbin:/opt/xilinx/bin:/usr/local/sbin:/usr/sbin:/sbin"
Type=simple
PIDFile=/greengrass/v2/alts/loader.pid
RemainAfterExit=no
Restart=on-failure
RestartSec=10
ExecStart=/bin/sh /greengrass/v2/alts/current/distro/bin/loader
KillMode=mixed

[Install]
WantedBy=multi-user.target
(2) UNAUTHORIZED_NUCLEUS_MINOR_VERSION_UPDATE
今回はAWSに保護サイトのサンプルでデプロイしたので、aws.greengrass.Nucleus-2.11.3の指定でデプロイしたので止まっていた。 なのでインストールしたaws.greengrass.Nucleus-2.12.1の番号に変えて再度デプロイしたらRUNNINGとなった。
2023-12-20T02:37:07.384Z [ERROR] (pool-2-thread-9) com.aws.greengrass.deployment.DeploymentService: Deployment task failed with following errors. {DeploymentId=arn:aws:greengrass:ap-northeast-1:647792915344:configuration:thing/GG-gm1-00:9, detailed-deployment-status=FAILED_NO_STATE_CHANGE, deployment-error-types=[REQUEST_ERROR], GreengrassDeploymentId=18483e48-767e-45ca-8c82-496610c8503e, serviceName=DeploymentService, currentState=RUNNING, deployment-error-stack=[DEPLOYMENT_FAILURE, UNAUTHORIZED_NUCLEUS_MINOR_VERSION_UPDATE]}
com.aws.greengrass.componentmanager.exceptions.PackagingException: The deployment attempts to update the nucleus from aws.greengrass.Nucleus-2.12.1 to aws.greengrass.Nucleus-2.11.3 but no component of type nucleus was included as target component, please add the desired nucleus version as top level component if you wish to update the nucleus to a different minor/major version
コンポーネントの作成
デプロイが出来たら、
もしかしたらgreengrassv2/recipe/recipe.jsonが必ず使用されるのかもしれない。
{
  "RecipeFormatVersion": "2020-01-25",
  "ComponentName": "com.example.HelloWorld",
  "ComponentVersion": "1.0.0",
  "ComponentDescription": "My first AWS IoT Greengrass component.",
  "ComponentPublisher": "Amazon",
  "ComponentConfiguration": {
  "DefaultConfiguration": {
  "Message": "world"
    }
   },
  "Manifests": [
      {
        "Platform": {
        "os": "linux"
      },
        "Lifecycle": {
        "run": "python3 -u {artifacts:path}/hello_world.py \"{configuration:/Message}\""
        }
     },
     {
     "Platform": {
      "os": "windows"
      },
      "Lifecycle": {
      "run": "py -3 -u {artifacts:path}/hello_world.py \"{configuration:/Message}\""
      }
   ]
}
コンポーネントにはいくつかの設定値(Configuration)を設定できます。 RecipeでDefaultの設定値(Configuration)を指定してコンポーネントを登録できますが、コンポーネントをDeployする時に、その設定値を変更や設定値の追加をする時に、以下のような記述ができる。 ”reset”:[]の部分の意味や使い方はまだわかっていない。
{
  "reset": [],
  "merge": {
    "Message": "world-20240111"
  }
}
コンポーネント用コマンド
$ sudo /greengrass/v2/bin/greengrass-cli deployment create \
  --recipeDir ~/greengrassv2/recipes \
  --artifactDir ~/greengrassv2/artifacts \
  --merge "com.example.HelloWorld=1.0.0"

$ sudo /greengrass/v2/bin/greengrass-cli deployment create \
  --merge "com.example.HelloWorld=1.0.0" \
  --update-config hello-world-config-update.json

$ sudo /greengrass/v2/bin/greengrass-cli deployment create --remove="com.example.HelloWorld"

//これでDeployment自体が成功かどうか見る事が出来る。
$ aws greengrassv2 list-effective-deployments --core-device-thing-name GG-gm1-00

//これでDeploymentの各Componentの状態が見れる。 全てRunningかFinishedが良い状態。
//Confiugration:{"Message":この内容が見れる。}
$ sudo /greengrass/v2/bin/greengrass-cli component list

//これでコンポーネントが発行したprint文の出力を見れる。
$ sudo tail -f /greengrass/v2/logs/com.example.PublishClassMethod.log

//以下はここより上に記載していて繰り返しになるが、よく使うのでここに纏めています。
//(1) このログは電源を切ると消えて最初からログが始まるみたい。
//これはNucleusの起動が成功したかどうかを見れる。
//スペースかPageDnを押すと改ページ出来る。 PageUPで戻れる。 『q』でコンソールに抜ける(exit)。
$ sudo journalctl -u greengrass

//(2)これでコンポーネントが正常動作したかBROKENなどで止まったかすぐ見れる
$ sudo tail -n 20 /greengrass/v2/logs/greengrass.log

$ sudo greengrass-cli component restart --names "com.example.PublishClassMethod"
$ sudo greengrass-cli component stop --names "com.example.PublishClassMethod"
//以下の方法だと一回いれたら自動的に止まるので便利。
$ sudo greengrass-cli component restart --names "com.example.PublishClassMethod" && sleep 2 && sudo greengrass-cli component stop --names "com.example.PublishClassMethod"
java.lang.RuntimeException: Unable to create ipc client
AWSのサンプルプログラムを走らそうgreengrass-cli deployment createとしたら、このエラーで止まった。原因は、上記の2つの対策を施すと解決した。(多分、(1) java command not foundと(2) UNAUTHORIZED_NUCLEUS_MINOR_VERSION_UPDATEの対策) 要は元となるgrenngrass.serviceがactiveになって、サンプルコードをデプロイできた。
java.lang.RuntimeException: Unable to create ipc client
        at com.aws.greengrass.cli.adapter.impl.NucleusAdapterIpcClientImpl.getIpcClient(NucleusAdapterIpcClientImpl.java:509)
        at com.aws.greengrass.cli.adapter.impl.NucleusAdapterIpcClientImpl.createLocalDeployment(NucleusAdapterIpcClientImpl.java:198)
        at com.aws.greengrass.cli.commands.DeploymentCommand.create(DeploymentCommand.java:137)
        at java.base/jdk.internal.reflect.NativeMethodAccessorImpl.invoke0(Native Method)
        at java.base/jdk.internal.reflect.NativeMethodAccessorImpl.invoke(NativeMethodAccessorImpl.java:62)
        at java.base/jdk.internal.reflect.DelegatingMethodAccessorImpl.invoke(DelegatingMethodAccessorImpl.java:43)
        at java.base/java.lang.reflect.Method.invoke(Method.java:566)
        at picocli.CommandLine.executeUserObject(CommandLine.java:1952)
        at picocli.CommandLine.access$1100(CommandLine.java:145)
        at picocli.CommandLine$RunLast.executeUserObjectOfLastSubcommandWithSameParent(CommandLine.java:2332)
        at picocli.CommandLine$RunLast.handle(CommandLine.java:2326)
        at picocli.CommandLine$RunLast.handle(CommandLine.java:2291)
        at picocli.CommandLine$AbstractParseResultHandler.execute(CommandLine.java:2159)
        at picocli.CommandLine.execute(CommandLine.java:2058)
        at com.aws.greengrass.cli.CLI.main(CLI.java:59)
Caused by: software.amazon.awssdk.crt.CrtRuntimeException: socket connection refused. AWS_IO_SOCKET_CONNECTION_REFUSED(1047)
        at software.amazon.awssdk.crt.eventstream.ClientConnection.connect(ClientConnection.java:174)
        at software.amazon.awssdk.eventstreamrpc.EventStreamRPCConnection.connect(EventStreamRPCConnection.java:92)
        at com.aws.greengrass.cli.adapter.impl.NucleusAdapterIpcClientImpl.connectToGGCOverEventStreamIPC(NucleusAdapterIpcClientImpl.java:526)
        at com.aws.greengrass.cli.adapter.impl.NucleusAdapterIpcClientImpl.getIpcClient(NucleusAdapterIpcClientImpl.java:503)
        ... 14 more
peta:/$ java.lang.RuntimeException: Unable to create ipc client
以下を実行したらエラーになった。 エラー内容は『トークンhelloが認識されない』とトンチンカンな表示だけど、要はパスが通ってなかったみたい。 AWSのサンプル通りではどこで実行するかの記載がないので不明瞭。 –update-config には絶対か相対パスを入れるか、jsonファイルがあるディレクトリで実行しないといけない。
$ sudo /greengrass/v2/bin/greengrass-cli deployment create \
  --merge "com.example.HelloWorld=1.0.0" \
  --update-config hello-world-config-update.json

Update configuration parameter is not a properly formatted JSON file or a JSON string
Unrecognized token 'hello': was expecting (JSON String, Number, Array, Object or token 'null', 'true' or 'false')
 at [Source: (String)"hello-world-config-update.json"; line: 1, column: 6]
$ sudo tail -f /greengrass/v2/logs/com.example.HelloWorld.log
tail: can't open '/greengrass/v2/logs/com.example.HelloWorld.log': No such file or directory
tail: no files

$ sudo tail -n 20 /greengrass/v2/logs/greengrass.log
$ sudo tail -f /greengrass/v2/logs/greengrass.log //見たけどRUNNINGになっている。
2023-12-18T05:52:05.762Z [INFO] (pool-1-thread-1) com.aws.greengrass.status.FleetStatusService: fss-status-update-published. Status update published to FSS. {trigger=CADENCE, serviceName=FleetStatusService, currentState=RUNNING}


$ sudo journalctl -u greengrass //これでgreengrassが起動時にloaderの何処でエラーになっているか分かる

$ sudo /greengrass/v2/bin/greengrass-cli component list

$ aws greengrassv2 list-effective-deployments --core-device-thing-name GG-gm1-00

$ aws greengrassv2 get-core-device --core-device-thing-name GG-gm1-00

$ aws greengrassv2 list-core-devices --thing-group-arn "arn:aws:iot:ap-northeast-1:647792915344:thing/GG-gm1-00"
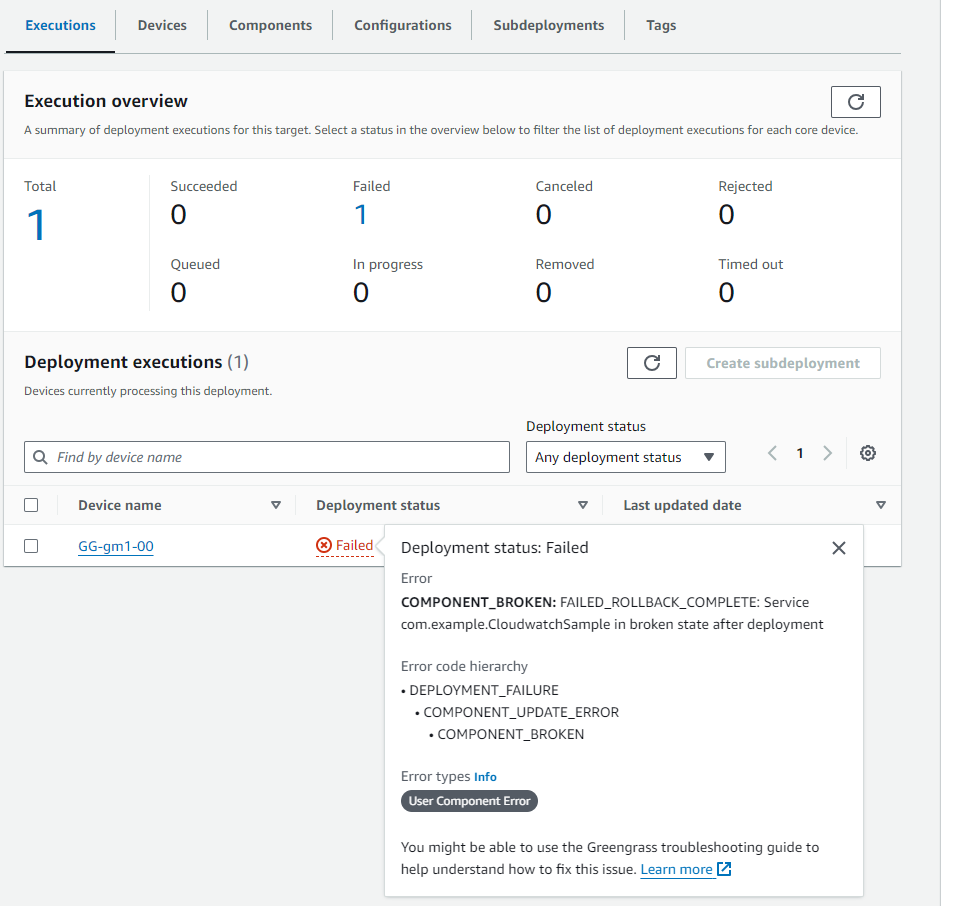
コンポーネントをDeployした結果をAWS IoT Core画面で確認。 Failedにカーソル焦点を当てるとFailedの原因が表示されます。 何のことか分かりにくいのですがヒントにはなります。
aws cli v1->v2
v1を削除してからv2をインストールする
$ sudo dnf remove awscli

$ curl "https://awscli.amazonaws.com/awscli-exe-linux-aarch64.zip" -o "awscliv2.zip"
$ unzip awscliv2.zip
$ sudo ./aws/install
AWS S3にartifactをUpload
本来、コンポーネント(Pythonプログラムとjson設定ファイル等)は各ボードに入れるのでなく、s3に格納して起き、ボードやIoT CoreからDeploy時にs3から取得してボードに転送して起動するようにする。 するとボードが1万台存在しても、一回のDeployで起動や更新が可能になる。 ここではボードからs3にUploadする方法を記しています。
s3にartifact(PythonファイルとjsonファイルをUploadする)
$ aws s3 cp hello_world.py s3://mybucket-tokyo-ichiri/myGG/
aws Battery コンポーネント tutorial
- AWSのTutorial 日本語
- 以下の設定で、『bucket』には既存のBucket名を入れないとエラーになった。
- そして、gdk component publishで発行したら、s3コンソールに表示され、GreengrassのDeploymentのcomponentの選択にも表示された。
- gdk(Greengrass Development Kit)は別途Core Deviceにインストールしなければならない。
{
    "component": {
      "com.example.BatteryAwareHelloWorld": {
        "author": "ichiri",
        "version": "NEXT_PATCH",
        "build": {
          "build_system" : "zip"
        },
        "publish": {
          "region": "ap-northeast-1",
          "bucket": "mybucket-tokyo-ichiri"
        }
      }
    },
    "gdk_version": "1.0.0"
  }
- componentはrecipeを見て実行(Deploy)される。
- 大文字の『BUCKET_NAME/COMPONENT_NAME/COMPONENT_VERSION』の部分は自動的に代入してくれる。
- recipe.json、pyプログラム、gdk-config.jsonは同じディレクトリに入れる事
- そのディレクトリでgdk component buildとすると自動でzipファイルを作り、s3ディレクトリに挙げてくれる。 URLも入れてくれるのでgdkを使うのが便利。
{
  "RecipeFormatVersion": "2020-01-25",
  "ComponentName": "com.example.BatteryAwareHelloWorld",
  "ComponentVersion": "1.0.0",
  "ComponentType": "aws.greengrass.generic",
  "ComponentDescription": "This Hello World component defers updates when the battery level is below a threshold.",
  "ComponentPublisher": "ichiri",
  "ComponentConfiguration": {
    "DefaultConfiguration": {
      "BatteryThreshold": 50,
      "LinuxBatteryFilePath": "/home/ggc_user/virtual_battery.json",
      "WindowsBatteryFilePath": "C:\\Users\\ggc_user\\virtual_battery.json"
    }
  },
  "Manifests": [
    {
      "Platform": {
        "os": "linux"
      },
      "Lifecycle": {
        "install": "python3 -m pip install --user awsiotsdk --upgrade",
        "run": "python3 -u {artifacts:decompressedPath}/com.example.BatteryAwareHelloWorld/main.py \"{configuration:/BatteryThreshold}\" \"{configuration:/LinuxBatteryFilePath}\""
      },
      "Artifacts": [
        {
          "Uri": "s3://BUCKET_NAME/COMPONENT_NAME/COMPONENT_VERSION/com.example.BatteryAwareHelloWorld.zip",
          "Unarchive": "ZIP"
        }
      ]
    },
    {
      "Platform": {
        "os": "windows"
      },
      "Lifecycle": {
        "install": "py -3 -m pip install --user awsiotsdk --upgrade",
        "run": "py -3 -u {artifacts:decompressedPath}/com.example.BatteryAwareHelloWorld/main.py \"{configuration:/BatteryThreshold}\" \"{configuration:/WindowsBatteryFilePath}\""
      },
      "Artifacts": [
        {
          "Uri": "s3://BUCKET_NAME/COMPONENT_NAME/COMPONENT_VERSION/com.example.BatteryAwareHelloWorld.zip",
          "Unarchive": "ZIP"
        }
      ]
    }
  ],
  "Lifecycle": {}
}
以下ファイルを作っておかないとエラーになる。
{
  "battery_level": 50
}
確認の仕方
sudo tail -f /greengrass/v2/logs/com.example.BatteryAwareHelloWorld.log
Publish サンプル
com.example.PublishClassMethodをコンポーネント名にする
- GM1の./com.example.PublishClassMethod/に以下3ファイルを入れて
- gdk component build
- gdk component publish
- を実行
import time
import json
import awsiot.greengrasscoreipc
from awsiot.greengrasscoreipc.model import (
    QOS,
    PublishToIoTCoreRequest
)

TIMEOUT = 10
topic = "topic"
qos = QOS.AT_LEAST_ONCE

ipc_client = awsiot.greengrasscoreipc.connect()

print("? publisher start.")

for i in range(30):
    message = {
        "counter": i
    }

    request = PublishToIoTCoreRequest()
    request.topic_name = topic
    request.payload = json.dumps(message).encode('utf-8')
    request.qos = qos

    operation = ipc_client.new_publish_to_iot_core()
    operation.activate(request)
    future = operation.get_response()
    future.result(TIMEOUT)

    print("? publish :{}".format(message))
    time.sleep(1)

print("? publisher finish.")
gdkを使う場合、recipe.jsonのManifestsの後に[ ]が必要。これは通常os:linuxとos:windowsなど、osの違いを配列にする為に使用されるが、linuxしか使わない場合でもgdkは配列番号(indices)を取得しようとするので、[ ]をつけて配列を与えてあげないとgdk component buildでエラーになる。
{
    "RecipeFormatVersion": "2020-01-25",
    "ComponentName": "com.example.PublishClassMethod",
    "ComponentVersion": "1.3.0",
    "ComponentType": "aws.greengrass.generic",
    "ComponentDescription": "This publishes value to topic.",
    "ComponentPublisher": "ichiri",
    "ComponentConfiguration": {
        "DefaultConfiguration": {
          "accessControl": {
            "aws.greengrass.ipc.mqttproxy": {
              "com.example.Publisher:publish:1": {
                "operations": [
                  "aws.greengrass#PublishToIoTCore"
                ],
                "resources": [
                  "topic"
                ]
              }
            }
          }
        }
    },
    "Manifests": [
      {
        "Lifecycle": {
          "install": "python3 -m pip install --user awsiotsdk --upgrade",
          "run": "python3 -u {artifacts:decompressedPath}/com.example.PublishClassMethod/main.py"
        },
        "Artifacts": [
          {
            "Uri": "s3://BUCKET_NAME/COMPONENT_NAME/COMPONENT_VERSION/com.example.PublishClassMethod.zip",
            "Unarchive": "ZIP"
          }
        ]
      }]
  }
- 以下のgdk-config.jsonを他のpythonファイルと一緒のディレクトリに格納して、
- gdk component build
- gdk component publish
- を実行する。
- NEXT_PATCHを使用すると、gdkが自動的に次のPATCH番号を作成する。 Major、Minor番号を変更するときは、2.3.0などで指定する。 その後はMajorかMinor番号が変わらなければNEXT_PATCHをつかう。
- gdk_versionの指定は、gdkの最低のバージョン指定。
{
    "component": {
      "com.example.PublishClassMethod": {
        "author": "ichiri",
        "version": "NEXT_PATCH",
        "build": {
          "build_system" : "zip"
        },
        "publish": {
          "region": "ap-northeast-1",
          "bucket": "mybucket-tokyo-ichiri"
        }
      }
    },
    "gdk_version": "1.0.0"
  }
以下で、デプロイしたコンポーネントの再実行ができる。
$ sudo /greengrass/v2/bin/greengrass-cli component restart --names "com.example.PublishClassMethod"
Subscribe
{
  "RecipeFormatVersion": "2020-01-25",
  "ComponentName": "com.example.SubscribeClassMethod",
  "ComponentVersion": "1.0.0",
  "ComponentType": "aws.greengrass.generic",
  "ComponentDescription": "This Subscribe value to topic.",
  "ComponentPublisher": "ichiri",
  "ComponentConfiguration": {
    "DefaultConfiguration": {
      "accessControl": {
        "aws.greengrass.ipc.mqttproxy": {
          "com.example.Publisher:publish:1": {
            "operations": [
              "aws.greengrass#SubscribeToIoTCore"
            ],
            "resources": [
              "topic"
            ]
          }
        }
      }
    }
  },
  "Manifests": [
     {
      "Platform": {
       "os": "linux"
      },
      "Lifecycle": {
        "install": "python3 -m pip install --user awsiotsdk --upgrade",
        "run": "python3 -u {artifacts:decompressedPath}/com.example.SubscribeClassMethod/subscribe.py"
      },
      "Artifacts": [
        {
          "Uri": "s3://BUCKET_NAME/COMPONENT_NAME/COMPONENT_VERSION/com.example.SubscribeClassMethod.zip",
          "Unarchive": "ZIP"
        }
      ]
    }]
}
import time
import awsiot.greengrasscoreipc
import awsiot.greengrasscoreipc.client as client
from awsiot.greengrasscoreipc.model import (
    IoTCoreMessage,
    QOS,
    SubscribeToIoTCoreRequest
)

TIMEOUT = 10
topic = "topic"
qos = QOS.AT_MOST_ONCE

ipc_client = awsiot.greengrasscoreipc.connect()

print("? subscriber start.")

class StreamHandler(client.SubscribeToIoTCoreStreamHandler):
    def __init__(self):
        super().__init__()

    def on_stream_event(self, event: IoTCoreMessage) -> None:
        message = str(event.message.payload, "utf-8")
        print("? payload:{}".format(message))

    def on_stream_error(self, error: Exception) -> bool:
        return True

    def on_stream_closed(self) -> None:
        pass

request = SubscribeToIoTCoreRequest()
request.topic_name = topic
request.qos = qos
handler = StreamHandler()
operation = ipc_client.new_subscribe_to_iot_core(handler)
future = operation.activate(request)
future.result(TIMEOUT)

while True:
    time.sleep(1)

operation.close()
print("? subscriber finish. ***************ichiri*************")
{
    "component": {
      "com.example.PublishClassMethod": {
        "author": "ichiri",
        "version": "NEXT_PATCH",
        "build": {
          "build_system" : "zip"
        },
        "publish": {
          "region": "ap-northeast-1",
          "bucket": "mybucket-tokyo-ichiri"
        }
      }
    },
    "gdk_version": "1.0.0"
  }
$ sudo tail -f /greengrass/v2/logs/com.example.SubscribeClassMethod.log
Hello World Tutorial
{
	"RecipeFormatVersion": "2020-01-25",
	"ComponentName": "com.example.HelloWorld",
	"ComponentVersion": "1.0.0",
	"ComponentDescription": "My first Greengrass component.",
	"ComponentPublisher": "ichiri",
	"ComponentConfiguration": {
		"DefaultConfiguration": {
			"Message": "world"
		}
	},
	"Manifests": [
		{
			"Name": "Linux",
			"Platform": {
				"os": "linux"
			},
			"Lifecycle": {
				"run": "python3 {artifacts:path}/hello_world.py '{configuration:/Message}'"
			},
			"Artifacts": [
				{
					"URI": "s3://mybucket-ichiri/myGG/hello_world.py"
				}
			]
		}
	]
}
Greengrass上でPythonないで環境変数『AWS_IOT_THING_NAME』にアクセスして自分のコアデバイス名を取得できる。
IoT Device Testをインストール
できなかったのであきらめる。
url=$(curl --request GET "https://download.devicetester.iotdevicesecosystem.amazonaws.com/latestidt?HostOs=linux&ProductVersion=2.5.3&TestSuiteType=GGV2" \
--user $AWS_ACCESS_KEY_ID:$AWS_SECRET_ACCESS_KEY \
--aws-sigv4 "aws:amz:ap-northeast-1:iot-device-tester" \
| jq -r '.LatestBk["DownloadURL"]')
SQSにpublish
aws events put-rule \
  --name MyGreengrassTelemetryEventRule \
  --event-pattern "{\"source\": [\"aws.greengrass\"], \"detail\": {\"ThingName\": [\"GG-gm1-00\"]}}"

//以下が表示された
{
    "RuleArn": "arn:aws:events:ap-northeast-1:647792915344:rule/MyGreengrassTelemetryEventRule"
}
SQSをCreateして、そのarnを代入して実行
aws events put-targets \
  --rule MyGreengrassTelemetryEventRule \
  --targets "Id"="1","Arn"="arn:aws:sqs:ap-northeast-1:647792915344:MySQS"

//以下が表示された
{
    "FailedEntryCount": 0,
    "FailedEntries": []
}
MyEventBridgeRule  <---aws consoleで作成した
MyGreengrassTelemetryEventRule  <--aws cliから作成した

aws greengrassv2 get-core-device --core-device-thing-name GG-gm1-00
aws greengrassv2 list-core-devices --thing-group-arn "arn:aws:iot:ap-northeast-1:647792915344:thinggroup/GGgroup-GM1"
Petalinux作成し直した時用に
AWSを使うために以下のファイルは色々触らないといけないかったので、念のため保存しておく。
/etc/environment を作る
/etc/profileをコピーする
/home/petalinux/.bashrcをコピーする

コメント